XR8-G and XR8-E MINI RACK OVEN INSTALLATION - OPERATION - MAINTENANCE BLODGETT OVEN COMPANY www.blodgett.com 44 Lakeside Avenue, Burlington, Vermont 05401 USA Telephone: (802) 658-6600 Fax: (802)864-0183 PN 38480 Rev P (5/14) © 2014 - G.S.
Your Service Agency’s Address: Model Serial number Oven installed by Installation checked by
TABLE OF CONTENTS IMPORTANT WARNING: Improper installation, adjustment, alternation, service or maintenance can cause property damage, injury or death. Read the instllation, operation and maintenance instructions thoroughly before installing or servicing this equipment. INSTRUCTIONS TO BE FOLLOWED IN THE EVENT THE USER SMELLS GAS MUST BE POSTED IN A PROMINENT LOCATION. This information may be obtained by contacting your local gas supplier.
Installation Oven Description and Specifications The Blodgett Mini-Rack oven features a continuously rotating eight pan rack and unique airflow system that moves large amounts of air at low velocity to ensure a consistently even bake. The Blodgett rack slide system allows the operator to quickly adjust slide spacing from 1 to 4 inches in any configuration. In addition, the Mini-Rack oven is capable of producing large volumes of steam for bagels or similar products.
Installation Delivery and Location Delivery and inspection It is essential that an adequate air supply to the oven be maintained to provide a sufficient flow of combustion and ventilation air. All Blodgett ovens are shipped in containers to prevent damage. Upon delivery of your new oven: • • Inspect the shipping container for external damage. Any evidence of damage should be noted on the delivery receipt which must be signed by the driver. Uncrate the oven and check for internal damage.
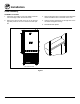
Installation Oven Assembly Assembly to Stand 1. Center the oven frame on top of the stand so that the oven overhangs at both the front and back. 3. Align the two bolt holes on each side of the stand with the two threaded holes on each side of the oven. 2. Remove the three screws at the top of the left and right side panels of the oven. Remove the side panels. 4. Insert a bolt from the bottom up through each of the two holes and tighten securely. 5. Reinstall the side panels.
Installation Ventilation (XR8-G only) Canopy Type Exhaust Hood On gas models the installation of a proper ventilation system cannot be over emphasized. This system removes unwanted vapors and products of combustion from the operating area. A mechanically driven, canopy type exhaust hood is the preferred method of ventilation. The exhaust fan should have an interlock switch with the oven to prevent the oven from operating when the exhaust fan is not running. U.S.
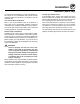
Installation Ventilation (XR8-G only) Direct Flue Arrangement Installing the draft hood When the installation of a mechanically driven exhaust hood is impractical the oven may be vented by a direct flue arrangement. Ovens ordered for direct venting are supplied with a draft hood. Install the draft hood as follows: 1. Disconnect power to the oven. 2. Remove the two screws holding the exhaust guard. See Figure 2. WARNING!! It is essential that the direct flue be installed as follows.
Installation Utility Connections - Standards and Codes U.S. and Canadian installations THE INSTALLATION INSTRUCTIONS CONTAINED HEREIN ARE FOR THE USE OF QUALIFIED INSTALLATION AND SERVICE PERSONNEL ONLY. INSTALLATION OR SERVICE BY OTHER THAN QUALIFIED PERSONNEL MAY RESULT IN DAMAGE TO THE OVEN AND/OR INJURY TO THE OPERATOR. The installation must conform with local codes, or in the absence of local codes, with the National Fuel Gas Code, ANSI Z223.
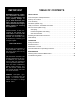
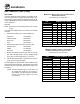
Installation Gas Connection (XR8-G only) Gas Piping Maximum Capacity of Iron Pipe in Cubic Feet of Natural Gas Per Hour A properly sized gas supply system is essential for maximum oven performance. Piping should be sized to provide a supply of gas sufficient to meet the maximum demand of all appliances on the line without loss of pressure at the equipment. (Pressure drop of 0.5 Inch W.C.
Installation Gas Connection (XR8-G only) Pressure Regulation and Testing XR8-G ovens are rated at 110,000 BTU/Hr. (32 kW) (116 MJ/hr). Each oven has been adjusted at the factory to operate with the type of gas specified on the rating plate. W.C. kPa W.C. kPa Each oven is supplied with a regulator to maintain the proper gas pressure. The regulator is essential to the proper operation of the oven and should not be removed. It is preset to provide the oven with 3.5” W.C. (.87 kPa) for natural gas and 10.
Installation Gas Connection (XR8-G only) Gas Hose Restraint If the oven is mounted on casters, a commercial flexible connector with a minimum of 3/4” (1.9 cm) inside diameter must be used along with a quick connect device. WARNING!! If the restraint is disconnected for any reason it must be reconnected when the oven is returned to its original position. The restraint, supplied with the oven, must be used to limit the movement of the unit so that no strain is placed upon the flexible connector.
Installation Plumbing and Electrical Connections electrical connections plumbing connections All Models WARNING!! NOTE: Electrical connections must be performed by a qualified installer only. Plumbing connections must comply with applicable sanitary, safety and plumbing codes. Before making any electrical connections to these appliances, check that the power supply is adequate for the voltage, amperage, and phase requirements stated on the rating name plate mounted on the appliance.
Installation Initial Startup Adjustments associated with initial installation The following is a check-list to be completed by qualified personnel prior to turning on the appliance for the first time. • Verify there are no gas leaks, by checking all gas connections with a soapy water solution. Repair leaks if necessary. (XR8-G only) • Verify there are no water leaks to the oven. Repair leaks if necessary. • Verify rack rotation as follows: Open oven doors and turn the power switch to ON.
Operation Safety Information What to do in the event of a power failure: The information contained in this section is provided for the use of qualified operating personnel. Qualified operating personnel are those who have carefully read the information contained in this manual, are familiar with the functions of the oven and/or have had previous experience with the operation of the equipment described.
Operation Standard Control Control Description 1. POWER SWITCH - controls power to the oven XR8 2. DISPLAY - displays time, temperature and programming information Solid State Digital OVEN OVEN OFF ON 3. HEAT LED - lights when the burners are on 4. READY LED - lights when oven has reached the preset temperature 5. ACTUAL TEMP LED - lights when temp key is pressed, actual temp is displayed HEAT READY 6. SELECTION DIAL - use to enter time, temperature and programmable settings.
Operation Standard Control operation Oven Startup At the End of the Bake Cycle 1. Be sure the GAS SHUTOFF SWITCH (13) is in the on position. 1. At the end of the bake cycle, an alarm sounds, the display reads DONE and the rack continues to rotate until the door is opened. Press the START/STOP KEY (12) to silence the alarm. 2. Turn the POWER SWITCH (1) to the on position. The HEAT LED (3) lights and the oven preheats to the last used set temperature. 2. Open the door to remove the product.
Operation MenuSelect™ Control Control Description 1. START/STOP KEY - press to start, cancel or pause the bake 2. COOL DOWN KEY - initiates oven cool down cycle 3. BAKE MORE KEY - press at the end of a bake cycle to add additional bake time in one minute increments. 4. DISPLAY - displays time or temperature and other information related to oven function and/or programming. 5. DIAL - used to enter set points, time, and programmable settings. Also used to select the programmed product.
Operation MenuSelect™ Control operation Oven Startup Programmed Baking Mode 1. Be sure the GAS SHUTOFF SWITCH (17) and CIRCUIT BREAKER (16) are in the on position. The display flashes OFF PRESS POWER KEY TO START. 1. Turn the DIAL (5) until the name of the product is highlighted. Press the center of the dial to select. The oven preheats to the programmed temperature. The display flashes READY / IDLE and the alarm beeps 5 times when the oven is at temperature and ready to bake.
Operation MenuSelect™ Control Using the USB Port programming 1. Remove the cover to the USB port and insert the USB drive. Entering the Program Mode 1. Press the PROGRAM KEY (12). If the control is password protected, the display reads ENTER CODE. Use the alpha/numeric keypad to enter the manager passcode 3124, then press the center of the dial to enter the program mode. 2. To turn the oven on press the POWER KEY. The display toggles between set and actual temperature. 3.
Operation MenuSelect™ Control Programming a Product Recipe 8. Rotate the dial, or use the alpha/numeric keypad to set the vent position. The vent may be opened from 0% to 100%. Press the center of the dial to set the vent position. NOTE: The control can hold 100 recipes. Each recipe may have up to 6 cooking stages. 1. Turn the dial to highlight the name of the product to be programmed. Press the center of the dial to select the product. 9.
Operation General Guidelines for Operating Personnel Cook Times and Temperatures Operating tips Preheating the oven Pans and Racks Always preheat the oven before baking or roasting. We recommend preheating 50ºF (28ºC) above the bake temperature to offset the drop in temperature when the doors are opened and cold product is loaded into the oven. Set the thermostat to the bake temperature after the product is loaded. Product or pan height determines how many racks are used.
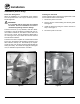
Maintenance Cleaning and Preventative Maintenance cleaning the oven preventative maintenance Stainless steel ovens may be kept clean and in good condition with a light oil. Deposits of baked on splatter, heat tint and heavy discoloration may be removed with any non-toxic industrial stainless steel cleaner. The best preventative maintenance measures are, the proper installation of the equipment and a program for routinely cleaning the ovens. 1. Apply cleaners when the oven is cold.
Maintenance Troubleshooting Guide POSSIBLE CAUSE(S) SYMPTOM: Oven will not fire. • Gas turned off (XR8-G only). • Turn the gas valve to ON. • Oven not plugged in. • Plug in electrical supply cord. • Power switch on the control panel is off. • Set the control panel to ON. • Control set below ambient temperature. • Set to desired cook temperature. • Doors are open. • Close doors. • No draft on the burner (XR8-G only). • Check draft inducer opening. SYMPTOM: Oven does not come to ready.