
Installation Manual


23 / 63 EN
Over The Range Convection Microwave Oven / Installation Manual
5
Installation
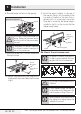
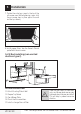
5.2.2 Outside back exhaust
(horizontal duct type B)
3/8
"
TO
EDG
E
NO
TE
: IT IS
VERY I
MPORTANT TO
READ AND FO
LLO
WT
HE
D
IRECTIO
N
S
IN THE INSTALLATION INSTRU
CTI
O
NS
BEF
O
RE PR
OCEEDING
WITH
T
HIS
REAR WALL TEM
PLA
T
E
.
Th
i
s R
ea
r
Wa
ll T
e
mpla
te
s
e
r
ve
s
to po
sitio
n th
e
b
o
tto
m
mou
nting pl
a
te
a
nd
to lo
cate th
e h
o
ri
zon
tal exh
aust
ou
t
le
t.
1
. Us
e a l
e
vel
to
ch
e
c
k th
at the t
empla
te
is pos
ition
ed
a
ccur
ate
l
y
.
2. L
o
c
ate
a
nd
mark
a
t le
a
s
t o
ne
stu
d
on thele
ft o
r
righ
t s
id
e
of the
ce
n
te
rl
i
n
e
.
It is im
po
rtant to u
se
a
t le
ast
one
wo
od
scre
w
mo
unte
d
fir
mly
i
n a
s
tud to support the weigh
t
of
the mic
r
ow
ave. Mar
k
tw
o a
d
di
tion
a
l, e
venlyspa
c
ed
lo
c
ation
s f
or the
suppl
ied
toggle
bo
l
t
s.
3. Dri
ll
h
ol
es in
th
e
marked lo
catio
ns.
Whe
re t
h
e
re is
a stud,
d
r
ill
a 3/16" h
ole for
woo
d s
cr
e
w
s.
F
o
r h
oles
that
d
o not lin
e up
w
ith a
s
tu
d, d
r
il
l 5
/8
"
h
o
le
s fo
r
to
ggl
e bo
lts
.
DO
NO
T
IN
S
T
A
L
L T
HE
MO
U
NT
I
N
G
P
L
A
T
E
A
T T
HIS
T
IME.
4. Re
m
ove the te
mplate
fr
om
the r
ear wal
l.
5.R
e
vie
h
tw e In
stallationIns
t
r
uction bo
ok for y
ou
r
installa
tio
n
s
i
tuat
ion.
Locat
e and m
ar
k
holes
to ali
gn wi
th holes
i
n t
he
mounting
p
l
ate.
IMPO
RTANT
:
LO
C
A
T
E AT LEA
ST
O
N
E
STUD O
N EITHER
SID
E O
F
TH
E CENTERLIN
E
.
MARKTHE LO
CATION
FOR 2 ADDITION
AL, EVENLY
SP
ACE
D T
O
G
GLE
BO
LTS
IN THE MO
UN
TING
PLATE
AREA
.
Locate and mar
k
hol
es
to al
i
gn with holes
in the
.et
al
p
g
n
i
t
nu
o
m
IMPO
RTANT
:
LO
CAT
E AT LEAST ON
E
STUD O
N EI
THER SI
DE O
F
TH
E
CENT
ER
LINE.
MARK
T
HE LO
CATIO
N
F
O
R 2 ADDITION
A
L, EV
ENLY
SP
ACED
TO
G
GLE
BO
LTS IN
THE MO
UN
TING
PLATE
AREA
.
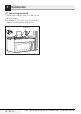
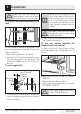
Trim the r
ear wall temp
late along
t
he dotted
line.
Trim t
he
rear
wal
l t
em
pla
t
e along
t
h
e dotted line.
12"
4"
Da
r
l
ev
u
e
ltaa
laho
j
apa
r
a
consu
l
ta
r
la
vers
i
ó
ne
nEs
paño
l
.
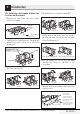
Installation overview
B1. Prepare Rear Wall
B2. Remove Blower Plate
B3. Attach Mounting Plate to Wall
B4. Prepare Top Cabinet
B5. Adjust Blower
B6. Mount the Microwave Oven
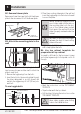
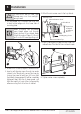
A
Make sure the screws for the blower
motor and blower plate are securely
tightened when they are reinstalled.
This will help to prevent excessive
vibration.
A
Make sure the motor wiring has
been properly routed and secured,
and that the wires are not pinched.
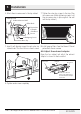
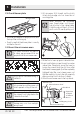
B1. Preparing the rear wall for out-
side back exhaust
You need to cut an opening in the rear wall for out-
side exhaust.
3
/
8" TO E
DGE
NOTE
: IT IS VE
RY IMPOR
T
ANT
TO
READ
A
ND FOLL
OW
TH
E
DIR
ECTIONS
IN THE IN
STA
L
SNI
N
OI
TAL
TR
U
CTIO
NS
BEFO
RE PR
OCEED
ING
WITH
THI
S
REAR
W
ALL
TEMP
LATE
.
T
his
Re
ar
Wall
Tem
pl
a
te
s
erv
esto p
osit
i
on
t
hebottom
m
ounting
pla
tea
nd
t
o
loc
ate
t
hehor
iz
o
nt
alexhaust
out
let
.
1. Us
e
alevel t
o
checkt
hat
the
tem
pla
t
e
isposi
tioned
accurat
ely.
2.
Loc
at
e
andmark a
t
l
ea
stone stud on t
he
lef
tor
right
side of
th
e
c
e
nter
line.
I
tis im
portant
t
o
use
at
leas
t
on
ewood
screw
m
oun
t
e
df
irmly
ina stud
tos
upport
t
he
wei
ght
of
them
i
crowave.M
ar
k
twoa
dditional,
e
v
enlyspaced
loca
t
i
on
sfor
t
hesupplied
t
og
glebolt
s.
3.
Drill
h
olesin t
h
e
m
ark
ed
l
oca
tions.Where t
h
ereis
a st
ud,
drill
a3/
1
6"
ho
lefor
woodscrews.
F
o
r
holes
that
donot line
up
wit
ha stud,
d
r
il
l5
/8
"
holes
f
or
toggle
b
olts.
DO
NO
TINS
T
ALL
T
HE
M
OUNTI
NG
P
LATE
ATTHI
S
T
IM
E.
4.
Remo
v
e
t
hetem
plat
e
f
rom
t
he
rearwall.
5.
R
eviewth
e
I
nst
allation
I
n
s
truc
t
ionboo
kf
or
y
our
installationsit
uat
io
n.
Lo
cate
and
mar
k hol
es to
a
lig
n with ho
les
in the
mou
nting plate.
IMP
O
RTA
NT:
LOCATE AT LEA
ST ON
E
STU
D
ON
EITHER SIDE
O
F
THE
C
ENTERLINE.
M
A
R
K TH
E LOC
AT
ION FOR
2 ADDITI
O
NAL
,
EVEN
LY
SPACE
D TOGG
LE BOLTS IN THE MOU
NTIN
G
PLA
TE
AREA.
Lo
cate
and
mar
k hol
es to
alig
n w
ith holes
in the
mountingplate.
IMPORTA
NT:
LO
CATE
AT LEAST ON
E STU
D O
N EIT
H
ER SIDE
O
F
THE CE
N
TER
LINE.
MARK TH
E
L
OCAT
ION FOR
2 AD
DIT
I
O
NAL
, EVEN
LY
SP
AC
E
D
TOGG
LE BOLTS
IN THE
MOU
NTI
NG PLATE
AREA.
Trim
therea
r wall te
mplate a
l
o
n
g the dotted
line
.
Tri
m
the
r
ea
r
wall
template a
l
ong
the
d
otted
line
.
1
2
"
4"
Dar
levuelta
ala
hojapar
acon
sul
tarla
ve
r
sión
en
E
spañ
ol.
• Read the instructions on the REAR WALL
TEMPLATE.
• Tape it to the rear wall, lining up with the holes
previously drilled for holes A and B in the wall
plate.
• Cut the opening, following the instructions of
the REAR WALL TEMPLATE.