
Installation Manual


Four à micro-ondes à convection à hotte intégrée / Manuel d’installation
59 / 63 FR
5
Installation
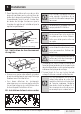
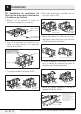
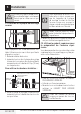
7. Serrez les deux vis extérieures qui se trouvent
sur la partie supérieure du four à micro-ondes.
(Lorsque vous serrez les vis, maintenez le
four à micro-ondes contre le mur et l’armoire
supérieure.)
8. Installez les filtres à graisse. Reportez-vous au
manuel d’utilisation qui accompagne le four à
micro-ondes.
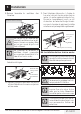
5.2.3 Recyclage d’air (évacuation
sans conduit de type C)
3
/8
"T
O
EDG
E
NOTE
:
ITIS VER
Y
I
MP
OR
TANT T
O
READ AND F
O
LL
OWT
HE DIRECTI
O
NS
I
N T
HE
INST
ALL
AT
ION
I
NSTR
U
CTIO
NS
BE
F
O
R
E PROC
EEDI
NG
W
IT
H T
H
IS
R
EAR W
ALL TEM
PL
AT
E
.
Th
is
R
e
ar
Wa
ll
T
e
mp
la
te
se
rve
s
t
opo
s
itio
nth
e
bo
t
to
m
mo
u
n
ti
n
g p
l
a
t
e
a
n
d
t
o
loc
at
et
h
e
h
or
iz
o
nt
al
e
x
h
a
ust
o
utle
t
.
1
.
Use
a
l
e
v
el
to
c
he
ck
t
h
at
th
e
te
m
p
la
t
e i
s
p
ositi
o
n
ed
a
cc
u
ra
t
e
l
y
.
2
.
Lo
ca
t
e an
d
mark
a
t
l
e
a
s
t one
s
t
u
d
o
n
th
e
l
e
f
t
o
r
r
ig
ht
si
d
e
o
fth
e
c
e
nte
rli
n
e
.
I
t
is
imp
o
rta
nt
to
us
e
a
t l
e
asto
n
e
wo
o
d
scre
w
mo
u
n
te
d fi
rmly in
a
stu
dt
o
su
p
p
o
rt
t
h
e
we
i
g
ht
o
f t
h
e
microw
ave
.
Ma
rk
t
wo
addi
t
io
n
a
l,eve
n
lys
pa
c
e
d
lo
c
atio
n
s
fo
r th
e
s
u
p
p
lie
d
t
og
g
le bo
l
ts.
3.
Dri
ll
h
o
le
s
inth
e
ma
r
k
e
d locat
io
n
s.Where
t
h
e
r
e
i
s
a
s
t
ud
,
dr
ill
a
3
/1
6
"
h
ol
e
f
o
r wo
od
scr
e
ws
.
Fo
r
ho
les
th
a
t
do
n
o
t
l
in
e upwit
h
ast
u
d, drill
5
/8
"
h
o
le
s
f
o
r
t
o
g
g
l
e bolts.
DO N
O
TI
N
S
TA
L
L
TH
E
M
OU
N
TIN
GP
L
A
TE
A
T
T
HIS
TI
M
E
.
4
. Re
m
o
v
e
t
h
e
t
emp
l
a
te
f
rom
t
h
e re
a
r
wa
l
l.
5. Re
view
the
In
sta
l
lation
Inst
r
ucti
on
b
oo
k
fo
r
yo
u
r
i
n
s
t
a
lla
tion
si
tu
atio
n.
Loc
a
t
e
a
n
d
mark
hol
es to
a
l
i
gn wit
h hol
es
in th
e
mount
i
ng
p
l
ate.
I
MPOR
T
ANT:
LOCA
T
E AT
L
E
AST
O
NESTUD
O
N
E
I
T
HER SIDEOF
T
H
E
CE
N
TE
RLIN
E.
MARK T
HELO
CA
T
IO
N F
O
R2
ADDITIONAL,
EVENLY
SPACE
D
TOGGLE
B
O
LT
SIN
TH
E
MOU
N
T
ING
PL
A
TE
A
REA
.
L
o
ca
t
e
and
mark holes
t
o
a
l
i
gnwi
t
h
h
o
l
e
s
in
t
h
e
m
o
untin
g
p
lat
e
.
I
MPO
RTA
NT
:
LO
C
AT
E AT
LEA
ST
O
NES
T
U
D
ON E
I
T
H
ER SIDE
O
F
TH
EC
ENT
ERLIN
E.
MARK TH
E
LOCA
TION F
O
R
2 ADDITION
AL
,
EVENLY
SP
A
CED TO
G
G
LE
BO
L
T
SIN
T
H
E
MO
UNT
I
N
G
PLAT
E
A
RE
A.
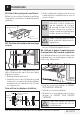
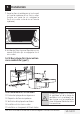
T
r
im th
e rea
r
w
a
ll t
em
plate al
on
g
t
h
e
dot
t
ed
li
ne.
Tri
m
th
e rea
r
w
all
tem
p
late al
o
n
g
t
he
d
ottedl
ine.
1
2
"
4"
Da
r
le
v
ue
l
t
a
a
la
ho
ja
par
a
c
ons
u
l
tarla
v
e
rs
ió
n
e
n
Es
p
añol.
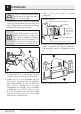
Vue d’ensemble de l’installation
C1. Fixation de la plaque de montage au mur
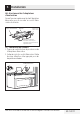
C2. Préparation de l’armoire supérieure
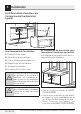
C3. Vérification de la plaque du ventilateur
C4. Installation du four à micro-ondes
C5. Installation ou changement du filtre à charbon
A
Assurez-vous que les vis du moteur
du ventilateur et de la plaque du
ventilateur sont correctement ser-
rées lorsque vous les remettez en
place. Cela permet d’éviter des vibra-
tions excessives.