Refrigerator User Manual Réfrigérateur Manuel d’utilisation Refrigerador Manual del usuario BRFD2230SS-BRFD2230XSS EN/FR/ES 57 6124 0000/BD -EN-FR-ES
Please read this manual before using the product! Dear Customer, We'd like you to make the best use of our product, which has been manufactured in modern facilities with care and meticulous quality controls. Thus, we advise you to read the entire user manual before you use the product. In case the product changes hands, do not forget to hand the guide to its new owner along with the product. This guide will help you use the product quickly and safely.
1 Important instructions for safety and environment 3 4 Preparation 14 1.1 General safety . . . . . . . . . . . . . . . . . . . . . .3 1.1.1 HCA warning . . . . . . . . . . . . . . . . . . . . . . .4 1.1.2 For products with a water dispenser . . . . . .4 1.2 Intended use . . . . . . . . . . . . . . . . . . . . . . .4 1.4 Package information. . . . . . . . . . . . . . . . . . .4 5 Operating the product 18 2 Your Refrigerator 5 3 Installation 6 3.1 Appropriate installation location . . . . . . . . .
1 Important instructions for safety and environment This section contains safety instructions that will help protect from risk of personal injury or property damage. Failure to follow these instructions shall void any warranty. Intended use – WARNING: Keep ventilation openings, in the appliance enclosure or in the built-in structure, clear of obstruction. – WARNING: Do not use mechanical devices or other means to accelerate the defrosting process, other than those recommended by the manufacturer.
Important instructions for safety and environment t %P OPU QMBDF DPOUBJOFST GJMMFE XJUI MJRVJE PO UPQ PG UIF product. Spilling water on an electrical component may cause electric shocks or risk of fire. t %P OPU TUPSF QSPEVDUT WBDDJOFT IFBU TFOTJUJWF medicines, scientific materials and etc.) that require a precise temperature control in the refrigerator. t *G ZPV XJMM OPU PQFSBUF UIF QSPEVDU GPS B MPOH QFSJPE PG time, unplug and unload the food in it.
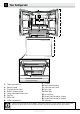
2 Your Refrigerator *3 *4 *13 12 6 *5 *11 10 1 *9 *7 *8 2 14 *17 12345678- Fridge compartment Bottom Freezer Display/indicator panel Butter & cheese section Fridge compartment door shelf Egg Tray Bottle shelf Chiller compartment C 15 16 9- Crispers 10- İnner water dispenser 11- Adjustable glass shelf 12- Fan Cover 13- Water filter 14- Ice container 15- Frozen Food Storage Bın (Upper) 16- Frozen Food Storage Bın (Lower) 17- Separator Figures in this user manual are schematic and may not match th
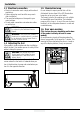
3 Installation Refer to the nearest Authorized Service Agent for installation of the product. To make the product ready for use, make sure that the electricity installation is appropriate before calling the Authorized Service Agent. If not, call a qualified electrician to have any necessary arrangements carried out. C B B A C Preparation of the location and electrical installation at the place of installation is under customer's responsibility. Product must not be plugged in during installation.
Installation 3.3 Electrical connection t &MFDUSJDBM DPOOFDUJPO NVTU DPNQMZ XJUI OBUJPOBM regulations. t 1PXFS DBCMF QMVH NVTU CF XJUIJO FBTZ SFBDI after installation. t 5IF TQFDJGJFE WPMUBHF NVTU CF FRVBM UP ZPVS mains voltage. t %P OPU NBLF DPOOFDUJPOT WJB FYUFOTJPO DBCMFT or multi-plugs. WARNING: Damaged power cable must B B be replaced by the Authorized Service Agents.
Installation 3.7 Water connection Depending on the model of the refrigerator, you can connect it either to a carboy or water mains. First you must connect the water hose to the refrigerator. C A C In cases where a carboy is used, a separate pump must also be used. WARNING: Refrigerator and the pump, if any, must be unplugged during connection. Following parts may not be supplied with your product since they are not required when using a carboy.
Installation 3.7.1 Before Installation Make sure that you have everything necessary to ensure proper installation before proceeding, including: Your product comes with an internal water filter for use inside the fridge. Part number of the filter is 4918450200 and you can use this part number when ordering replacement filters. 3.8 Connecting the water hose to the refrigerator 1. Remove the valve channel cover (A) from the water inlet valve. 2. Slip the union (C) water inlet valve (B). 3.
Installation 3.10 Water filter (in some models) Your refrigerator may be equipped with an external or internal filter depending on the model. To fit the water filter, follow the instructions below referring to the figures supplied: Filter end of life warning. 3.10.1 Attaching the internal filter into the refrigerator Filter replacement consists of 2 parts. These are physically changing the filter and making adjustments on the display. button before removing the 1. Press “Ice Off” by pass cover. 2.
Installation 3.11 Before starting to use the water/ice dispenser t It is recommended that the water is disconnected if you will not be using the refrigerator for a long period of time due to vacation or similar reasons. t Do not attempt to dismantle the ice container group assembly parts. t Do not attempt to clean the ice container assembly without removing it from the refrigerator. t When taking water from the water dispenser, remove the glass from the opening 1 second after releasing the trigger.
Installation 3.13 Installing the appliance Alcove dimensions 70,7” (1795 mm) (63 5m m) ” (93 36,9 8mm ) 8,46”(215mm) Minimum clearances Top View Recessed water line Electrical Outlet Water Line 12,6 “(320mm) 25” 3,35”(85mm) 7,87” (200mm) Recessed electrical outlet 2'' ceiling, 1/2” from sides and 1-3/8” the back.
Installation Minimum clearances ) mm 11,2 ”( 3 5 12,2 21,9 2” 13 / 37 EN ( 55 7m m) Refrigerator / User Manual
4 Preparation Before starting to use the product, check that all preparations are made in accordance with the instructions in sections "Important instructions for safety and environment" and "Installation". t Clean the interior of the refrigerator as recommended in the “Maintenance and cleaning (Page 31)” section. Check that inside of it is dry before operating it. t Plug the refrigerator into the grounded wall outlet. When the door is opened the interior illumination will turn on.
Preparation Product Dimensions " 15 / 37 EN Refrigerator / User Manual
Preparation H Height-Overall "A" Height-TopOfCabinet "B" Depth-CabinetOnly "C" "O" Depth-Without Handles "D" 1771mm (69,72") 1710mm (67,32") 600mm (23,62") 680,5mm (26,79") Depth-WithHandles "E" Width-Cabinet "F" Depth-DrawerOpen "G" TotalDepth-DrawerOpen 1204,5mm (47,42’’) "H" 737mm (29,01") 908mm (35,74") 1157mm (45,55") 1178,5mm (46,40”) Width-Doors Open90°WithHandles "K" Width-Doors Open90°FromCabinetToHandle "L" Depth-Doors Open90° "I" TotalDepth-Doors 1120mm (44,9’) Open90° "J" 1
Preparation J 17 / 37 EN Refrigerator / User Manual
5 Operating the product 5.1 Indicator panel Touch-control indicator panel allows you to set the temperature and control the other functions of the refrigerator. Just press the relevant buttons for function settings. 1 2 3 4 5 6 7 8 9 10 *20 *19 1-On/Off function Press the On/Off button for 3 seconds to turn off or turn on the fridge.
Operating the product 9-High Temperature Error / Warning Indicator This icon comes on during high temperature failures and error warnings. 10-Freezer Compartment Temperature Setting Indicator Indicates the temperature set for the Freezer Compartment. 11-Eco-Extra Indicator Eco-Extra Indicator is illuminated when the Eco Extra function is active. 12-Quick Freeze Indicator This indicator is illuminated when the Quick Freezer function is active.
*20 *19 *17 *18 Operating the product 5.2 Activating water filter change warning (For products connected to the mains water line and equipped with filter) Water filter change warning is activated as follows: Automatic filter usage time calculation is not enabled ex factory. It must be enabled in products equipped with a filter. The display board we use in the refrigerator has a six-key system. Set values are shown in the display.
Operating the product Freezer Fridge Compartment Compartment Explanations Setting Setting -15°C / 5°F 4°C / 39°F This is the normally recommended setting. These settings are recommended when the ambient temperature -20°C / -4°F 3°C / 37°F exceeds 30°C/86°F. Use when you wish to freeze your food in a short time. Your Quick Freeze 4°C / 39°F refrigerator will return to its previous mode when the process is over.
Operating the product 5.3 U4 Control Board 3D Display Activating/Deactivating Of Ice-Off Function The display board we use in the refrigerator has a six-key system. Set values are shown on the display. *(pressing 3 sec.) Fridge Set Quick Fridge ( Eco-Extra ) Step 1: Ice-off function is activated by pressing the Freezer Set button for 3 seconds at any time after it is powered. The Ice-off icon turns on in the display and ice formation stops.
Operating the product 5.4 Dual cooling system Your refrigerator is equipped with two separate cooling systems to cool the fresh food compartment and freezer compartment.Thus, air and odour in the fresh food compartment and frozen food compartment do not get mixed. Thanks to these two separate cooling systems, cooling speed is much faster then other refrigerators. Also additional power saving is provided since the defrosting is performed individually. 5.
Operating the product 5.8 Deep-freeze information 5.10 Moving door rack You can keep the freshness of food for many months (at -15°C / 5°F or lower temperatures in the deep freeze). *optional Moving door rack can be fixed in 3 different positions. In order to move the rack, push the buttons on the side evenly. Rack will be movable. Move the rack up or down. When the rack is in the position that you want, release the buttons. Rack will be fixed again in the position where you have released the buttons.
Operating the product 5.13 Crisper 5.11 Glass shelves You can remove the glass shelves to clean them. Be careful when removing the shelves since they are heavy. 5.12 Chiller compartment (in some models) Chiller compartments allow you to prepare the food for freezing. You can also use these compartments to store your food at a temperature a few degrees below the fridge compartment. You can increase the inner volume of your refrigerator by removing any of the chiller compartments: 1.
Operating the product Never leave the vegetables inside the crisper in their bags. If the vegetables are left inside their bags, this will cause them to decompose in a short period of time. In case contacting with other vegetables is not preferred for hygiene concerns, use a perforated paper and other similar packaging materials instead of a bag. Do not place together the pear, apricot, peach, etc.
Operating the product 5.16 Butter & Cheese section (in some models) Store food such as butter, cheese and margarine in this section. C Movable middle section is closed when the left door of the fridge compartment is open. Movable middle section moves with the aid of the plastic part on the body while closing the door. Do not try to open by hand. 5.17 Egg holder (in some models) You can install the egg holder to the desired door or body shelf. Never keep the egg holder in the freezer compartment. 5.
Operating the product 5.20 Ion (in some models) Air is ionized by means of the ionizer system in the fridge compartment air duct. Thanks to this system, air-borne bacteria and odorising molecules removed from the air. C It is normal for the first few glasses of water taken from the dispenser to be warm. 5.21 Odor filter (in some models) Odor filter in the air duct of the fridge compartment prevents build-up of unpleasant odors in the refrigerator. 5.
Operating the product 5.25 Ice Tray (in some models) To get ice from the Ice Tray, fill the water tank in the fridge compartment with water up to the maximum level. Ice cubes in the ice drawer may stick to each other and become a bulk due to hot and humid air in approximately 15 days. This is normal. If you cannot break the bulk apart, you can empty the ice container and again. C C C C It is recommended to change the water in the water tank if it remains in the water tank for more then 2-3 weeks.
Operating the product 5.27 Refrigerator Shelf Weight Limitations Freshfood compartment cantalever shelves, those that only have rear supports, are tested for max 25kg (55pounds) per each part. Crispers will hold up to 15kg (33pounds) per each one. Chiller zone will hold up to 20kg (44pounds). These are dynamic loads for crispers and chiller zone. Ice container bin holds up to 10kg (22pounds), it is for usage without ice.
6. Maintenance and cleaning Service life of the product extends and frequently faced problems decrease if cleaned at regular intervals. B WARNING: Unplug the product before cleaning it. t Never use gasoline, benzene or similar substances for cleaning purposes. t Never use any sharp and abrasive tools, soap, household cleaners, detergent and wax polish for cleaning. t Dissolve one teaspoon of baking soda in half litre of water. Soak a cloth with the solution and wring it thoroughly.
7. Troubleshooting Check this list before contacting a servicer. Doing so will save you time and money. This list includes frequent complaints that are not related to faulty workmanship or materials. Certain features mentioned herein may not apply to your product. The refrigerator is not working. t The power plug is not fully seated. >>> Plug it in outlet completely into the socket. t The fuse connected to the socket powering the product or the main fuse is blown. >>> Check the fuses.
Troubleshooting t The freezer compartment temperature is set to a very low degree. >>> Set the freezer compartment temperature to a higher degree and check again. The cooler temperature is very low, but the freezer temperature is adequate. t The cooler compartment temperature is set to a very low degree. >>> Set the freezer compartment temperature to a higher degree and check again. The food items kept in cooler compartment drawers are frozen.