Front-Loading Dryer Owner’s Guide & Installation Instructions DHP 24400 W DHP 24412 W
Read this page first. Dear Customer, We hope that your product, which has been manufactured in modern facilities and passed strict quality control procedures, will give you the best results. We also want to bu sure that you use his dryer properly and safely. Read this entire manual before installing and operating the dryer and keep this guide for future reference. • Keep this operating manual handy. You may need it in the future. If you sell or transfer the product to someone else, give them this manual.
TABLE OF CONTENTS 1 Your Dryer 4 1.1 Overview..............................................4 1.2 Package Contents................................5 2 Important Safety Instructions 6 3 Installation Instructions 10 3.1 Electrical connection..........................10 3.2 Grounding Instructions....................... 11 3.3 Appropriate installation location..........12 3.4 Minimum Installation Clearances.......13 3.5 Use on top of a washer......................13 3.6 Adjusting the feet...................
1 Your Dryer 1.1 Overview 10 1 2 3 9 8 4 5 7 1. 2. 3. 4. 5. 6. 7. 8. 9. 10.
1.2 Package Contents 1 2 3 4 1. Water drain hose (2951261600) 2. Filter drawer spare sponge (2964840100) 3. User Manual (2960311018) 4.
2 Important Safety Instructions A WARNING: To reduce the risk of fire or electric shock resulting in serious injury or death when using this appliance, follow the basic precautions including the following: • Read all instructions before using the appliance. Failure to follow these instructions will increase the risk of fire or electric shock and will void the warranty. A This product has been designed for home use only. • The appliance must be operated at temperatures between +5°C and +35°C.
• This appliance must be grounded. In the event of malfunction or breakdown, grounding will reduce the risk of electric shock by providing a path of least resistance for electric current. This appliance is equipped with a cord having an equipment-grounding conductor and a grounded plug. The plug must be plugged into an appropriate outlet that is properly installed and grounded in accordance with all local codes and ordinances.
• Do not dry articles that have been previously cleaned in, washed in, soaked in or spotted with gasoline, dry-cleaning solvents or other flammable or explosive substances as they give off vapors that could ignite or explode. • Do not use the tumble dryer if industrial chemicals have been used for cleaning what you want to dry. • Do not dry unwashed items in the tumble dryer. • Do not place items exposed to cooking oils in your dryer.
• Do not reach into the appliance if the drum is moving. • Do not allow children to play on or in the appliance.Close supervision of children is necessary when the appliance is used near children. • Keep pets away from the appliance during the drying cycle. • Before the appliance is removed from service or discarded, remove the door to the drying compartment. • Close the loading door when you leave the area where the dryer is located.
3 Installation Instructions A • • • • WARNING Risk of fire The clothes dryer (“appliance‘) installation must be performed by a qualified installer. Install the appliance according to the manufacturer’s instructions and local codes. Do not install a clothes dryer with flexible plastic venting materials. If flexible metal (foil type) duct is installed, it must be of a specific type identified by the ap pliance manufacturer as suitable for use with clothes dryers.
To change the cord: 1. Make sure that the dryer is not plugged into any power outlet. B B DO NOT plug end of dryer power cord into a live receptacle before connecting dryer power cord to dryer terminals and closing junction/splitter box as described below. DO NOT repair old power supply cords. Power cord must be changed only by a qualified person. There is a risk of electric shock! 2. Remove the screw from the cover of the junction box located at the top rear of the dryer. 3.
B The appliance must not be operated unless it is repaired! There is the risk of electric shock! 3.3 Appropriate installation location •Install your appliance in environments that have no risk of freezing and in a stable and level position. •Do not place your appliance on a long pile rug or on similar surfaces. •Operate your appliance in a well-ventilated, dust-free environment. •Do not block the air ducts in front of and under the dryer.
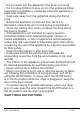
A 3.4 Minimum Installation Clearances Alcove or Built-under A Sides 0.5 in. (13 mm) B C 3.6 Adjusting the feet • Closet 0.5 in. (13 mm) B Top 1 in. (25 mm) 1 in. (25 mm) C Rear 0.5 in. (13 mm) 0.5 in. (13 mm) Front 0.20 in. (5 mm) 0.20 in. (5 mm) • In order to ensure that the dryer operates more silently and vibration-free, it must stand level and balanced on its feet. Balance the dryer by adjusting the feet. Turn the feet to left or right until the dryer stands level and firmly.
Connecting the water drain hose 1-2 Connect one end of the drain hose supplied with the dryer to the connection point from where you removed the hose of the product in previous step. 3 Connect the other end of the drain hose directly to the wastewater drain or to the washbasin. 2 1 1 3 A C C 14 / EN Hose connection should be made in a safe manner. Your drain house will be flooded if the hose comes out of its housing during water discharge.
4 Preparation 4.1 Laundry suitable for drying in the dryer Always obey the instructions given on the garment tags. Dry only the laundry having a label stating that they are suitable for drying in a dryer and make sure that you select the appropriate programme.
• • • • Do not add wet laundry while the dryer is in operation Clean the lint filter before or after each drying cycle. (See 6. Maintenance and cleaning) Clean the filter drawer regularly either when the Filter Drawer Cleaning warning symbol appears or after every 3 drying cycles. (See 6. Maintenance and cleaning) Ventilate the room, where the dryer is located, well during drying. 4.5 Correct load capacity Follow the instructions in the “Programme selection and consumption table”.
5 Operating the product 5.1 Control panel 1 2 6 1. 2. 3. 4. 5. 6. 3 5 4 Program selection knob Remaining duration indicator On/Off button Start/pause button End duration button Sound warning button 5.
5.3 Preparing the dryer 1. 2. 3. 4. Plug in the dryer Place laundry inside the dryer. Press the On/Off button. When your dryer turns on for the first time, it turns on with the regular dry program. C Pressing the On/Off button doesn‘t mean the program starts. Press the Start / Pause button to start the program. 5.4 Program selection 1. 2. Determine the appropriate program from the chart below containing the drying levels. Select the program you desire using the Program Selection knob.
• Bulky • Quick Dry 30 Dry only fibre quilts with dryerable label. Load the quilt in the correct way to avoid damages on the dryer and the quilt. Take out the quilt cover before loading the quilt in the dryer. Fold the quilt in two before loading. - Do not load more than 1 piece of fiber duvet for two persons (200x200 cm). Do not dry items containing cotton such as quilts, pillows and etc. - Do not dry items other than quilts such as carpets, rugs or mats. Permanent damage may arise in your dryer.
5.
5.8 Auxiliary functions Sound warning cancel Dryer makes sound warnings when the program is completed. If you don’t want sound notifications, press the “Sound Notification” button. When you press the sound notification button it lights up, and program does not make sound notifications when completed. C C You can select this function before or after the program starts. 5.9 Warning symbols Warning symbols may vary according to the specifications of your dryer.
5.11 Starting the program Start the program by pressing the Start / Pause button. Start/Pause led and the Drying led light up, indicating the program started. The “:” sign in the middle of the remaining duration starts to blink. 5.12 Child Lock The dryer features a child lock which prevents the dryer program flow from being affected when buttons are pressed during operation. When the Child Lock is active, all buttons except for the On/Off button are deactivated.
5.14 Canceling the program If you want to cancel the program and end the drying operation for any reason after the dryer starts running, press the On/Off button. A As it will be extremely hot inside the dryer when you cancel the program while the dryer is in operation; run the ventilation program to cool it down. 5.15 Program end When the program ends, the Final/Wrinkle Prevention, Fiber Filter Cleaning and Water Tank Warning leds on the program follow up indicator light up.
6 Technical Specifications Model Heat Pump Dryer with electronic sensor control Height (in) 33 5/16 Width (in) 23 3/4 Depth (in) 24 1/2 Height adjustment of feet (in) 1/5 Net weight (lbs) 121 Voltage / Frequency Connected load Dry Load Capacity Capacity 24 / EN 208-240V ~ 60 Hz 900 W - 4 A 8kg / 18 lb 4,1 cu-ft Dryer / User Manual
7 Maintenance and cleaning Service life of product extends and frequently experienced problems will be reduced if it is cleaned at regular intervals. • A layer can build up on the filter pores that can cause clogging of the filter after using the dryer for a while. Wash the lint filter with warm water to remove the layer that builds up on the lint filter surface. Dry the lint filter completely before reinstalling it.
7.2 Cleaning the sensor 7.3 Cleaning the filter drawer C C A • Remove the filter drawer cover by turning it in the direction of arrow. • Pull out the filter drawer. There are dampness sensors in the dryer that detect whether the laundry is dry or not. To clean the sensors: • Open the loading doorof the dryer. • Allow the dryer to cool down if it is still hot due to the drying process. • Wipe the metal surfaces of the sensor with a soft cloth, dampened with vinegar and dry them.
• Open the filter drawer by pressing the red button. • Take out the filter drawer sponge. • Clean lint, fiber, and cotton raveling on the filter cloth by hand or with a soft piece of cloth. When you notice a layer that may lead clogging on the filter cloth, please clean the layer by washing in warm water. Let the filter cloth dry thoroughly before installing back the filter drawer. • • Wash the filter drawer sponge by hand to remove the fiber and lint on the surface.
7.4 Cleaning the evaporator Clean the lint accumulated on the fins of the evaporator located behind the filter drawer with a vacuum cleaner. A 28 / EN CAUTION: You can also clean by hand provided that you wear protective gloves. Do not attempt to clean with bare hands. Evaporator fins can harm your hand.
7 Troubleshooting Drying process takes too much time. • Pores of the lint filter are clogged. >>> Wash the lint filter with warm water. • Filter drawer is clogged. >>> Clean the sponge and the filter cloth in the filter drawer. • Ventilation grids on the front side of the machine are blocked. >>> Remove the objects (if any) that block ventilation in front of the ventilation grids. • Ventilation is not sufficient since the room where the machine is installed is very small.
Lint Filter Cleaning symbol is on. • Lint filter is not cleaned. >>> Clean the lint filter. Lint Filter Cleaning symbol is flashing. • Filter housing is clogged with lints. >>> Clean the lint filter housing. • A deposit has built up on the lint filter pores that may cause clogging. >>> Wash the lint filter with warm water. • Filter drawer is clogged. >>> Clean the sponge and the filter cloth in the filter drawer.
www.blomberginternational.com info@blomberginternational.com 2960311018_EN/010316.