Dishwasher Instruction Manual GSN 9120
Welcome Dear customer Congratulations on your choice of a Blomberg quality dishwasher which has been designed to give you lasting service. Please read these instructions before installing the dishwasher and using it for the first time. The information contained herein is provided to avoid accidental risks and/or damage to your appliance Make sure you understand the controls prior to using your appliance. The dishwasher must only be used for it’s intended purpose, i.e. the washing of dishes in the home.
TABLE OF CONTENTS 1. Know your dishwasher / specification 5 2. Warning and safety information 7 Electrical Safety Children’s Safety General Recycling Energy and water saving What should not be washed in your dishwasher 7 7 7 8 8 Warning This appliance must be earthed Electrical requirements 9 9 9 8 3. Before first use 9 4. Installation 9 Important Fitting a different plug Water inlet hose connection Drain Hose Connection 10 10 11 11 5.
1 Know your dishwasher / specification ��������� �������� �������������� ����� ��������� ������������ ������������������������ ��������������� ���������������� ��������� ������������������� ����� ��������� ������������ �������������� ������� ������������������� ������������� ��������� ���������� ��������� ������������������ ����� ������������������������������� �������������������������� ������������������������ � ������������������������� �������������������� ������������������� ���������������
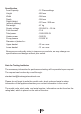
Specification Load Capacity Height Width Depth Depth/Height (without worktop) Net weight Supply voltage Fuse currrent Total power Heater power Pump powers Diameter of plates for : Upper basket Lower basket : 12 Place settings : 850 mm : 598 mm : 598 mm : 570 mm / 820 mm : 47 kg : 220-240 V ~ 50 Hz : 13 A : 1900-2200 W : 1800 W : 125/30 W : 25 cm max. : 31 cm max. Because we continually strive to improve our products, we may change our specifications and designs without prior notice.
2 Warning and safety information Electrical Safety Keep detergents out of children’s reach and do not put detergent in the machine until right before you start the washing programme. The dishwasher should only be operated on the voltage specified. For electrical safety, only earthed plugs and sockets should be used. Always use the fused plug provided with the appliance. The user is responsible for meeting these basic safety requirements.
Please dispose of the packaging material and old appliances carefully. Please ensure old machines do not become a threat to child safety. It is known that children lock themselves in unused machines. To avoid such a problem it is advised that you cut the mains cable off and break the door latch so it does not lock. The door of your machine is designed to support the weight of a full basket when the lower basket is pulled all the way out.
Iron and cast iron objects can rust and stain other items. 4 Installation If in doubt, contact the manufacturer of the item. When deciding on where to install your new dishwasher, ensure that the position of your dishwasher makes it easy and quick for you to place the dishes in the dishwasher and also to take them out and store away after the dishwashing is completed. Do not overload your dishwasher or do not load items other than those mentioned in this manual.
Destroy the old plug, which is cut off as a plug with a bared cord could cause a shock hazard if inserted into a socket elsewhere in the house. The moulded plug on this appliance incorporates a 13A fuse. Should the fuse need to be replaced an ASTA approved BS1362 fuse of the same rating must be used. Do not forget to refit the fuse cover. In the event of losing the fuse cover, the plug must not be used until a replacement fuse cover has been fitted.
Water inlet hose connection Make sure your plumbing is suitable to install your new dishwasher. If in doubt contact a qualified plumber. The appliance must be connected to the water mains using the new hose set supplied with your new dishwasher. Old hose sets must not be re-used. The water pressure coming from the water mains supply must be a minimum of 0.3 and a maximum of 10 bars. Drain Hose Connection Fit the drainage hose of your machine to the drainage pipe without bending.
��������� Installation of dishwasher Remove all packaging before positioning the machine. See the following diagram. Ensure there is a clearance each side of the machine to allow slight side ways movement for servicing. Note: If there is already enough space, you don’t need to remove the worktop to install it under the counter. Position the machine next to a water tap and a drain. When inserting the machine, ensure that the water inlet and drain hoses are not linked or squashed.
When the appliance is correctly levelled, the door will not catch on the inner liner on either side of the cabinet. �� If the door does not close correctly, loosen or tighten the adjustable feet, until the machine is perfectly level. �� 5 How to use Water hardness & regeneration settings The dishwasher requires lime free water. Hard water leaves watermarks on your dishes. Your dishwasher has a special water softening system to remove the hardness of the tap water.
To Adjust the Water Hardness; 1. Move the programme selection key to position 1 when the machine is turned off. 2. Press Start/Pause/Cancel button. 3. Press On/Off button while keeping the Start/Pause/Cancel button pressed to turn the machine on. Do not release the Start/Pause/Cancel button until “Water Hardness Level” set appears on the indicator of the machine (See. Water Hardness Level Adjustment Table). 4.
Filling the (water softener) dishwasher salt Detergent use Only use special pelletized dishwasher salt in your machine to soften the hard water. Never use other types of salts including table salt, animal feeding salt, sea salt, culinary salt. These types of salt do not dissolve in water easily and will damage your appliance beyond repair. ������ � �� � �� � � ��� When you run the dishwasher, the Water softener will be full of water.
Warning! Two-in-one and three-in-one detergents You will obtain the best results from your dishwasher if you use separate detergent, rinse aid and watersoftening salt. dishwasher. Always place the tablets in the detergent dispenser of the detergent holder. Detergent manufacturers also produce combined detergents known as ‘two-inone’ and ‘three-in-one’. Three-in-one: These products contain detergent, rinse aid and watersoftening salt.
Using two-in-one detergent and rinse aid • These detergents will not give you the same drying performance that you can obtain by using separate detergent, salt and rinse aid. To increase the drying performance: • Put your appliance’s rinse aid setting at “1” and apply rinse aid. When the rinse aid is used up, add more rinse aid to the rinse aid dispenser.
After you put in the detergent, shut the container lid (D) and ensure you hear the clicking sound. During the wash programme the detergent will dispense automatically and the lid (D) will remain open when the programme finishes. Do not use detergent when using the pre-wash programme. washing. Reduce it if there are sticky whitish streaks on the dishes. Filling the rinse aid dispenser Open the rinse aid dispenser lid by pressing the button as shown in the diagram.
Loading the dishwasher Loading the dishwasher correctly will increase the washing, drying and energy performance of your machine. Examine the information given in this section and the information stated in the Programme chart and quick reference card given with the manual. Remove any large scraps of food from the dishes before placing in the dishwasher to avoid clogging the filters. There are four separate baskets, in which you can put your load.
Folding plate support rods There are two separate “folding plate support rods” in the lower basket of your dishwasher designed to allow you more space to accommodate saucepans and large bowls. You can either fold each section (1,2) individually or, all at once, to create a large empty space.
Upper basket with variable height setting The upper basket is equipped with a lifting mechanism which enables you to change the height of the basket without having to remove it from the dishwasher, even if it is fully loaded. � The height of the upper basket was set to its lowest position at the factory. To lift the upper basket to the “high” (A) position, hold it on one side and carefully pull it upwards. To lift the opposite side of the basket, hold it and pull it upwards in the same manner (A).
6 • • • • • • • • Operating the dishwasher Turn the water tap on. Open the door of the machine. Check that the upper and lower arms can rotate freely. Pour (Put in) the detergent. Close the door of the machine Push in the on/off button and check that the programme indicator lights come on. Check the salt and rinse aid level indicator lights before you start the machine. If necessary add salt and rinse aid. Select the required programme by referring to the programme chart.
7 How to clean your machine Cleaning your machine at regular intervals ensures longer product life and reduces the risk of recurring problems. Clean spray arms and in particular filters at least once a week ! Always unplug the appliance and turn off the water supply before cleaning. To clean the door seal, use a neutral detergent and a damp cloth. To clean the control panel, use only slightly damp cloth. ����������� ������������� ! Do not use abrasive detergents.
Clean all three filters under running tap water with a brush. Reinsert the main filter in its place. Upper spray arm Turn the nut anti clockwise and remove both the nut and the spray arm. Flush away food particles under running water. Put the spray arm back on and screw on the nut turning clockwise until a clicking sound is heard. Place the coarse filter into the micro filter. Ensure the marks align properly. Turn the coarse filter clockwise until you hear a clicking sound.
8 Before calling service / Trouble shooting Before calling service check the following & Trouble shooting guide supplied on the following page.
Pitting of stainless steel items Prolonged contact with salty or highly acidic foods or with undissolved or highly concentrated detergent. Remove spots with silver polish. Rewash. Wash soon after use, or pre-wash items if they will not be washed right away. Do not overload cutlery basket. Avoid spilling or pouring detergent directly on flatware. Make sure dispenser cup is properly closed. Improper loading. Load so that all items are properly tilted for good drainage.
9 How To Obtain Service Please keep your purchase receipt or other proof of purchase in a safe place; you will need to have it should the product require attention under guarantee. You should also complete the details below; it will help us assist you when requesting service.
10 Guarantee Details Your new BLOMBERG product is guaranteed against the cost of breakdown repairs for three years from the date of the original purchase. What is covered? • Repairs necessary as a result of faulty materials, defective components or manufacturing defect. • The cost of functional replacement parts, but excluding consumable items. • The labour costs of a BLOMBERG approved repairer to carry out the repair. What is not covered? • Transit, delivery or accidental damage or misuse and abuse.
Blomberg, 36-38 Caxton Way, Watford, Hertfordshire, WD18 8UF Tel: 0845 6048340 Fax: 0845 6004922 email: service@blomberguk.com www.blomberguk.