
User manual


23
operation it is not necessary to switch off the power
supply or to remove the foodstuffs.
However when the ice becomes very thick on the
inner liner, complete defrosting should be carried out
as follows:
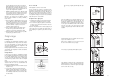
1. Remove the frozen food from the freezer, wrap it
in several layers of newspaper and put it in a
very cool place.
2. Switch off the appliance and pull out the plug, or
remove or unscrew the safety fuses.
3. Leave the freezer compartment door open.
4. Insert the plastic scraper into the recess provided
under the defrost water channel and place a
collecting basin under it.
5. Once defrosting is completed keep the scraper
for future use;
6. Turn the thermostat knob to the required setting
or replace the plug in the power socket.
Warning!
Never use metal tools to scrape off the frost
Do not use a mechanical device or any artificial
means to speed up the thawing process other than
those recommended by the manufacturer.
A temperature rise of the frozen food packs, during
defrosting , may shorten their safe storage life.
To switch off the appliance, turn the temperature
regulator to position "0".
If the appliance is not going to be used for an
extended period:
1. Remove all refrigerated and deep-frozen packa-
ges as well as ice trays.
2. Switch off the appliance by turning the tempera-
ture regulator to position "0".
Switching off the appliance
3. Remove the mains plug or switch off or turn out
the circuit breaker or fuse.
4. Defrost freezer compartment and clean thorough-
ly (see section: “Cleaning and Care”).
5. Leave the door open to avoid the build up of
odours.
For hygienic reasons the appliance interior, including
interior accessories, should be cleaned regularly.
Warning!
• The appliance may not be connected to the
mains during cleaning. Danger of electrical
shock! Before cleaning switch the appliance
offand rem ve the plug from the mains, or switch
off or turn out the circuit breaker or fuse.
• Never clean the appliance with a steam cleaner.
Moisture could accumulate in electrical compo-
nents, danger of electrical shock! Hot vapours
can lead to the damage of plastic parts.
• The appliance must be dry before it is placed
back into service.
Cleaning and Care
Attention!
• Ethereal oils and organic solvents can attack pla-
stic parts, e.g.
– lemon juice or the juice from orange peals;
– butyric acid;
– cleansers which contain acetic acid.
Do not allow such substances to come into contact
with appliance parts.
• Do not use any abrasive cleansers.
1. Remove frozen food and the food from the refri-
gerator. Wrap frozen food in several layers of
newspaper. Store it in a cool place, well covered.
2. Defrost the freezer compartment prior to cleaning
(see "Defrosting" section).
30
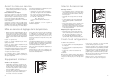
D
C
D723
D726
B
20 mm
A
50mm
PR166
PR266
A
B
C
D
A
D023
Séparer les pièces A, B, C, D comme l’indique de la
figure.
Appliquez les cahes (B) sur les ailettes des butées et
dans les trous des charnières.
Ouvrez la porte et appuyez l’appareil contre le
meuble de cuisine, du côté opposé aux charnières.
Fixez l’appareil à l’aide des 4 vis livrées dans le kit.
Appliquez la grille d’aération (C) et le couvre- char-
niére (D).
Glissez l’appareil dans la niche. Poussez à fond jus-
qu’au contact de la butée (A) avec le meuble.
Poser la glissière (A) sur la partie interne de la porte
du meuble dessus et dessous comme l’indique la
figure et marquer la position des trous externes.
Après avoir pratiqué les trous, fixer la glissière avec
les vis fournies.