Frost Free Combi Fridge Freezer KGM 9690 Instruction manual
Please read this manual first! Dear Customer, We hope that your product, which has been produced in modern plants and checked under the most meticulous quality control procedures, will provide you with years of good service. For this, we recommend you to carefully read the entire manual of your product before using it and keep it at hand for future reference. This manual • Will help you use your appliance quickly and safely. • Read the manual before installing and operating your product.
CONTENTS 1 Your refrigerator 2 Warnings 3 5 Using your refrigerator 14 4 Icematic and ice storage container... 18 Sliding Body Shelves........................ 18 ELECTRICAL REQUIREMENTS.......... 5 WARNING! THIS APPLIANCE MUST BE EARTHED..................................... 5 ENERGY SAVING TIPS....................... 6 3 Installation 7 TRANSPORTATION INSTRUCTIONS.. 7 INSTALLATION INSTRUCTIONS......... 8 REPLACING THE INTERIOR LIGHT BULB ................................................
1 Your refrigerator Congratulations on your choice of a BLOMBERG quality Appliance which has been designed to give you service for many years. 15 3 4 5 16 20 1 17 5 18 5 6 7 8 19 20 9 10 11 2 12 12 12 13 14 1. Fridge compartment 2. Freezer compartment 3. Interior light 4. Thermostat knob 5. Adjustable shelves 6. Defrost water collection channel Drain tube 7. Crisper cover 8. Salad crisper 9. Icebank 10. Fan 11. 12. 13. 14. 15. 16. 17. 18. 19. 20.
2 Warnings •DO NOT connect your appliance to the electricity supply until all packing and transit protectors have been removed. • Leave to stand for at least 4 hours before switching on to allow compressor oil to settle if transported horizontally. • If you are discarding an old refrigerator with a lock or latch fitted to the door, disable the lock/latch, ensure that it is left in a safe condition to prevent the entrapment of young children.
mm. 22mm. CORD GRIP EN FUSE N BLUE OR BLACK L BROWN OR RED FITTED WITH BS 1362 13A FUSE ALWAYS FIT BS 1362 REPLACEMENT CARTRIDGE FUSE GREEN & YELLOW OR GREEN 6mm. If the fitted moulded plug is not suitable for your socket, then the plug should be cut off and an appropriate plug fitted. Destroy the old plug which is cut off as a plug with bared cord could cause a shock hazard if inserted into a socket elsewhere in the house. The moulded plug on this appliance incorporates a 13 A fuse.
ENERGY SAVING TIPS 1- Ensure your appliance is installed in a well ventilated area. 2- Ensure the time between buying chilled/frozen food and placing them in your appliance is kept to a minimum, particularly in summer. We recommend you use a cool bag or a special carrier bag to carry frozen food. 3- Do not leave the door (s) of your appliance open longer than necessary and ensure they are closed properly after each opening.
3 Installation TRANSPORTATION INSTRUCTIONS 1. The appliance should be transported only in a vertical upright position. The packing as supplied must be intact during transportation. 2. If during the course of transport the appliance has to be transported horizontally, it must only be laid on its right hand side when standing in the frontof the appliance. After bringing it to upright position,it must not be operated for at least 4 hours to allow the system to settle. 3.
INSTALLATION INSTRUCTIONS 4. The fridge/freezer should be located on a smooth surface. The two front feet can be adjusted as required. To ensure that your appliance is standing upright adjust the two front feet by turning clockwise or anti-clockwise, until the product is in firm contact with the floor. Correct adjustment of feet avoids excessive vibration and noise. 1. The space in the room where the appliance is installed must not be smaller than 10 cubic metres. 2.
REPLACING THE INTERIOR LIGHT BULB Should the light fail to work, proceed as follows. 1. Switch off at the socket outlet and pull out the mains plug. • You may find it useful to remove shelves for easy access. 2. Use a flat tipped screwdriver to remove the light diffuser cover by inserting the blade in each of the two recesses to prise off each side. 3. First check that the bulb hasn’t worked loose by ensuring it is screwed securely in the holder. Replace the plug and switch on.
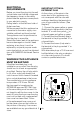
REVERSING THE DOORS We recommend that you reverse doors before switching on for the first time. Tools required: Small and medium size flat and cross-headed screwdrivers, a pair of pliers. Spare Parts supplied in the plastic bag: The following parts, which are exclusively for left hand side fitted hinge operation are supplied in a plastic bag with the appliance: - Upper door top trim hinge covers – there are 2 different parts, one for each side of top trim.
10. Rotate the upper hinge 180 degrees and then unscrew and remove the hinge pin using a pair of pliers and re-fit to opposite side of hinge. (8) 11. Reposition plugs and hinge pin bushings on top of doors on the opposite side of both doors. Use small flat-headed screwdrivers to remove plugs and bushings. Take care not to mark doors.(9) 12. Reposition left hand side feet on the opposite side. Unscrew and reposition the bottom hinge bushing. (10) 13.
6 6 5 5 4 4 7 9 2 1 8 45 ° 12 13 11 10 14 3 15 20 19 21 18 180° 21 22 25 27 26 24 27 23 16 17 12 EN 22
4 Before operating Final Check Before you start using the fridge/ freezer check that: 1. The feet have been adjusted for perfect levelling. 2. The interior is dry and air can circulate freely at the rear of the cabinet. 3. Clean the interior as recommended under “CLEANING AND CARE.” 4. Insert the plug into the wall socket and switch on the electricity supply. • When the door is open the fridge interior light will come on. 5. You will hear a noise as the compressor starts up.
5 Using your refrigerator TEMPERATURE CONTROL AND ADJUSTMENT Remember you must take your reading very quickly since the thermometer temperature will rise very rapidly after you remove it from the freezer. Please remember each time the door is opened cold air escapes and the internal temperature rises. Therefore never leave the door open and ensure it is closed immediately after food is put in or removed.
SUGGESTED ARRANGEMENT OF FOOD IN THE FRIDGE/FREEZER Arrangement Examples (See diagram) 1. Baked, chilled cooked food, dairy products, cans. 2. Meat, sausages, cold cuts. 3. Fruit, vegetables, salads. 4. Making, storing ice cubes. 5. Frozen food. 6. Frozen food and freezing of fresh food. 7. Butter, cheese. 8. Small bottles, cans, tubes. 9. Eggs. 10. Tall, large bottles, beverages. 11. Winerack The following guidelines and recommendations are suggested to obtain the best results and storage hygiene. 1.
11. Shelves, racks, crisper bins, drawers, flaps, bottle grippers are all removable. 12. Do not leave frozen food at room temperature to thaw; the best way to defrost food is to put it in the fridge to thaw slowly. Make sure you avoid defrosting food or food juices drip onto other food. 13. For hygiene reasons, always wrap food using a suitable packaging material before storing in your appliance to avoid contact with the appliance surface.
MAKING ICE CUBES check to ensure that no food particles have blocked the drain tube. The drain tube can be cleared by pushing the special plastic plunger provided down the drain tube (2). If the frost layer reaches about 1/4”(7 mm), reduce the setting (i.e. from 4 to 1) to restart automatic defrosting. Fill the ice - cube tray 3/4 full with water and place it in the Ice Bank. Loosen frozen trays with the handle of a spoon, never use sharp edged objects such as knives, forks.
Icematic and ice storage container Sliding Body Shelves Using the Icematic * Fill the Icematic with water and place it into its seat. Your ice will be ready approximately in two hours. Do not remove the Icematic from its seating to take ice. * Turn the knobs on it clockwise by 90 degrees. Ice cubes in the cells will fall down into the ice storage container below. * You may take out the ice storage container and serve the ice cubes. * If you wish, you may keep the ice cubes in the ice storage container.
6 Maintenance and cleaning ** Check door seals regularly to ensure they are clean and free from food particles. ** We recommend that you switch off the appliance at the socket outlet and pull out the mains plug before cleaning. ** Never use any sharp abrasive instrument, soap, household cleaner, detergent and wax polish for cleaning. ** Use luke warm water to clean the cabinet of the appliance and wipe it dry.
7 Do's and Don'ts Do- Clean your appliance regularly (See “Cleaning and Care”) Do- Keep raw meat and poultry below cooked food and dairy products. Do- Take off any unusable leaves on vegetables and wipe off any soil. Do- Leave lettuce, cabbage, parsley and cauliflower on the stem. Do- Wrap cheese firstly in greaseproof paper and then in a polythene bag excluding as much air as possible. For best results take out of the fridge compartment an hour before eating.
Don’t- Exceed the maximum freezing loads (4 kg in any 24 hours) when freezing fresh food. Don’t- Give children ice-cream and water ices direct from the freezer. The low temperature may cause ‘freezer burns’ on lips. Don’t- Freeze fizzy drinks. Don’t- Try to keep frozen food which has thawed, it should be eaten within 24 hours or cooked and refrozen. Don’t- Remove items from the freezer with wet hands. Don’t- Close the freezer door before placing the compartment cover in its place.
8 How To Obtain Service Please keep your purchase receipt or other proof of purchase in a safe place; you will need to have it should the product require attention under guarantee. You should also complete the details below; it will help us assist you when requesting service.
9 Guarantee Details Your new BLOMBERG product is guaranteed against the cost of breakdown repairs for three years from the date of the original purchase. What is covered? • Repairs necessary as a result of faulty materials, defective components or manufacturing defect. • The cost of functional replacement parts, but excluding consumable items. • The labour costs of a BLOMBERG approved repairer to carry out the repair. What is not covered? • Transit, delivery or accidental damage or misuse and abuse.
WARNING ! * DO NOT USE ANY COPPER POT, DISH INSIDE THE CABINET! * DO NOT LOAD ANY FOOD WITHOUT PACKAGE! WARNUNG ! * BENUTZEN SIE KEINERLEI KUPFERGESCHIRR IM GERÄT! * GEBEN SIE KEINE UNVERPACKTEN LEBENSMITTEL IN DAS GERÄT! AVERTISSEMENT ! * N'UTILISEZ PAS DE RECIPIENTS OU DE PLATS EN CUIVRE A L'INTERIEUR DES COMPARTIMENTS ! * N'INTRODUISEZ PAS DE DENREES NON EMBALLEES Blomberg, 36-38 Caxton Way, Watford, Hertfordshire, WD18 8UF Tel: 0845 6048340 Fax: 0845 6004922 email: service@blomberguk.com www.