
Installation Guide
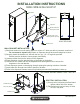

HOLE SPACING
A
6"
15"
1"
WALL BRACKET INSTALLATION:
1) Mark hole locations on wall making sure one column of 2 holes are able to penetrate a wall stud.
Do not mount to drywall only.
Bottom of dispenser should be at same height as counter.
2) Securely attach the bracket to a wall with the four qty. 1/4" x 2" lag bolts provided.
Bracket must be leveled to insure proper functionality.
3) Unscrew rubber feet from the bottom of the dispenser.
4) Place dispenser onto the bracket lining up the holes on the bottom.
5) Reinsert all four rubber feet into the dispenser and hand tighten them to secure the
dispenser to the wall bracket.
6) Route dispenser power cord and plug through rectangular opening in bottom of bracket.
7) Install water line through round hole in bottom of bracket.
8) Refer to the dispenser owners manual for plumbing and electrical installation & start-up.
INSTALLATION INSTRUCTIONS
MODEL FMWB-5G WALL MOUNT KIT
2M-Z15995 (Rev -)
Lag Bolt
Rubber Foot
Wall Bracket
Dispenser
DRIP TRAY INSTALLATION:
1) Line up holes in drip tray shelf and hand
tighten rubber feet to the bottom.
2) Place plastic trip tray into array of holes
on top of tray shelf.
OPTIONAL MODEL WMBDT DRIP TRAY KIT
Rubber Foot
Plastic Drip Tray
Drip Tray Shelf
Route water line
through this hole
Route power cord
through this opening
8
3
32
"