
Assembly & Installation Instrutions


Hardware Package (included):
TO AVOID RISK OF ELECTRICAL SHOCK, BE SURE TO SHUT OFF
POWER WHILE INSTALLING OR SERVICING THIS FIXTURE.
Turn off the power at fuse or circuit box.
Long Screw (A)
Wire Connector (B)
Turn on the power at fuse or circuit box.
Installation Steps
ASSEMBLY AND INSTALLATION
INSTRUCTIONS
Warning: LED electronics can be damaged by electro static discharge (ESD)shock. Before
installation, discharge yourself by touching a grounded bare metal surface to remove this
hazard. To avoid damage, do not touch the LED module.
NOTES: 1. Before installing, consult local electrical codes for wiring and grounding requirements.
2. READ AND SAVE THESE INSTRUCTIONS.
WARNING:
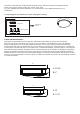
1.Unscrew the three cap nuts to remove the metal ring and the
plastic shade from the ceiling pan.
2.Attach the two long screws(A) to the holes on outlet box, thread
them in part way: 2 to 3 turns only.
3. Connect the black to black (power), white to white (neutral) and
green / yellow wire to ground wire with supplied wire connectors(B).
Tuck all wires into outlet box.
4. Attach the ceiling pan to the outlet box by inserting two long
screws head into the key holes(A), and then rotate the ceiling pan
until it is locked in place, finally secure the long screws tightly with
screwdriver (not included).
5. Attach the plastic shade to the ceiling pan,secure it in place by
inserting the metal ring into the threaded studs with cap nuts.
Module
Ceiling Pan
Threaded Stud
Plastic Shade
Metal Ring
Cap Nuts
Outlet Box
Long Screw(A)
Wire Connector (B)
Ground Wire