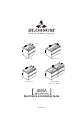
luxury made simple V8018 24 23/24 V8018 36 23/24 V8018 30 23/24 V8018 48 23/24 (two 23-1/2” vanities) JENA Specifcation & Installation Guide www.blossomus.
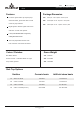
JENA luxury made simple JENA Series Vanities Specifcation & Installation Guide Features Package Dimension Furniture grade water proof polyvinyl 24” 26-3/8'' X 20-15/32'' X 24-1/64'' Chloride board, protected with several 30” 32-43/64'' X 20-15/32'' X 24-1/64'' Coats of polyurethane. 36” 38-37/64'' X 20- 15/32'' X 24-1/64'' Night lights & drawer lights with touch switches on both side panels. Luxury look Calacatta White or Light Grey matte glass drawer fronts.
JENA luxury made simple JENA 48” 47'' X 18'' X 20-3/4'' 30” 29-5/16 X 18'' X 20-3/4'' Series Vanities Specifcation & Installation Guide 36” 24” Side View www.blossomus.
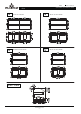
JENA luxury made simple JENA Series Vanities Specifcation & Installation Guide (not includes) Anchors Lag Bolt Leveling Bracket Bolt Wall Preparation The typical dimensions shown will result in vanity cabinet height of 32-3/4” (831mm). Depending on the sinks selected, the total height will vary from 33-1/2” (850mm) 35-1/4” (895mm). If an alternate height is desired, adjust the rough-in and backing material heights using the dimensions provided.
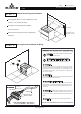
JENA luxury made simple STEP 1. JENA Series Vanities Specifcation & Installation Guide Cabinet positioning and installation The suggestion height of vanity installation is 32-3/4” (831mm) - not including the basin. The height of Leveling Bracket Installation 6-1/3” (160mm) is 26-1/2” (671mm). Please reserve the power around 21-5/8(550mm) The suggestion install height 32-3/4” (831mm) off ground. STEP 2. Leveling bracket installation & Wiring WARNING: Shut off power before wiring the vanity.
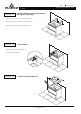
JENA JENA luxury made simple STEP 3. Specifcation & Installation Guide Hang the cabinet on the leveling bracket and adjust it horizontally Place vanity on leveling bracket, Leveling brackets are only to level the vanity. They are not designed for permanent support. Vanity needs to be secured into the wood backing material. STEP 4. Fixed Cabinet Install Lag Bolt after determined the height, left & right position then fix the Vanity. STEP 5. Series Vanities Install sink top with Silicone www.
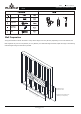
JENA luxury made simple 48” JENA Series Vanities Specifcation & Installation Guide If you need to install a 48" double basin Please link the wiring together after combined both vanities WARNING: Shut off power before wiring the vanity. Link the wiring of both vanities * Please make sure the color of both wiring is matched. Please link the wiring together after combined both vanities and follow up by Intersect Step 2. Screw STEP 6. Finish Other size 48” size www.blossomus.
Blossom Kitchen & Bath Supply Corporation luxury made simple (718)-366-0088 | sales@BlossomUS.com | www.BlossomUS.com For clarification, please contact us at (718)-366-0088 or sales@BlossomUS.com All dimensions are approximate and subject to standard tolerance. Specifications subject to change without prior notice.