
User's Manual


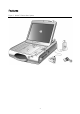
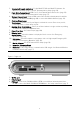


Table Of Contents
- Introduction
- Indications
- Intended Use
- Contraindications
- Technical Support
- Features
- Setup Instructions
- Maintenance and Troubleshooting
- Technical Data
- Symbols
- Symbols

4
1. Telemetry Strength Indicators. For the Merlin™ PCS and Merlin™ Antenna. See
Merlin™ PCS Setup (page 7) and RF Communication Setup (page 14).
2. Flash Drive Compartment (USB Port 1). See External Device Connection (page 18)
and Bluetooth Wireless Communication Setup (page 17).
3. Storage Compartment. Connect ECG cable and inductive telemetry wand. Install the
Merlin™ PSA Model EX3100 (page 10) or connect the Merlin Antenna (page 14).
4. Carrying Strap Loops.
5. Touchscreen. Use the pad of your finger to activate the screen. Do not use pencils,
pens, fingernails, or other sharp objects.
6. Rhythm Strip Print Buttons. Select one of these buttons to begin continuous printing
of markers and ECG and EGM waveforms.
7. Paper Tray Door. See Printer Paper (page 20).
8. Display Latch.
9. Shock Button. Select this button to display the Shock screen. See Emergency
Operation (page 18).
10. VVI Button. Select this button to reprogram a device to high-output Emergency VVI
settings. See Emergency Operation (page 18).
11. Merlin Antenna. See RF Communication Setup (page 14).
12. Inductive Telemetry Wand.
13. Bluetooth
®
Low Energy wireless communication USB dongle. See Bluetooth Wireless
Communication Setup (page 17).
Figure 2. Right side
1. Wi-Fi‡ port
2. Ethernet port
3. PSA port. Connect the PSA Wand Model 3150 or an additional telemetry wand here.
Do NOT connect the Merlin PSA Model EX3100 here. See Setup Instructions (page 7).