Owner’s Manual Model: Speedy Wash Speedy Wash-92141 www.arblueclean.
I ntroduction Congratulations on the purchase of your BLUE CLEAN POWER WASHER! Your BLUE CLEAN POWER WASHER is a power tool in every sense of the word that may be used outside your house and in. It is one of the finest most powerful home-use power washers in the marketplace today. Speedy Wash features include: A proprietary, all-aluminum, water pump. A full 12-month “bumper to bumper” warranty on the power washer and all parts/accessories.
TABLE OF CONTENTS Page Introduction 2 Safeguards, Warnings, and Safety Tips 3, 4, 5 Package Contents 6 Unpacking & Assembly Instructions 6, 7 Operating Instructions 8 Operating Tips and Maintenance 8, 9, 10 Storage 10, 11 Pump Saver 11,12 Troubleshooting 13 Replacement Parts 14 Specifications 15 Limited Warranty & Warranty Returns 15 S afeguards , W arnings and S afety T ips • To avoid personal injury and/or damage to property and to maximize
• To avoid mishaps or injury, always use the trigger safety lock when not using the power washer even if the spraying stops for a moment. • The power washer is equipped with a Ground Fault Circuit Interrupter (GFCI) which greatly reduces the chance of electric shock while the unit is in use. • Point the spray gun in a safe direction when beginning a power washing session.
• Never allow the power washer pump to run for more than one minute, after you have turned off the water supply. This can cause the motor and pump to overheat and fail. • Never use lances or other parts that have not been supplied with your power washer. • Never use an extension power cord since it defeats the effectiveness of the GFCI and increases the chance of electrocuting the operator. • Never spray any electrical outlet with your power washer. • Inspect the power cord before using.
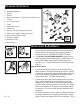
P ackage C ontents : 1. Power washer unit 2. Handle attachment 1 3. Wheels 14 4. Manual 2 5. Nozzle cleaning wire - taped to the manual for safe keeping 15 6. 3 in 1 spray nozzle 12 7. Lance 4 8. High pressure hose 3 11 8 6 9. Fixed brush 5 10. Spray gun (D shows trigger lock button) 7 13 11. Garden hose adapter (blue/grey/orange) 9 12. Quick connect adapter (clear) 10 13. Accessory adapter D 14. Detergent suction 15. Screws (two) U npacking & A ssembly Fig. 1 Fig.
Spray Gun • D Switch OFF Fig. 6 Fig. 5 To lock the trigger of the spray gun, make sure power is off (O) (Fig. 5) aim the spray gun away from you and push the lock button up, (Fig. 6) after doing so, squeeze or pull the trigger to make sure it is locked and will not move. Get in the habit of leaving the lock button in the “locked” position when the power washer is not in use. This ensures the gun is in “safe” mode until it is ready for use.
O perating I nstructions Switch ON Fig. 11 Switch OFF • Make sure the “ON/OFF” switch is in the “OFF” position. The power switch has international symbols for ‘on’ and ‘off’: On ( | ) (Fig. 11) Off (O) (Fig. 12). • Unwind the power cord completely and plug the GFCI into a grounded 120 volt outlet. Press the ‘reset’ button on the GFCI box (Fig. 13). The indicator window should show a red color. This must be done each time the unit is plugged in.
o the fan pattern of the nozzle (when using the adjustable nozzle) o the angle of the water spray to the surface being cleaned o the distance of the nozzle from the surface being cleaned Fig. 18 Fig. 19 • Never use a narrow high pressure stream of water from the lance on soft surfaces susceptible to damage. Nozzle Functions • Turbo Setting: (Fig. 18) The turbo nozzle has a pulsating, rotating flow of high pressure water spray. Use on hard, uneven surfaces like concrete and patio bricks.
bottom up for same reason. • If a stain is particularly tough, it may be necessary to reapply the detergent and use a stiff bristled brush to scrub the stain. Subsequent power washing after brushing should successfully complete your cleaning job. Fixed Brush Use • Attach the fixed brush to help scrup surfaces to get them clean. Can be used on lawn furnitrue, automobiles, RVs, motorcycle, boat ect.
S torage • When your power washing session has been completed. 1. Turn water supply off. 2. Disconnect the garden hose. 3. Pull the trigger on the spray gun for 30 seconds twice to release any remaining water pressure Fig. 23 4. Turn off the power switch located on the front of the power washer. Off (O) 5. Unplug the power washer. 6. Disconnect the high pressure hose from the back of the machine and the bottom of the spray gun. Attach Spray Gun or Lance 7.
power washer. 4. Screw the dispensing valve on the bottle of the Pump Saver into the water inlet on your power washer. (Fig. 25) 5. Turn the valve on the bottle to the open position. 6. Pull trigger on spary gun. Fig. 25 En - 12 7. Turn the power washer on. Turn the power washer off as soon as the Pump Saver fluid begins to exit the water outlet. 8. Turn the valve on the bottle to the off position and remove the Pump Saver bottle valve assembly from the power washer.
T roubleshooting Unit will not turn on. and FAQ s Make sure the power washer is in the “OFF” position. Plug in the electrical cord to a grounded 120 volt outlet (no electrical extension cord should be used). If the electrical cord will not plug into your outlet, your electrical outlet is not properly grounded and should not be used. Use another electrical outlet. Press the reset button on GFCI power box. If the color of red is not visible in the little window on the GFCI, unplug and plug in again.
R eplacement P arts 5 9 6 4 2 3 7 8 10 1 Pos. 1 1 1 2 2 2 3 4 5 6 7 8 9 10 Description Spray Gun (Blue) Spray Gun (Grey) Spray Gun (Orange) Extension Lance (Blue) Extension Lance (Grey) Extension Lance (Orange) Fixed Brush Adapter 3 in 1 Nozzle Quick Connect Filter (clear plastic) Garden Hose Adapter (blue/grey/orange) Electric Cord w/GFCI Fixed Brush High Pressure Hose GFCI Assembly Pump Spare Part Kits Water Seals & Valves Pre-Assembly TSS O-Ring Kit En - 14 Part Number Qty.
S pecifications Model Speedy Wash Max PSI Max GPM (lbs/sq/in) (gal/per/min) 1,600 1.45 Max Temp Volts Amps Weight (lbs) 122° F 120 14 18 L imited W arranty This product is under warranty to the original retail consumer against defects in material and workmanship for a period of 1 (one) year and is a complete “bumper to bumper” warranty including the spray gun, the high pressure hose and all accessories from the date of purchase. The warranty is not transferable or assignable.
Model Speedy Wash www.arblueclean.