0” ELECTRIC POLE SAW WARNING This product contains or, when used, produces a chemical known to the State of California to cause cancer and birth defects or other reproductive harm. (California Health & Safety Code § 25249.5, et seq.) *Actual product may vary slightly Please carefully read and save these instructions before attempting to assemble, maintain, install, or operate this product. Observe all safety information to protect yourself and others.
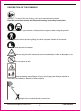
DESCRIPTION OF THE SYMBOLS Warning – To reduce the risk of injury, user must read instruction manual Read the instruction manual and follow all warnings and safety instructions. Wear ear protection, eye protection, safety helmet and gloves when using the product Clothing must be sturdy and snug-fitting, but allow complete freedom of movement. Wear protective footwear Remove plug from the main power source immediately if cable is damaged or cut. Do not expose to rain. Keep bystanders away.
INTENDED USE The chainsaw with telescoping arm is intended for removing branches from trees. It is not suitable for extensive sawing work and felling trees or for the sawing of materials other than wood. Please observe that our machine was not designed for use in commercial, technical or industrial applications. We assume no liability if the machine is used in commercial, technical or industrial applications or for equivalent activities.
3. Personal safety a) Stay alert, watch what you are doing and use common sense when operating the tool. Do not use the tool when you are tired or under the influence of drugs, alcohol or medication. b) Use safety equipment. Always wear eye protection. c) Avoid unintentional starting. Make sure that the switch is in the off position before plugging the tool into the main power source and/or fitting the batteries, picking it up or carrying it. d) Remove any adjustment key before operating the tool.
• • • • • • • • • • • • • • • • • • • Cut wood only. Do not use chain saw for purposes not intended. Follow the manufacturer’s instructions for operation, sharpening and maintaining the saw chain. The risk of kickback is increased when the pole is in short position. Take special care when cutting undergrowth and young trees. Do not cut into the ground, metal fences or similar unsuitable items and materials.
As a chain saw user, you should take all necessary steps to keep your cutting jobs free from accident or injury. Kickback is the result of tool misuse and/or incorrect operating procedures or conditions and can be avoided by taking proper precautions as given below: a) Maintain a firm grip, with thumbs and fingers encircling the pole saw handles, with both hands on the saw and position your body and arm to allow you to resist kickback forces.
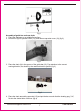
Fig.1 Assembly of guide bar and saw chain 1. Place the chainsaw on a suitable flat surface. 2. Loosen nut (8) on sprocket cover (13), and remove sprocket cover (13) (fig.2) Fig 2 3. Place the chain (9) in the groove of the guide bar (10). Pay attention to the correct running direction, as shown by the rotation direction symbol (fig.3) Fig.3 4. Place the chain around the sprocket (15) and put the bar on such that the locating peg(14) fits into the slotted hole of the bar. (fig.
Fig.4 5. Install the sprocket cover (13) (fig.5): The thread bolt (18) is the holder for the nut (8). The hole (17) in the guide bar (10) is the holder for the chain tensioning pin (16). Turn the hand wheel (12) to adjust the chain tensioning pin (16) and make it into the hole (17). 6. Tighten the nut (8) lightly by hand, as the saw chain still has to be tensioned. (fig.5) Fig.5 PREPARATION BEFORE WORK Attention! Always pull out the main plug before inspection and adjustment work.
2. Turn hand wheel (12) in a clockwise direction until the correct chain tension is reached. (fig.6) Fig.6 3. The correct chain tension is reached when the chain in the middle of the bar can only be lifted by approximately 2 mm.(fig.7) Fig.7 4. Tighten the nut by turning it clockwise. (fig.6) 5. Check whether all chain links lie correctly in the guide tracks of the bar. Attention! Tensioning saw chain too tightly will overload the motor and cause damage. Insufficient tension can cause chain to derail.
Fig.8 Filling the oil tank (Fig. 8) • Place the chainsaw on a level surface. • Clean the area around the oil tank cap (7) and then open it. • Fill the oil tank with chainsaw oil. In doing so, make sure that no dirt gets into the oil tank so that the oil nozzle does not clog. • Close the oil tank cap (7).
Fig.9 1. Swing out the telescopic handle lock (5) on the telescopic handle (22). 2. Pull or push to adjust the length of the telescopic handle (22). 3. Lock the telescopic handle lock (5). Putting on the shoulder strap (Fig.10) Always wear a shoulder strap when working with the equipment. Always switch off the equipment before loosening the shoulder strap. 1. Put on the shoulder strap (3). 2. Adjust the strap length so that the carabiner hook is at hip height. Fig.10 3.
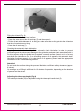
3. Wear the shoulder belt so that it lies over the left shoulder (Fig. 12). Fig 12 Connection to the main power supply • Connect the main power cable to a suitable extension cable. Make sure that the extension cable is designed to accommodate the power of the chain saw. • Secure the extension cable against tractive forces and accidental unplugging as shown in (Fig.13). Fig 13 OPERATION Switching on/off (Fig.
Fig 14 Switching off • Release the on/off switch (23). Always pull out the main plug when discontinuing the work. Safe work • Before beginning work and after dropping or other impacts, inspect the chainsaw in order to identify any significant damage to the housing, the main cable, the saw chain and the guide bar. Never use an obviously damaged machine. • Before beginning work and regularly during work, check oil level, lubrication system and chain tension.
• • Do not saw with the tip of the guide bar. Important! Use the shoulder strap ! Always use the shoulder strap when working with the equipment. Switch off the equipment before you take off the shoulder strap (risk of injury). And hold the pole saw firmly with both hands Working time and working posture Always keep a firm footing and balance position during operation. It takes lots of energy to cut the branches.
Fig 17 Make a relief cut when sawing thick branches. a) First saw through 1/3 of the branch diameter from bottom to top using the top side of the guide bar. b) Then saw from top to bottom to the first cut using the bottom side of the guide bar. c) Saw off longer branches in sections in order to maintain control over the location of impact.
Maintenance Daily Weekly Monthly maintenance maintenance maintenance Clean the outside of the machine. X Check that the on/off switch works correctly. X Check the tension of the saw chain. X Check that the saw chain is undamaged and shows no signs of cracking or other damage. Replace the saw chain if necessary. X Check that the guide bar is secure, undamaged and not deformed. X Check that the nuts and screws are tight. X Check that the oil supply works correctly.
TROUBLE SHOOTING Chainsaw does not operate Chainsaw operates irregularly No current power supply Defective Plug Power cord damaged Main power cable damaged External loose connection Internal loose connection Defective on/off switch Saw chain dry Chain/guide rail hot No oil in the tank Ventilation in the oil tank cap clogged Oil tank flow channel clogged No oil in the tank Ventilation in the oil tank cap clogged Oil tank flow channel clogged Dull chain Chain tension too loose Dull chain Chainsaw jumps
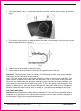
COMPONENTS 1. Cable strain relief 2. Padded grip 3. Shoulder strap 4. Auxiliary handle 5. Telescopic handle lock 6. Motor housing 7. Oil tank cap 8. Nut 9. Chain 10. Guide bar 11. Carrying eyelet for shoulder strap 12. Hand wheel 13. Sprocket cove customerservice@focus-ontools.
Limited Manufacturer Warranty FOT makes every effort to ensure that this product meets high quality and durability standards. FOT warrants to the original retail consumer a 1-year limited warranty from the date the product was purchased at retail and each product is free from defects in materials. Warranty does not apply to defects due directly or indirectly to misuse, abuse, negligence or accidents, repairs or alterations, or a lack of maintenance.