Pager and Charger Guide Part Number 321045B5 Premises Pager System® QuikCall™ Pagers
Introduction Introduction: Congratulations on your purchase of a JTECH Paging System. Please take a few minutes to review this manual prior to installing and operating your system. Please inspect the System upon receipt. If the contents appear to be damaged, notify the shipper immediately to file a claim and notify JTECH Customer Care. If any component is missing, please contact JTECH Customer Care.
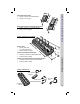
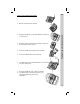
Define what transmitter is to be used. Note: W W H JTECH L Pager (With Promotional Paddle And Inserts): LxWxH 1.2x 2.2x 7.7” (31x56x196mm) Weight 4.4oz. (124gm) H L Charger Dimensions and Weight Charger Only LxWxH 13.5x 4.8x 2.6” (343x122x65mm) Weight 1.64lbs (0.75kg) L Charger and 10 Pagers With Clips: LxWxH1 13.5x 4.8x 4” (343x122x102mm) Weight 3.41lbs (1.55kg) H1 H Charger and 10 Pagers With Promotional Paddles: LxWxH2 13.5x 4.8x 8.8” (343x122x224mm) Weight 4.
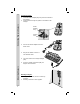
Connecting Power: 1. Mounting Chargers Connecting Power to Chargers 2. 4 Insert the Power Adapter plug into jack on the bottom of the Charger. Feed the wires through the guides in the bottom of the Charger. Power Adapter Plug Charger Jack 3. Connect the Power Adapter to the AC Power Cord. 4. Plug the AC Power Cord into a 110-240VAC outlet. 5. The green LED on the Charger will light (ON). 6. Once the Charger is powered (ON), the Pagers can be inserted.
Combining Chargers: If two Chargers are to be used, they can be combined with one 2.4A Power Supply. To combine: 1. Use a screwdriver or similar tool to extend the metal tabs out from one of the Chargers. 2. Place both Chargers on a table and slide together. The metal tabs will lock both Chargers together. Power Adapter Plug Charger Jack 4. Use the Jumper Wire (optional) to connect both Chargers together. 5. Feed the wires through the guides in the bottom of the Charger. 6.
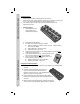
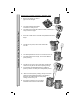
Connecting Power to Chargers Charging Pagers: Pagers are turned OFF during shipment from JTECH. When first received, Pagers must be charged for a minimum of 3 hours prior to use. This first charge will also turn ON the Pagers for use. The charging system is two stage, with a fast initial and then final maintenance charge. Charging Pagers: 1. Insert Pagers into the empty locations of a powered (ON) Charger. 2. 3. 4. 5. Charging and Storing Pagers 6. Each Pager’s LED will light.
Paging Using a Desktop Controller: 2. The Pager will vibrate and it’s LEDs will flash to confirm it is ready for use. 3. The Pager charge LED will continue to flash, confirming the it is ready to receive a page. 4. Enter the number of the Pager on the Controller. 5. Press # or SEND button to send the page. 6. The XMIT light on the Controller will turn ON, confirming the page is being sent. Paging Using a Desktop Controller 1. Remove a Pager from the Charger. 7.
Paging Using a Kitchen Controller or Expeditor Panel: 1. Remove the Pager you wish to page from the Charger. 2. The Pager will flash and vibrate to confirm it is ready for use. The Pager charge LED will continue to flash, confirming it is ready to receive a page. Paging Using a Kitchen Controller or Expeditor Panel 3. 4. Press the number on the Controller or Expeditor Panel of the Pager. 5. The light on the panel, next to that number will turn ON. 6. 7.
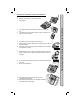
1. Remove the Pager you wish to page from the Charger. 2. The Pager will flash and vibrate to confirm it is ready for use. The Pager charge LED will continue to flash, confirming it is ready to receive a page. 3. 4. 5. 6. Pick up the phone and listen for the dial tone. Dial the phone number that has been assigned to the TELCO Module installed. Listen for a voice message from the telephone that confirms the Controller is ready. 7.
Replacing the Clip : There are 3 Clip attachments; Metal, Spring or Paddle. To replace a Clip or Paddle: 1. 2. Turn the Pager over. Push or pull the small plastic tab as shown in below and slide the Clip or Paddle off. Slide the new Clip or Paddle on until a “click” can be heard, locking the clip or paddle onto place. 3.
Replacing the Insert: 3. 4. 5. 6. 7. JTECH JTECH Turn the Pager over. Using a flat blade screwdriver or equivalent to unlock the clear plastic cover. Slide the clear plastic cover out. Remove the Insert. Replace with a new Insert. Replace and slide the clear plastic cover into place. When inserted completely, the cover will “snap” into place. Replace and tighten the screw (do not over tighten). Inserts 1. 2.
SYSTEM WARRANTY JTECH Communications, Inc. warrants its equipment to be free from defects in materials and workmanship for a period of one year. Its obligation under this warranty is limited to repairing or replacing, at its own sole option, any such defective products. Products must be returned with transportation charges prepaid. All warranty returns must also include a JTECH-issuesd RMA number, clearly displayed on the interior and exterior of the package(s).