
User's Manual
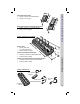
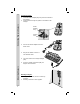

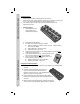
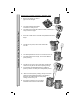
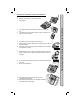
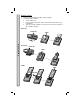


Table Of Contents
- QuikCall Pagers Cover Page 321045
- Introduction
- Pager C ertifications
- Pager Dimensions and Weights
- Charger Dimensions and Weights
- Charger Components
- Connecting Power
- Mounting Chargers
- Combining Chargers
- Charging and Storing Pagers
- Paging Using a Desktop Controller
- Paging Using a Kitchen Controller or Expeditor Panel
- Paging Using a Desktop Controller and Telephone
- Replacing the Clip
- Replacing the Insert
- Insert Dimensions
- Replacing the Battery
- System Warranty - Back Page

11
Lo
os
e
n
Replacing the Insert:
1. Turn the Pager over.
2. Using a flat blade screwdriver or
equivalent to unlock the clear
plastic cover.
3. Slide the clear plastic cover out.
4. Remove the Insert.
5. Replace with a new Insert.
6. Replace and slide the clear plastic
cover into place. When inserted
completely, the cover will “snap” into place.
7. Replace and tighten the screw (do not over tighten).
Inserts:
Inserts can be professionally printed (call
your JTECH sales representative for more
details).
Material thickness is 0.020” (5.1mm)
maximum.
Replacing the Battery:
1. Batteries that no longer charge properly or have a reduced operating
time can be replaced by the user.
2. If using a Spring Clip, it must be removed to access the battery door
screw.
3. Use a #1 Philips screwdriver to remove the screw.
4. Slide the battery door and Pager Clip off.
5. Carefully slip a screwdriver tip under the plastic wrapper on the battery
pack and lift the battery out.
6. Unplug the battery connector.
7. Dispose of the Nickel Metal Hydride battery pack at any retail
department or home improvement stores that recycles batteries.
8. Plug the new battery into the Pager’s connector.
9. Push excess battery wire into the space next to the connector.
10. Press the battery into the Pager compartment.
11. Replace the battery door, clip and screw (do not over tighten).
12. Insert the Pager into the Charger and fully charge the battery.
Insert Dimensions
4-1/2” (114.3mm)
1-7/8” (47.6mm)
Replacing the Battery Inserts
J
T
E
C
H
J
T
E
C
H
J
T
E
C
H
T
ig
hten