
User Manual

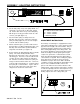

292-2215 7/02 8 of 10
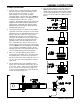
initial setting, adjust to your driving preference if
needed. The location of the adjusting nut is shown
in Figure 23. The initial preload ranges are listed in
Figure 24.
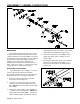
10. Once you have the cable wrapped properly, pull
slowly on the other end of the cable while holding
the pulleys and swage in place with the other hand
to prevent the cable from unwrapping. Keep tension
on the cable and slide the pulleys into the AutoStop
tube. (Figure 20) When the second set of pulleys
start into the tube, stop and remove the 5/8 rod.
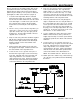
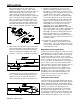
Figure 21
ASSEMBLY INSTRUCTIONS
Figure 20
11. Pull slowly on the cable until the holes in the
second set of pulleys line up with the holes in the
end of the AutoStop tube and insert the 5/8 rod.
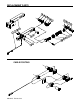
12. With the AutoStop still on its side, be sure that the
pulleys, cable anchor, and pulley divider are all
together and pressed down to the side of the tube.
Place a 20 thousanths inch (.020") feeler gauge
between the cable anchor and wide pulley and
tighten the set screw in the end of the cable anchor.
(Figure 21) NOTE: Be sure to keep the
5/8 rod centered in the AutoStop tube while
tightening the set screw.