
User guide
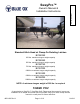


SwayPro™ Owner’s Manual & Installation Instructions
405-0120 Rev K Page 4 of 10 8/16/13
Installation
1. Park the towing vehicle and trailer in a straight line on rm, level ground. Air-ride shock
absorbers, air springs, or automatic leveling systems on towing vehicle should be disabled or
deated to the manufacture’s minimum recommended pressure prior to SwayPro™ installation.
Unhook the trailer from the towed vehicle and level. Remove the existing receiver hitch.
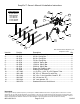
2. Insert the hitch mount receiver shank into the towing vehicle receiver and secure with the 5/8” x
3” pin and clip.
3. Install the appropriate ball (not provided) to match the coupler onto the hitch head per ball
manufacturer’s instructions. Use the 1.031 ID spacer tube for 1” ball shank. The hitch ball
capacity must meet or exceed the gross trailer weight rating.
4. Level the trailer and then measure the coupler height. Install the hitch head onto the receiver
shank, using the 3/4”-10 bolts, 3/4” lock washers and 3/4”-10 hex nuts. Measure the hitch head
ball height. The ball height needs to be 1” to 2” higher than the trailer coupler height, adjust as
necessary. Torque the 3/4”-10 bolts to 257 ft/lbs.
5. Couple the trailer to the hitch head by placing the trailer coupler onto the hitch ball per the
manufacturer’s instructions.
6. Measure 29” back from the center of the ball coupler and mark this point on the trailer tongue
frame work on both sides. Center and mount the rotating latches to the trailer frame over the
marked areas. Remove or relocate any obstructions on the trailer tongue framework if necessary.
Finger tighten the bolts on the rotating latch at this time.
7. Insert the spring bars into the bar pivots until the manual release pins snap closed and locks the
bars in place.
8. After verifying that the rotating latches are in the proper position, torque the 1/2”-13 square head
set screws against the trailer tongue framework to 40 ft. lbs and tighten the jam nut.
IMPORTANT: The spring bar chain must be straight up and down in the center of the rotating
latch when the towing vehicle and trailer are aligned. Reposition the rotating latch along the trailer
frame if necessary.
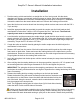
9. Release the rotating latch by rotating or pulling out on the lock pin handle.
Rotate the bracket using the wrench that was provided and turn clockwise until
the chain slot is on the bottom. Insert the chain with desired chain link into the
slot of the latch. Using the wrench, rotate the latch counterclockwise until the
lock pin engages in the lock pin hole.
Note: The suggested starting point is to have three (3) full chain links showing
under the latch. Do this on both sides of the trailer.
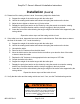
Caution must be used when unlatching due to the potential of injury if the tension of the spring
bar is suddenly released the wrench will rotate quickly. Hold the wrench rmly as the rotating
latch bracket will rotate downward causing a quick jerk on the wrench. Rotate slowly and rmly.