
User guide
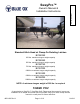


SwayPro™ Owner’s Manual & Installation Instructions
405-0120 Rev K Page 6 of 10 8/16/13
Unhooking
1. While holding the wrench rmly, release the locking pin handle on the latch by rotating or pulling
out on it. Rotate the latch clockwise until the chain is released from the latch. Do this on both
sides of the trailer. Optional: Supporting the trailer tongue weight with the trailer jack eases the
tension on the spring bar chains and allows easier unlatching.
The latch will rotate quickly when the locking pin is released. Ensure you have control of the
wrench when releasing.
2. Disconnect the spring bars by pulling outward on the bars then slightly pulling up on the locking
pins to release the bars from the bar pivot tubes.
3. Unhook the trailer coupler from the hitch head.
4. Remove the hitch pin and clip from the hitch receiver.
5. Remove the hitch head/receiver mount assembly from the receiver tube.
Operation
Hooking Up
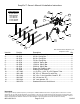
1. Install the hitch head/receiver mount assembly into the towing vehicle receiver tube and secure
with the 5/8” x 3” pin and clip.
2. Couple the trailer to the hitch head.
3. Install both spring bars into the bar pivot tubes.
4. Conrm that both of the rotating latches are tight on the tongue.
5. Attach the spring bar chains to the rotating latches with the appropriate chain link. Apply tension
to the spring bar by using the wrench to rotate the latch counter-clockwise until the locking pin
on the latch engages. Do this on both sides of the trailer. Optional: Supporting the trailer tongue
weight with the trailer jack eases the tension on the spring bar chains and allows easier latching.
NOTE: If your trailer and/or axle weight has changed since your last trip, adjustments to the
spring bar chains may be necessary.
DO NOT exceed the vehicle manufacturer’s
specication for trailer gross vehicle weight
or tongue weight as this may cause a serious
accident and/or injury while towing.
!
WARNING