Owners Manual Manual del Usuario Model No. 235000 U.S. Patent Number: 6,6102,031; 6,470,877; Hong Kong Patent Number: 1108587.1; All Other Foreign Patents May Apply. WARNING FOR YOUR SAFETY For Outdoor Use Only (Outside any enclosure) Solamente Para Uso En Exteriores (Fuera de cual quier recinto) WARNING FOR YOUR SAFETY Improper installation, adjustment, alteration, service or maintenance can cause injury or property damage.
® Contact 1.800.762.1142 for assistance. Do not return to place of purchase. WARNING WARNING FOR YOUR SAFETY FOR YOUR SAFETY For Outdoor Use Only (Outside any enclosure) WARNING FOR YOUR SAFETY Improper installation, adjustment, alteration, service or maintenance can cause injury or property damage. Read the installation, operation and maintenance instructions thoroughly before installing or servicing this equipment If you smell gas: 1. Shut off gas to the appliance. 2. Extinguish any open flame.
Contact 1.800.762.1142 for assistance. Do not return to place of purchase. ® Table of Contents Safety First! . . . . . . . . . . . . . . . . . . . . . . . . . . . . . . . . . . . . . . . . . . . . . . . . . . . . . . . . . . . . . . . 4 Assembly Instructions Components & Hardware . . . . . . . . . . . . . . . . . . . . . . . . . . . . . . . . . . . . . . . . . . . . . . . .
® Contact 1.800.762.1142 for assistance. Do not return to place of purchase. Safety First! Read and become familiar with this entire manual, especially the following precautions. If you are unsure of anything in these instructions, STOP and contact 1.800.762.1142 for assistance. Before you do anything else, read and understand all precautions in Safety First! Caution: This appliance is for outdoor use only (outside any enclosure). Always make sure there is fresh air ventilation.
Contact 1.800.762.1142 for assistance. Do not return to place of purchase. ® • In its natural state, propane has no odor. For your safety, an odorant is added that smells like rotten cabbage. • Contact with LP can cause freeze burns to skin. • This heater is shipped from the factory for LP gas use only. “20 lb.” LP Cylinder Valve Collar • Use only Department of Transportation (DOT) approved “20 lb.” LP gas cylinders (same as those commonly used on gas grills) with Acme / Type 1 / QCC safety valves.
Contact 1.800.762.1142 for assistance. Do not return to place of purchase.
Contact 1.800.762.1142 for assistance. Do not return to place of purchase. ® Assembly Instructions General Components & Features Familiarize yourself with all components before proceeding. Refer to page 6 for hardware and components, and page 21 for specifications. The white ceramic cone in the top of the engine is an important piece. DO NOT REMOVE. Do NOT attempt assembly unless all components are available. If you believe a component is missing or damaged, contact 1.800.762.1142 for assistance.
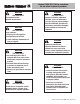
Contact 1.800.762.1142 for assistance. Do not return to place of purchase. ® Step 2 – Attach Platform to Legs Line up hole in clip (K) with small threaded hole on bottom of platform. Attach clip loosely to platform with large screw (B). Note: do not tighten until step 10. Using 7/16” wrench, secure platform to legs using 6 sets of large bolts (D), small lock washers (I), and small nuts (F). Tighten fully. Fully tighten all nuts and bolts from step 1.
Contact 1.800.762.1142 for assistance. Do not return to place of purchase. ® Step 4 – Insert Gas Line through Platform/Attach Shroud Cover Insert gas line up through large hole in platform from underneath between center and left leg as shown in illustration. Slide shroud cover over gas line, then over platform/leg assembly until bottom of shroud rests on base. Step 5 – Attach Small & Medium Dome to Engine Set engine assembly on its top as shown at left.
® Contact 1.800.762.1142 for assistance. Do not return to place of purchase. Step 6 – Attach Engine to Post Lay engine assembly on its side, using shipping carton for support. Remove and save control knob. Remove and save engine access panel by unscrewing black thumbscrew from bottom of access door. Disconnect wire from igniter by gently pulling wire from back of box. Align 4 holes in top of post with 4 holes in bottom of engine. Note: one hole is at a different level than the rest.
Contact 1.800.762.1142 for assistance. Do not return to place of purchase. ® Step 8 – Connect Gas Line to Engine Attach gas line to control valve: Pull collar of gas line back. (small arrow) Insert gas line over control valve. (large arrow) Release collar and it should lock in place. (Tip – push gas line up from bottom of post to make a good seating before releasing the collar.) Gently tug on line to test for proper connection. If gas line moves you are not properly connected.
® Caution Before you attempt to use a propane cylinder, understand all cylinder and propane related precautions in Section #1 - “Safety First.” Contact 1.800.762.1142 for assistance. Do not return to place of purchase. Step 11 – Connect Gas Line to Cylinder The pressure regulator and hose assembly supplied with the appliance must be used and replacements must be those specified by the manufacturer. • Slide full propane cylinder onto heater base.
Contact 1.800.762.1142 for assistance. Do not return to place of purchase. ® Step 13 – Replace Engine Access Panel Slide igniter wire onto igniter post. Slide tab at top of access panel into slot in emitter bottom. Rotate panel down until holes line up at bottom. Secure access panel in place with thumbscrew. Replace control knob. Step 14 – Install Igniter Battery Remove battery cover cap by turning cap counterclockwise. Install AA battery (L). Negative end of battery goes in first.
Contact 1.800.762.1142 for assistance. Do not return to place of purchase. ® Operation WARNING FOR YOUR SAFETY • Do NOT attempt to operate heater until you have read and understand all precautions in Section 1 “Safety First.” Failure to do so can result in serious personal injury, death, or property damage. • I f at any time you are unable to light burner and smell gas, wait 5 minutes to allow gas to dissipate before attempting to light heater.
Contact 1.800.762.1142 for assistance. Do not return to place of purchase. • If for some reason your ignitor fails to deliver a spark, your heater can be started by inserting a lit match through the pilot view hole while pushing the control knob in while in the PILOT position. If you experience any ignition problem consult “Troubleshooting” on page 17. Caution: Avoid inhaling fumes emitted from the heater’s first use. Smoke and odor from the burning of oils used in manufacturing will appear.
® Contact 1.800.762.1142 for assistance. Do not return to place of purchase. Operation Checklist For a safe and pleasurable heating experience, perform this check before each use. Before Operating q I am familiar with entire owner’s manual and understand all precautions noted in “Safety First”. q All components are properly assembled, intact and operable. q No alterations have been made. q All gas connections are secure and do not leak. q Wind velocity is below 10 mph.
Contact 1.800.762.1142 for assistance. Do not return to place of purchase. ® Troubleshooting If the problem is: Pilot won’t light And this condition exists: Tank valve is closed Blockage in orifice or pilot tube Air in gas line Note: Heater operates at reduced efficiency below 40ºF (5ºC).
Contact 1.800.762.1142 for assistance. Do not return to place of purchase. ® WARNING FOR YOUR SAFETY • Do NOT touch or move heater for at least 45 minutes after use. • Dome is hot to the touch. • Allow dome to cool before touching. Maintenance To enjoy years of outstanding performance from your heater, make sure you perform the following maintenance activities on a regular basis: Keep exterior surfaces clean. Use warm soapy water for cleaning. Never use flammable or corrosive cleaning agents.
Contact 1.800.762.1142 for assistance. Do not return to place of purchase. ® Storage Between uses: Turn Control Knob OFF. Disconnect LP source. Store heater upright in an area sheltered from direct contact with inclement weather (such as rain, sleet, hail, snow, dust and debris). If desired, cover heater to protect exterior surfaces and to help prevent build up in air passages. Note: Wait until heater is cool before covering.
® Contact 1.800.762.1142 for assistance. Do not return to place of purchase. Limited Warranty Blue Rhino Global Sourcing, LLC (“Vendor”) warrants to the original retail purchaser of this product, and to no other person, that if this product is assembled and operated in accordance with the printed instructions accompanying it, then for a period of two (2) years from the date of purchase, all parts in such product shall be free from defects in material and workmanship.
Contact 1.800.762.1142 for assistance. Do not return to place of purchase. ® Specifications Certifications: CSA International Requirement 5.90 Canadian National Standard CAN1-2.23-M82 Rating: Maximum 40,000 BTU/hr. input Heat Range: Up to 20 foot diameter Fuel: Liquid Propane Gas (LP) Cylinder Size: Nominal 20 lb / 5 Gallon Inlet gas supply pressure: Maximum – 150 PSI Minimum – 5 PSI Manifold Pressure: 11.00 in. W.C.
® 22 Contact 1.800.762.1142 for assistance. Do not return to place of purchase.
Contact 1.800.762.1142 for assistance. Do not return to place of purchase.
Manufactured in China for: Blue Rhino Global Sourcing, LLC Winston-Salem, NC 27104 USA 1.800.762.1142, www.bluerhino.com © 2006 Blue Rhino Global Sourcing, LLC. All Rights Reserved. Endless Summer® is a registered trademark of Blue Rhino Global Sourcing, LLC. All Rights Reserved.