
Installation Guide


Bringthewallclosetothebottomrail.
Make sure there is nothing in the bottom rail before inserting the wall. If there is
earth or something is in the bottom rail,take out it accordingly.
Begin to insert end of wall into bottom rail. One person unwinding wall (wall
should be on a plywood base for ease of rotating) while the other person is
feeding wall into slot of bottom rail around entire pool.
As you unwind the wall and insert it into the assembled bottom rails, temporarily
place top rail sections on top of the wall. This will help to prevent the wall form
bending or falling over.
Should the wall be either too short or too long,Adjust bottom rails,The
circumference of bottom rails can be adjusted slightly by equally tapping
outward or inward at the each lower joint until the wall ends meet.
Bring the two open ends of the wall together as shown above.
This is one of the most important steps in assembling the pool. Pay close
attention to the following points.
There is an up and down side on steel wall. Locate the skimmer cutouts
which are near the outside end of the wall. These cutouts must be at the
TOP even if you will not be using these cutouts .
Place coiled wall near bottom rail one section open.
8) INSTALLING WALL
It is practical if two people work together; one inside and one outside of the
pool.
Due to the weight of wall,some bending will occur in the top and bottom corrugation.
because the wall is built to flex. Simply bend those sections back before inserting wall in
top or bottom rail.
Use Wall Joint Bolt Package packed in a Wall Carton.
Bottom rails between the horizontal supports are set up by inserting each end of bottom rail into side lower joint,Insert the bottom rails around the entire
perimeter using lower joints on the circular portion of the pool.Leave one section open that will be nearest to where you will locate your filter.
Before proceeding to the next step, place a large amount to sifted earth in the middle of the circle. (see chart for the amount on the first page.)
Sifted earth should not contain any pebbles.
Place a patio block under each lower joint around curved area.Make sure top of patio block is flush with ground surface and top of horizontal support.
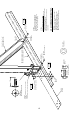
Before proceeding, remove the steel wall from carton and stand on a 3'x3' board inside pool area as shown at down. Put the liner, (leaving it in the
carton) inside pool area.
7) ASSEMBLING BOTTOM RAIL
Step 4:
STEP 1:
STEP 3:
Note:
STEP 2:
STEP
1:
STEP
2:
8
P.N.-0513
1/4 x 1/2in Truss Head Screw
1/2
P.N.-0611
1/4in Nut
WALL
WALL
NUT
INSIDE OF POOL
BOLT
REINFORCING
WASHER
P.N.-0411
1/4in Reinforcing Washer
φ 1 3/8
Wall
C
U
R
V
E
D
A
R
E
A
C
U
R
V
E
D
A
R
E
A
SIFTED
EARTH
SIFTED
EARTH
LI
N
E
R