
Full Product Manual

ASSEMBLY INSTRUCTIONS (Cont.)
5
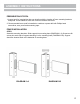
STEP 2-A
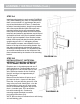
Install mounting bracket to each upright (DIAGRAM
2-A). When installing your fence, it is important that
there is no more than a 4" gap between the pool’s
top rail and the bottom rail of fence. To determine
location of mounting bracket, simply line up bracket
with a fence post attached (slide fence post onto
mounting bracket, but do not permanently attach
fence post to mounting bracket as it will need to be
removed), and measure gap between top rail of pool
and bottom rail hole in the post. Anywhere between
0 and 4" gap is acceptable. Once location is deter-
mined, remove post and attach mounting bracket to
upright using two #12 x 1” self-tapping screws.
Once installed, measure exact distance from the
bottom of the top rail to the mounting bracket. Use
that same measurement to determine location of
remaining mounting brackets. It is important to take
an accurate measurement as the levelness of the
fence is determined by the location of the mounting
bracket.
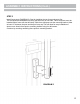
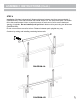
STEP 2-B
INSTALLATION OF “ARTIFICIAL
UPRIGHT” TO INSTALL FENCE UP
TO A-FRAME LADDER OR DECK:
Requires one 4 x 4 wooden post and one 2"
sheet-metal screw. Position ladder next to a
pool upright so it can hold the fence on one
side. Determine location for the "Artificial
Upright" and dig a hole approximately 6"
into the ground.
Measure from the bottom of hole to top of
pool and cut the 4 x 4 post to fit the span.
Place the 4 x 4 post into the ground so it fits
snug to the pool wall. Attach the 4 x 4 to the
pool structure by using one 2" sheet metal
screw. Screw down through the top rail into
the 4 x 4 wooden post. Fill in around the
hole with remaining dirt. Continue by
mounting support brackets to wooden
post using instructions (2-A).
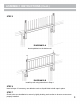
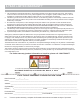
NOTE: Be sure the pool entrance has a self-closing
and self-latching gate.
DIAGRAM 2-A
DIAGRAM 2-B