
Owners manual


30www.AquaProducts.com/Service
CLIMBS TO WATERLINE THEN MOVES LEFT WHEN FLOATING HANDLE IS LOCKED IN ONE
DIRECTION, BUT DOES NOT MOVE RIGHT WHEN HANDLE DIRECTION IS REVERSED
Should your cleaner not move left/right when at the waterline in a consistent manner throughout its cleaning cycle due to
an obstruction or for an unknown reason, then your cleaner may not be able to reach and clean all areas of the pool and
may remain in one or two portions of the pool while missing others.
Check that the Floating Handle (Page 6. Fig. 6) is locked in a diagonal position (only applicable to models whose handles
require diagonal locking)
Side Pocket Floats (Page 15)
In rare situations the composition or temperature of the water may directly affect the buoyancy of a pool cleaner, whereby
it will move on one direction at the waterline, but not the other. Most models have two motors: a Pump Motor located in
the center of the cleaner’s body and a Drive Motor on one side of its body (Page 3, Fig. 1). In such cases the Drive Motor
side may be heavier than the non-motor side. To increase the buoyancy of the Drive Motor side, do the following:
Models with Bottom Lid Assembly (Page 4; Fig. 3a): Insert one Side Pocket Float into the Bottom Lid Assembly (Page 15,
FLOTATION), in one of the open slots beside the Debris Intake Ports. When reinserting the Bottom Lid Assembly back
into the body of the cleaner, be sure that the Side Pocket Float is on the Drive Motor side of your cleaner. Lock the Handle
diagonally.
If you have previously added any (combination) of the Flotation (Page 4; Fig. 3) provided into your cleaner, to assist its
buoyancy, it is suggested that you remove the devices one-by-one until proper buoyancy is restored and the noise has
lessened.
Squeaking
The cleaner is built from plastic, rubber and stainless steel components which may squeak as the cleaner operates. Apply
non-water soluble grease or oil to component contact points [i.e. where the Wheel Tube meets the Side Plate (Page 3, Fig.
1), where the Drive Pulley meets the Bushing (Page 19; Fig. 26a, 26b), etc.] to assure the smooth movement of these parts
and reduce squeaking.
Grinding
Check Drive Belts and Drive Tracks (Page 18, Page 19; Fig. 26a, 26b) for proper tension and alignment. Adjust or replace
if necessary.
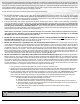
BUMPER
If your cleaner is becoming stuck or “stalled” against the pool wall on a regular basis,
you should install Bumpers on the ends of the Sideplates.
Figure 1
This shows the assembly of the Bumper to the Sideplate of the cleaner when viewed
from the underside. Be sure that the Bumper fits over the horizontal rib on the
Sideplate for proper assembly.
Figure 2
Note that it is normal for the Bumper to extend beyond the bottom edge of the
Sideplate when properly installed.
Figure 2
Bumper Assembly: Viewed from the side
Figure 2
Bumper Assembly: Viewed from underneath
Bumper
Side Plate
Bumper
Brass Insert
Screw
Washer
Wheel Tube Axle
Horizontal Rib
Side Plate
Wheel Tube Axle