PREMIUM ENTERPRISE TABLET RT100 USER Manual
This user manual is protected by copyright. The radio equipment can’t be used for life saving services because there is possibility to have radio interference and failure. This product’s partial functions might have problems from the environment, user program, and other machines. This product’s program is legally protected. Illegal copying, transmitting, or erasing of the program is prohibited. This user manual has been created by the Bluebird Inc.
Contents 1 Safety Precautions 1.1 Symbols ............................................................................................................................................. 01 1.2 Device ................................................................................................................................................ 01 1.3 Environment .......................................................................................................................................
Contents 7 Connecting to External Devices 7.1 Connecting to a Bluetooth Device (Windows) ................................................................................... 22 7.2 Connecting to External Devices (Android) ......................................................................................... 22 7.3 Connecting to USB Devices .............................................................................................................. 23 8 Customizing the Device (Windows) 8.
Contents 14 Help and Support 14.1 Preparing for Service ....................................................................................................................... 45 14.2 Bluebird Customer Service .............................................................................................................. 45 14.3 Conditions for After-sales Service ................................................................................................... 46 14.4 Charged Service ........................
1 Safety Precautions 1.1 Symbols This manual uses the following symbols to indicate hazards and additional information. Symbol Name Description Caution Indicates a potential hazard that could result in a minor injury or damage to the device. Note Indicates additional information that can help you get the most out of the device. 1.2 Device • Do not submerge the device in water or expose it to damp conditions. Doing so may damage the device and void the warranty.
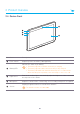
2 Product Overview This chapter explains the components included with the tablet package system and provides an overview of the tablet. 2.1 Package Components The device includes the following components. If any of these components are missing, please contact the retailer who sold you the device. RT100 tablet Micro USB cable Power adapter The images in this manual may not reflect the color and shape of the actual device. These illustrations are intended for descriptive purposes only. 2.
2 Product Overview 2.3 Device Front 4 1 2 3 5 No. Name Description 1 Front camera Captures pictures and video (2.0 megapixels). 2 Battery LED Indicates the status of the battery. • The battery LED turns red when the battery is charging. • The battery LED turns white when the battery is fully charged. • The battery LED blinks red and white alternately at 1 second intervals when the battery has a problem, such as it being too hot or too cold.
2 Product Overview 2.4 Device Back 3 4 5 6 1 7 8 2 No. Name Description 1 Audio jack Connects to the 3.5 mm adapter on headphones or computer speakers. 2 USB port Connects to the power adapter to charge the device. Connects to USB devices, such as memory sticks, keyboards, and external hard drives. 3 Power button Turns on the device. For more information, see 3.3 Turning On the Device on page 10. 4 Rear camera Captures photos and video (5 megapixels).
2 Product Overview 2.5 Cradle Front (Optional) 1 No. Name 1 Connector Description Connects the cradle to a device. 2.6 Cradle Bottom (Optional) 1 3 2 4 No. Name Description 1 DC OUT port Connects another power source. 2 USB port Connects to USB devices, such as memory sticks, keyboards, and external hard drives. 3 DC IN port Connects a power cable. 4 Ethernet port Connects an ethernet cable.
3 Getting Started This chapter explains the basics of how to use the device, including how to charge the device, and turn it on or off. Subsequent chapters teach you how to navigate Windows or Android and customize the device, but the information in this chapter will help you start the device for the first time and configure basic settings. 3.1 Inserting a USIM Card USIM cards allow the device to connect to mobile networks. 1 Unlock the battery lock and remove the battery.
3 Safety Precautions 3 Insert the USIM card into the slot until you hear a click. • Make sure that the gold-colored contacts are facing up. Do not insert the USIM card into an incorrect slot. Check the shape and orientation of the slot to ensure that it is designed for a USIM card. 4 Close the cover of the USIM card slot. 5 Replace the battery and lock the battery lock. 2 1 To remove the USIM card, see 10.2 Removing a USIM Card on page 33.
3 Safety Precautions 3.2 Charging the Device The device charges when connected to the power adapter or resting in the cradle (optional). • Do not attempt to charge the device with anything other than the adapter it shipped with. • Charge the device fully before using it for the first time. Failure to do so may decrease the life of the battery. To Charge with the USB Cable 1 Open the cover on the right side of the device. 2 Plug the USB cable into the port.
3 Safety Precautions To Charge with the Cradle (Optional) 1 Install the device into the cradle. 2 Connect the power adapter into the DC IN port of the cradle. 3 Connect the AC power cord into the adapter and an outlet.
3 Safety Precautions 3.3 Turning On the Device Press and hold the power button on the back of the device to turn on the device. To turn off the device, see 4.9 Turning Off the Device on page 18. The power button is also used: • To turn off the screen without turning off the device. To turn the screen back on, press the power button again. • To turn off the device manually by pressing and holding the power button for about five seconds.
3 Safety Precautions 3.4 Using Touch Gestures Touch gestures allow you to interact with Windows or Android and the applications installed on the device. Gesture Name Description Tap Lightly touch an item to launch apps, interact with buttons, and select options. Zoom Touch two points on the screen and move your fingers together to zoom out or move them apart to zoom in. Press and hold Continue touching an item to open context menus and display other options.
3 Safety Precautions 3.5 Starting the Device for the First Time (Windows) When you start the device for the first time, you are prompted to create a user account and configure basic settings. To configure Windows upon initial startup, follow these steps: 1 When the Region and language screen appears, select the desired Country or region, App language, Keyboard layout, and Time zone, and then tap Next.
4 Windows 8.1 Tutorials Windows 8.1 includes features optimized for touch screens, such as the new Start screen, Charms menu, and gestures for switching and closing apps. The next few sections will teach you about these features and help you feel comfortable in this new environment. 4.1 Start Screen The Start screen provides easy access to the apps and information most important to you.
4 Windows 8.1 Tutorials 4.3 Charms Menu The Charms menu provides quick access to frequently used functions from any screen. The functions in the Charms menu may differ based on the current app. To open the Charms menu, follow these steps: 1 Swipe in from the right edge of the screen.
4 Windows 8.1 Tutorials 2 Tap the desired charm: Icon Name Function Search Finds things on the device or the web. Share Shares files, photos, or links from the current app. Start Opens the Start screen or desktop. Devices Allows you to play, print, or project from peripheral devices. Settings From apps: Changes the settings for the current app. From the Start screen and desktop: Changes Windows settings. 4.
4 Windows 8.1 Tutorials To show all of the apps installed on the device, follow these steps: 1 Place your finger in the center of the Start screen and swipe upwards. 2 On the Apps screen, swipe to the left or right to show more apps. You can swipe up from the bottom of the screen to display the context menu. The context menu allows you to pin apps to the Start screen or taskbar, uninstall apps, run apps as an administrator, or open app locations. 4.
4 Windows 8.1 Tutorials 4.7 Viewing Two Apps at Once To display two apps at the same time: 1 From any app, drag your finger inwards from the left edge of the screen. 2 When the second app appears, drag it to the left or right side of the screen. 3 Release the app. You can press and drag the dividing line in the center to resize the apps.
4 Windows 8.1 Tutorials 4.8 Closing Active Apps 1 From the app, slide your finger downwards from the top edge of the screen. 2 When the app snaps to the bottom of the screen, release it. If the app appears in the window, tap the close button in the top right corner of the window. 4.9 Turning Off the Device 1 In the top right corner of the Charms screen, tap the 2 Tap Shut Down. button.
5 Connecting to Networks (Windows) The device can connect to Wi-Fi and mobile wireless networks. The device can connect to Wi-Fi networks right out of the box, but you will need to insert a USIM card to connect to mobile networks. Connecting to and using mobile networks may incur charges from your mobile carrier. You can also use Bluetooth to connect peripheral devices, such as keyboards and cell phones, to this device.
5 Connecting to Networks (Windows) 5.3 Sharing a Mobile Connection To share a connection to a mobile network with other devices, follow these steps: 1 Swipe in from the right edge of the screen. 2 In the Charms menu, tap 3 In the Settings menu, tap Change PC settings. 4 In the PC settings menu, tap Network. 5 Under Mobile broadband, tap the name of the network to share. 6 Under Share this connection, tap the toggle switch to turn on network sharing.
6 Connecting to Networks (Android) 6.1 Connecting to a Wi-Fi Network Connecting to a Wi-Fi network is an easy way of accessing the Internet. When you are out, you can connect to Wi-Fi networks in public places, such as libraries or coffee shops. 1 On the Home screen, tap 2 Make sure switch the Wi-Fi to ON. 3 Tap the network you want to join. 4 If necessary, enter the password for the network and tap Connect. > . To close the connection, switch the Wi-Fi to OFF.
7 Connecting to External Devices 7.1 Connecting to a Bluetooth Device (Windows) 1 Swipe in from the right edge of the screen. 2 In the Charms menu, tap 3 At the bottom of the Settings sidebar, tap Change PC settings. 4 In the PC Settings menu, tap PC and devices. 5 In the PC and devices menu, tap Bluetooth. 6 Tap the Bluetooth toggle to enable Bluetooth. 7 Tap the device that you want to pair with. Settings.
7 Connecting to External Devices 7.3 Connecting to USB Devices 1 Open the cover on the right side of the device. 2 Plug the USB cable into the port. Before you connect a USB device, make sure that the connector is oriented correctly and that it can physically fit into the port. 3 When the notification appears, the device is ready to use. The USB port supports USB 2.0 and 3.0 devices, such as mice, keyboards, and portable hard disks.
8 Customizing the Device (Windows) After learning how to navigate Windows and getting a feel for the device, you will probably want to customize its style and functionality. You can customize the Start screen, lock screen, and function buttons easily by following the instructions in this section. 8.1 Configuring the Start Screen The Start screen is where it all begins, so you should add your own flair to make it your own.
8 Customizing the Device (Windows) Adding Tiles Tiles allow you to add your favorite apps, websites, and contacts directly to the Start screen. 1 Place your finger in the center of the Start screen and swipe upwards. 2 On the Apps screen, press and hold an app until the context menu appears at the bottom of the screen To add multiple apps at the same time, tap the desired apps while the context menu is open. 3 In the context menu, tap Pin to Start.
8 Customizing the Device (Windows) Resizing Tiles 1 On the Start screen, press and hold the app until the context menu appears at the bottom of the screen. 2 In the context menu, tap 3 Tap the desired size. Resize. Grouping Tiles You can group tiles based on function, frequency of use, or even personal preference. Once grouped, the tiles will remain together until moved to another group or removed from the Start screen.
8 Customizing the Device (Windows) 3 Release the app. 4 After grouping all of the desired apps, tap the Name group textbox above the group to name the group. 8.2 Changing Your Account Picture To change the picture associated with your Microsoft account, follow these steps: 1 Swipe in from the right edge of the screen. 2 In the Charms menu, tap 3 In the Settings menu, tap Change PC settings. 4 In the PC Settings menu, tap Accounts. 5 In the Accounts menu, tap Your account.
8 Customizing the Device (Windows) 8.4 Setting the Date and Time 1 Swipe in from the right edge of the screen. 2 In the Charms menu, tap 3 In the Settings menu, tap Change PC settings. 4 In the PC Settings menu, tap Time and language. 5 In the Date and time menu, tap Change to set the date and time. Settings. 8.5 Booting to the Desktop To boot to the desktop instead of the Start screen, follow these steps: 1 Swipe in from the right edge of the screen.
8 Customizing the Device (Windows) 2 In the menu that appears in the bottom right corner of the screen, tap 3 In the Type dropdown menu, select None, Key event, or Run app. FN . • None: The function button does nothing. • Key event: The function button performs the same function as the associated key. • Run app: The function button opens the specified app. 4 In the Key select dropdown menu, select a key. • Select Etc… to specify a key in the Key code field.
8 Customizing the Device (Windows) 3 Tap an icon to enable or disable that feature. A white icon indicates that the feature is enabled. A dark blue icon indicates that the feature is disabled. Icon Feature Description Accelerometer Measures the acceleration of the device along the x, y, and z axes. Ambient Light Changes the brightness of the screen based on the light in the usage environment. Compass Detects the direction that the device is facing.
9 Customizing the Device (Android) 9.1 Customizing Your Home Screen You can customize the Home screen by adding shortcuts and widgets. Adding Shortcuts or Widgets Shortcuts added on the Home screen allows you to access and launch apps or activate a feature quickly and easily. Widgets appear as on-screen apps. to view your all apps under the APPS tab or all widgets under the WIDGETS On the Home screen, tap tab. Locate an app or widget, and tap and hold the item until the Home screen appears.
9 Customizing the Device (Android) 1 Drag down from the top right of the screen at any time from any app and tap a quick action button to turn it on or off. 2 Drag up from the bottom of the screen or tap the Back button . Setting Date and Time The date and time are automatically set based on the network you are connected to. To set the date and time manually On the Apps screen, tap > Date & time, then disable Automatic date & time.
10 Using the Card Slots This chapter explains how to insert cards into the device. 10.1 Inserting a USIM card See 3.1 Inserting a USIM Card on page 06. 10.2 Removing a USIM Card 1 Unlock the battery lock and remove the battery. 2 Open the cover to the USIM card slot on the left. 3 Press the USIM card into the slot to release it. 4 Pull the USIM card to remove it. 5 Close the cover of the USIM card slot. 6 Replace the battery and lock the battery lock.
10 Using the Card Slots 10.3 Inserting a MicroSD card MicroSD cards increase the storage capacity of the device. 1 Unlock the battery lock and remove the battery. 2 Open the cover to the microSD card slot on the right. 3 Insert the microSD card into the slot until you hear it click. • Make sure that the gold-colored contacts are facing up. Do not insert the microSD card into an incorrect slot. Check the shape and orientation of the slot to ensure that it is designed for a microSD card.
10 Using the Card Slots 10.4 Removing a MicroSD Card 1 Unlock the battery lock and remove the battery. 2 Open the cover to the microSD card slot on the right. 3 Press the microSD card into the slot to release it. 4 Pull the microSD card to remove it. 5 Close the cover of the microSD card slot. 6 Replace the battery and lock the battery lock. 10.5 Accessing Data on MicroSD Cards 1 Insert the microSD card into the device (see 10.3 Inserting a MicroSD card on page 34).
11 Using the Camera (Windows) The Bluebird Camera app allows you to capture photos and record videos using either of the cameras on the device. After capturing photos or recording videos, you can then view the photos or videos stored on the device. 11.1 Installing the Camera App 1 Swipe upward on the Start screen to display the list of apps. 2 Tap 3 Tap Install to install the app. Camera App Install to open the link to the Windows Store.
11 Using the Camera (Windows) 11.3 Taking Pictures Ensure that the icon appears in the top right corner of the screen. If the to switch to photo mode. appears instead, tap the icon Tap the Capture button to take the picture. • Tap the resolution button in the lower right corner of the screen to change the resolution of the image. to reverse the image horizontally. • Tap • Tap to switch between the front and rear cameras on the device. 11.4 Recording Video Ensure that video mode.
11 Using the Camera (Windows) 11.5 Viewing Photos To view photos taken using the cameras on the device, follow these steps: 1 In the Charms menu, tap 2 In the Search box, type File Explorer. 3 In the search results, tap 4 On the left side of the File Explorer, under This PC, tap the Pictures folder. 5 Double tap a photo in the folder to view it. Search. File Explorer. 11.
12 Using the Camera (Android) Use this app to take photos or record videos. On the Apps screen, tap Camera. • If a micro SD card is installed, the photos and videos will be saved on the internal storage. • The first time you open the Camera app, you will be prompted to add location tags to your photos and display the information. 12.1 Taking Photos 1 On the Apps screen, tap Camera and make sure that camera mode is set to 2 Aim the camera at the object and adjust the image.
13 Maintenance and Troubleshooting Despite its robust design, the device still requires a small amount of maintenance to continue operating optimally. Regular maintenance involves cleaning the touchscreen and ensuring the optimal battery life for the device. However, if you run into major problems with the device, then you may want to try the steps described in the Troubleshooting and Recovering Windows sections. 13.
13 Maintenance and Troubleshooting To decrease the length of the screen time-out and lower the screen brightness on the Android device, follow these steps: 1 On the Home screen, tap 2 Tap Display. 3 Tap Brightness to adjust the brightness level or Sleep to set a shorter duration. > . 13.3 Troubleshooting Attempt the following remedies before contacting the service center. Issue Remedy The device got wet. • Allow the device to dry for at least 24 hours before you power on the device.
13 Maintenance and Troubleshooting 13.4 Updating Windows Unless you specify otherwise, Windows automatically downloads and installs updates when they become available. However, you may need to manually update Windows when you start the device for the first time or if Windows is not updating correctly. To manually update Windows: 1 Plug in the device. Do not unplug the device during the update process. Doing so may result in lost or damaged data. 2 Swipe in from the right edge of the screen.
13 Maintenance and Troubleshooting 13.5 Backing Up Windows Backing up the device creates a system image, which contains Windows as well as the applications, system settings, and files on the device. You can use this system image to recover the contents of the computer if a critical error occurs on the device. 1 On the Apps screen, tap 2 When AOMEI OneKey Recovery loads, tap OneKey System Backup. 3 On the System Backup screen, specify where to create the backup image. AOMEI OneKey.
13 Maintenance and Troubleshooting 13.6 Recovering Windows Recovering Windows allows you to revert to a backup system image created using AOMEI OneKey. The backup image contains Windows as well as the applications, system settings, and files in the device when the backup was made. You may need to recover Windows if a critical error occurs on the device. 1 On the Apps screen, tap AOMEI OneKey. You can also tap Enter into AOMEI OneKey Recovery on the boot menu to access AOMEI OneKey.
14 Help and Support Bluebird is committed to ensuring that you get the most out of the device. If you encounter any problems while using the device, then please use the following methods to contact us for service and support. 14.1 Preparing for Service You are responsible for backing up any important information or data before bringing the device for servicing. The repair process may require formatting or replacing the hard disk drive in the device, resulting in the loss of all data stored on the device.
14 Help and Support 14.3 Conditions for After-sales Service You must adhere to the following conditions in order to receive after-sales service: • You must deliver the product to the service center through mail, a delivery service, or in person. • You must enclose the device in protective packaging before delivering it to the service center. We recommend packaging the product in the box it came in.
Appendix A Specifications Physical Characteristics Dimensions (W x H x D) 262 x 178 x 14.6 mm (10 x 6.8 x 0.57 inch) Weight 810 g (1.78 Ib) Display 10.1"(1280x800) IPS, 10 point multi-touch, Direct Bonding, Gorilla Glass Storage 16 GB eMMC / 32 GB eMMC (Optional) Keypad Volume Up/Down, Power Virtual Battery 6000 mAh, 3.
Appendix A Specifications User Environment Durability Drop: - Multiple 1.2 m (4 ft.) drops per MIL-STD-810G without the rugged plug - Multiple 1.5 m (5 ft.) drops per MIL-STD-810G with the rugged plug Sealing: IP65 Operating Temp. -10°C to 60°C (14°F to 140°F) Storage Temp. -20°C to 65°C (-4°F to 149°F) Humidity 90% non-condensing ESD ± 8 kv Air, ± 4 kv Contact Wireless WWAN GSM/GPRS/EDGE 850/900/1800/1900MHz WCDMA/HSDPA/HSUPA/HSPA+ 850/900/1700/1900/2100MHz WLAN 802.11 a/b/g/n (2.
Appendix B Accessories Smart Plugs • Type 1: MSR • Type 2: Barcode scanner (2D imager with a laser aimer), IC card reader, 1 SAM slot, and a spin handstrap • Type 3: A spin handstrap Cradles • One Slot Cradle: Charging only • One Slot Ethernet Cradle: Charging port, 3 USB 2.0 ports, 1 Ethernet port, 1 DC-in A power adapter (80001144) and a country-specific AC power cord (80001133 ~ 80001140) are required to use the charging feature.
Appendix C Safety and Regulatory Compliance FCC compliance information This device complies with Part 15 of the FCC`s Rules. Operation is subject to the following two Conditions: • This device may not cause harmful interference, and • This device must accept ant interference received, including interference that may cause undesirable operation. This device complies with part 15 of the FCC Rules. Operation is subject to the condition that this device does not cause harmful interference.
Appendix C Safety and Regulatory Compliance IEC 60417-6044 Do not listen to sound at high volume for long periods. It may cause hearing damage. Also, only use compatible receiver, headphones, or earpieces with your device. CE Hereby, Bluebird Inc. declares that this RFR900 is in compliance with the essential requirements and other relevant provisions of directive 1999/5/EC. To comply with CE RF exposure requirements, the handset must be kept 0.59 inches (1.
Appendix D Warranty Information Certificate Product Name Model Name RT100 Date of Purchase Serial Number Purchase Location Warranty Term 1 year from date of purchase Warranty Terms Bluebird Inc. (hereinafter referred to as Bluebird) provides warranty service for its products in compliance with the relevant regulations and the terms of the warranty.
&( 5) 5DGLDWLRQ ([SRVXUH 6WDWHPHQW &DXWLRQ 7KLV HTXLSPHQW FRPSOLHV ZLWK (XURSHDQ 5) UDGLDWLRQ H[SRVXUH OLPLWV IRU 6$5 6SHFLILF $EVRUSWLRQ 5DWH 7KLV WUDQVPLWWHU PXVW QRW EH FR ORFDWHG RU RSHUDWLQJ LQ FRQMXQFWLRQ ZLWK DQ\ RWKHU DQWHQQD RU WUDQVPLWWHU BLUEBIRD CUSTOMER SERVICE Operating Hours Customers Service Center Monday to Friday 9:30 A.M. - 6:30 P.M. (GMT Time: +9 Hours) The center is closed on Saturdays, Sundays, and national holidays.