TABLE FAN ASSEMBLY. Stay cool. 10 minutes 1 person 4 beads of sweat 2 1 3 5 6 In the box 1 Fan motor, 5 Stand, 6 4 7 Your own tools 2 Grille attachment, Fan blades, 7 3 Rear grille, Fan fastener, 8 4 Grille closure ring, Front grille. + cross-head screwdriver.
CHECKLIST. 1. ASSEMBLING THE STAND 2. GRILLE ATTACHMENT 3. REAR GRILLE ATTACHMENT You’re 50% there. Make sure the connector isn’t plugged into the socket. Tip: Don’t throw out the box containing the fan, but use it to store the fan at the end of the season. Need help? Call 010 798 89 99 Coolblue.nl/en/customerservice Pull the power cord through the hole in the stand 5 . Place the fan motor 1 on the stand 5 , in such a way that the protrusions fit the cutouts of the stand 5 .
INSTALLATION DU VENTILATEUR. Garde la tête froide. 10 minutes 1 personne 4 gouttes de sueur 2 1 3 6 5 Dans la boîte 1 Bloc moteur, 5 Socle, 6 4 7 Ce que vous devez avoir 2 Pales, Fixation de grille, 7 3 Grille arrière, Bouton de fixation, 8 4 Grille avant. Collier de serrage, + tournevis (en croix).
CHECK. 1. INSTALLER LE SOCLE 2. LA FIXATION DE GRILLE 3. MONTER LA GRILLE ARRIÈRE Ça, c’est fait. Assurez-vous que la fiche n’est pas branchée dans la prise. Astuce : Ne jetez pas la boîte du ventilateur, mais réutilisez-la plutôt pour ranger l’appareil en fin de saison. Vous ne vous en sortez pas ? Appelez le 03 808 27 00 coolblue.be/fr/serviceclient Faites passer le câble électrique à travers l’ouverture dans le socle 5 .
TAFELVENTILATOR INSTALLEREN. Houd je hoofd koel. 10 minuten 1 persoon 4 zweetdruppels 2 1 3 6 5 In de doos 1 Ventilator motor, 5 Voet, 6 4 7 Uit eigen doos 2 Roosterbevestiging, Ventilatorbladen, 7 3 Achter-rooster, Bevestigingsknop, 8 4 Rooster sluitring, Voor-rooster. Kruiskop schroevendraaier.
1. VOET MONTEREN 2. ROOSTERBEVESTIGING 3. MONTAGE ACHTER-ROOSTER Zorg dat de stekker niet in het stopcontact zit. Tip: Gooi de doos waarin de ventilator geleverd wordt niet weg, maar gebruik deze om ‘m aan het einde van het seizoen weer in op te bergen. Trek de elektrokabel door het gat in de voet 5 . Plaats de ventilator motor 1 op de voet 5 , op zo’n manier dat de uitstulpingen in de uitsparingen van de voet 5 vallen.
CBL1172/CBL1173/CBL1174 BlueBuilt TV1210 Table Fan
CONTENTS. Table shaped. Technical information 3. Safety instructions 4. How it works 6. Different settings 6. Ventilation 6. Oscillation 7. Maintenance Occasional cleaning 8. End-of-season cleaning 9. Troubleshooting 2. 8. 10.
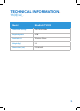
TECHNICAL INFORMATION. T3(N[CA|_. Model BlueBuilt TV1210 Connection voltage 220-240V/50Hz Required power 40W Fan blades Ø 12 inches/30cm Weight (kg) 2.2 Dimensions (cm) 27.5x30x52 3.
SAFETY INSTRUCTIONS. Better safe than sorry. • This fan is only suitable for indoor use. Don’t use it outdoors, as that will void the warranty. • Have you discovered damage to the fan or its connector while you were unpacking it? Send it back or have it repaired by an expert, but don’t use the machine. • Make sure to fully assemble the fan before plugging the connector into the socket. Read how to do this in the installation manual. • Only use the fan on a flat, sturdy, and horizontal surface.
• Don’t connect the fan to a dimmer or timer. • Don’t set the fan on fire. • Never pull the cord or the connector. • Don’t roll up the cord too tightly. • Never repair the machine or the connector yourself. Always let an expert handle repairs. • Always turn off the fan and remove the connector from the socket before cleaning or moving it. • Don’t let the fan continuously blow on small children, patients, or people who have difficulty walking.
HOW IT WORKS. Go for it. The fan has various settings to ventilate the room. Use the buttons on the top part of the stand to switch between settings. Ventilation The fan blows the air through the room at a constant speed. The fan has 3 different speed settings. 1. Press one of the buttons to choose the fan setting. 2. Press 1 when you want a low speed (sleep mode). This setting has fewer RPM and makes less noise. 3. Press 2 for an average speed. 4. Press 3 for a high speed. 5.
Oscillation Oscillation means that there’s movement in the airflow. The fan will swivel at a 75-degree angle. 1. Press the button on the back of the fan to let it swivel. 2. Pull this button back up to stop the fan from swiveling. 7.
MAINTENANCE. Neatly done. Always turn off the machine and remove the connector from the socket before cleaning or doing maintenance on the machine. Occasional cleaning The fan doesn’t need a lot of maintenance, but you don’t want it to spread dust around the house either. To prevent this, it’s important to clean the fan every so often. • Clean the fan with a soft cloth or a feather duster on a regular basis, otherwise the fan will spread dust around the room.
End-of-season cleaning Is the sun setting earlier again and is the temperature no longer causing you to sweat? If so, you probably no longer need the fan. To make sure you can use the fan again without any problems next summer, the way you store the fan is very important. • Turn off the fan, remove the connector from the socket, and clean it. • Apply some lubricant to the motor axle to prevent rust. An example of a lubricant is silicone spray.
TROUBLESHOOTING. Need a Band-Aid. Problem Check the following The fan blade doesn’t rotate while the fan is turned on. • Is the connector properly plugged into the socket? The fan blade doesn’t rotate while the fan is turned on. • Have the fan blades been placed on the motor axle as far as possible? Take a look at the installation manual to see whether you’ve properly assembled the machine.
Disposal In the EU, this symbol indicates that this product may not be disposed of as ordinary household waste. Old equipment contains valuable materials that can and should be recycled to prevent any adverse effects to health and the environment caused by unregulated waste collection. Make sure to bring old equipment to a designated collection point or contact the company where you bought the machine. They can make sure that as many of the components as possible can be recycled.
BACKSIDE. Stop staring.
CBL1172/CBL1173/CBL1174 MODE D’EMPLOI DÉTAILLÉ. On vous dit tout.
CONTENU. Y’a tout ce qu’il faut. Données techniques 3. Consignes de sécurité 4. Comment ça marche 6. Modes 6. Ventilation 6. Ondulation 7. Entretien Nettoyage régulier 8. Nettoyage de fin de saison 9. Dépannage 2. 8. 10.
DONNÉES TECHNIQUES. T3[|-|NiK3. Modèle BlueBuilt TV1210 Tension de raccordement 220 - 240 V / 50 Hz Puissance absorbée 40 W Ø des pales 12” / 30 cm Poids (kg) 2,2 Dimensions (cm) 27,5 x 30 x 52 3.
CONSIGNES DE SÉCURITÉ. Restez calme. • C e ventilateur convient uniquement à une utilisation intérieure. Ne pas utiliser à l’extérieur, sous peine de ne pas voir la garantie s’appliquer. • V ous constatez des dommages lors du déballage du ventilateur ? Retournez-le-nous ou faites-le réparer par un spécialiste, mais ne l’utilisez pas. • T erminez intégralement le montage du ventilateur avant de le brancher sur la prise électrique.
• N e pas utiliser le ventilateur près de substances inflammables, explosives ou gazeuses. Une seule étincelle provenant de l’interrupteur ou du moteur pourrait causer une explosion. • N e pas insérer vos doigts, mains, bras ou objets quelconques dans l’appareil. Cela pourrait provoquer des douleurs et des blessures ou endommager le ventilateur. • N e jamais placer le ventilateur sur une fenêtre ouverte. La pluie pourrait causer un choc électrique dès le contact avec le ventilateur.
COMMENT ÇA MARCHE. Commencez par l’étape 1. Le ventilateur dispose de plusieurs modes pour ventiler un espace. Utilisez les boutons sur la partie supérieure du support pour basculer entre les modes disponibles. Ventilation Le ventilateur tourne à une vitesse constante et dispose de 3 modes d’intensité différents. • Appuyez sur un des boutons pour choisir un mode. • A ppuyez sur 1 si vous souhaitez un mode de ventilation léger (mode sommeil).
Ondulation L’ondulation implique que le ventilateur fasse circuler l’air. Le ventilateur tournera dans un angle de 75°. 1. Appuyez sur le bouton à l’arrière du ventilateur pour activer l’ondulation. 2. Soulevez ce bouton pour immobiliser le ventilateur. 7.
ENTRETIEN. C’est du propre. Avant de commencer l’entretien ou le nettoyage, éteignez toujours l’appareil et retirez la fiche de la prise murale. Nettoyage régulier Le ventilateur nécessite peu d’entretien. Cependant, afin d’éviter que votre ventilateur ne répande de la poussière partout chez vous, nettoyez-le de temps à autre. • P our éviter que le ventilateur ne répande de la poussière à travers la maison, dépoussiérez-le régulièrement avec un chiffon doux ou un plumeau.
Nettoyage de fin de saison Le soleil se couche plus tôt et la température ne vous fait plus suer ? Il est alors temps de ranger votre ventilateur. Afin d’être sûr d’avoir un ventilateur en état de marche l’été prochain, il est important de ranger votre appareil de manière optimale. • Éteignez le ventilateur, retirez la fiche de la prise et dépoussiérez-le. • A ppliquez un peu de lubrifiant sur l’axe du moteur pour éviter la rouille. Pour se faire, utilisez un spray silicone par exemple.
DÉPANNAGE. Premiers secours. Problème Vérifiez les choses suivantes Les pales ne tournent pas alors que le ventilateur est allumé. • La fiche est-elle bien branchée dans la prise ? Le ventilateur fait des bruits bizarres quand je l’allume. • L es pales ont-elles été installées à l’extrémité de l’axe du moteur ? Consultez le mode d’emploi d’installation pour voir si vous avez correctement effectué l’installation.
Élimination Dans l’UE, ce symbole indique que ce produit ne peut être jeté avec les déchets ménagers ordinaires. Les appareils mis au rebut peuvent contenir des matériaux précieux, qui doivent être réutilisés pour ne pas porter atteinte à l’environnement et à la santé en raison d’une récupération non régulée. Nous vous prions donc de déposer vos appareils dans un point de collecte destiné à cet effet ou de contacter l’entreprise par laquelle vous avez acheté l’appareil.
FACE ARRIÈRE. Retourner avant utilisation.
CBL1172/CBL1173/CBL1174 BlueBuilt TV1210 Tafelventilator
INHOUD. Niet in steen. Technische gegevens 3. Veiligheidsinstructies 4. Hoe het werkt 6. Verschillende standen 6. Ventilatie 6. Zwenken 7. Onderhoud Reiniging tussendoor 8. Einde seizoen-reiniging 9. Probleemoplossing 2. 8. 10.
TECHNISCHE GEGEVENS. T3[|-|nisCh. Model BlueBuilt TV1210 Aansluitspanning 220-240V / 50Hz Opgenomen vermogen 40W Ventilatorbladen Ø 12” / 30cm Gewicht (kg) 2,2 Afmetingen (cm) 27,5 x 30 x 52 3.
VEILIGHEIDSINSTRUCTIES. Niet rennen. • Deze ventilator is alleen geschikt voor gebruik in huis. Gebruik ‘m dus niet buiten, dan vervalt namelijk de garantie. • Zie je bij het uitpakken schade aan de ventilator of aan de stekker? Stuur deze dan terug of laat ‘m repareren door een specialist maar gebruik het apparaat niet. • Zet voor je de stekker in het stopcontact steekt de ventilator volledig in elkaar. Hoe je dit doet lees je in de installatiehandleiding.
• Zet de ventilator nooit in een open raam. Regen op de ventilator kan namelijk een elektrische schok veroorzaken. • Raak de ventilator of stekker nooit aan met natte handen. • Sluit de ventilator niet aan op een dimmer of timer. • Steek de ventilator niet in brand. • Trek nooit aan het snoer of de stekker. • Rol het snoer niet te strak op. • Voer nooit zelf reparaties uit aan het apparaat of de stekker. Laat dit altijd over aan een specialist.
HOE HET WERKT. Begin bij stap 1. De ventilator heeft verschillende standen om de ruimte te ventileren. Gebruik de knoppen op het bovendeel van de standaard om te wisselen tussen de standen. Ventilatie De ventilator blaast de lucht met constante snelheid door de kamer. De ventilator heeft 3 verschillende blaasstanden. • Druk op een van de knoppen om de ventilatorstand te kiezen. • Druk op 1 wanneer je een zachte blaasstand wilt (slaapstand). Deze stand maakt minder toeren en dus minder geluid.
Zwenken Zwenken houdt in dat je beweging brengt in de luchtstroom. De ventilator zal in een hoek van 75° draaien. 1. Druk de knop op de achterkant van de ventilator in om ‘m heen en weer te laten bewegen. 2. Trek deze knop weer omhoog om de ventilator stil te zetten. 7.
ONDERHOUD. Met schoon genoegen. Schakel het apparaat altijd eerst uit en haal de stekker uit het stopcontact, voordat je schoonmaak- of onderhoudswerkzaamheden uit gaat voeren. Reiniging tussendoor De ventilator heeft weinig onderhoud nodig, maar je wilt natuurlijk niet dat ‘ie stof rond blaast in huis. Om dit te voorkomen is het belangrijk om tussendoor de ventilator te reinigen. • Stof de ventilator regelmatig af met een zachte doek of plumeau, anders blaast het apparaat al het stof door de kamer.
Einde seizoen-reiniging Gaat de zon eerder onder en zorgt de temperatuur niet meer standaard voor zweetdruppels op je voorhoofd? Dan heb je de ventilator waarschijnlijk niet meer nodig. Om ervoor te zorgen dat je volgende zomer de ventilator weer zonder problemen gebruikt, is de manier waarop je ‘m opbergt belangrijk. • Schakel de ventilator uit, haal de stekker uit het stopcontact en maak ‘m stofvrij. • Breng een beetje smeermiddel aan op de motor-as, om roest te voorkomen.
PROBLEEMOPLOSSING. Kusje erop? Probleem Controleer het volgende Het ventilatorblad draait niet terwijl de ventilator is aangezet. • Zit de stekker wel goed in het stopcontact? Er komt een raar geluid uit de ventilator als je ‘m aanzet. • Zijn de ventilatorbladen zo ver mogelijk op de motor-as geplaatst? Bekijk de installatiehandleiding om te zien of je deze goed geïnstalleerd hebt. • Staat er wel stroom op het stopcontact? • Wordt het blad ergens geblokkeerd, bijv.
Verwijdering Binnen de EU betekent dit symbool dat dit product niet met het normale huishoudelijke afval mag worden afgevoerd. Afgedankte apparaten bevatten waardevolle materialen die hergebruikt kunnen en moeten worden, om het milieu en de gezondheid niet te schaden door ongereguleerde afvalinzameling. Breng afgedankte apparatuur daarom naar een daarvoor aangewezen inzamelpunt of neem contact op met het bedrijf waar je het apparaat gekocht hebt.
ACHTERKANT. Omdraaien voor gebruik.