
Roof curb installation instructions


The Roof Curb can now have the braces and the insulated pans installed.
Step 5:
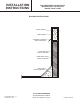
Place curb restraint in location that is shown if Figure 6 and secure with screws provided. Do the same for the other curb
restraints and .
Step 6:
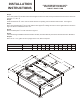
Install vertical brace on the curb as shown with the roof opening over the desired duct location. See Figure 6.
Step 7:
Place the horizontal brace on the curb and the duct support making sure that it is in the right location as shown in
Figure 6. Also See "DETAILS #1 and #2".
Step 8:
Place insulated pans in curb as shown in Figure 6.
Step 9:
If the curb is being assembled & moved to another location, attach the brace & pans to the curb as shown in the “DETAILS”.
Step 10:
Place the ¾" x 1 ¼" gasket on the top edges of the curb, braces and pans.
Fig ure 6
FOR LRP/PR/PRP 024-060 UNITS
48193-063/-064 / 11U78/11U79
"HINGE" ROOF CURB
UNIT# MODEL# A B C D E F G H I J
LRP/PR/PRP 024-036 11U78 37 ½ 37 34 ½ 33 ¾ 12 14 ½ 18 ¾ 16 ¼ 15 ½ 20
LRP/PR/PRP 042-060 11U79 45 ½ 36 ¼ 42
3
8
33
1
16
12 20 21
3
16
21
9
16
15 ½ 20
C
B
E
G
F
1 ½
14
D
A
INSULATED
PAN
H
I
INSULATED
PAN
J
INSTALLATION
INSTRUCTIONS
RETURN
DUCT
OPENING
SUPPLY
DUCT
OPENING