
BC1 and BC4X Evaporator Coil Installation Manual
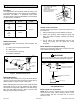
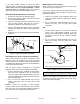


Table Of Contents

0674398-00 / 507792-01B Issue 1835 Page 3 of 8
NOTE: Special procedures are required for cleaning the
aluminum coil in this unit. See Page 8 in this instruction
for information.
General
The BC4X and BC1P upow evaporator coils are available
cased only. The BC1P coil includes a factory-installed
HFC-410A xed orice (RFC) metering device that must be
replaced if the system match with the coil requires a eld-
installed check/expansion valve. The BC4X coil includes
an externally equalized factory-installed HFC-410A check/
expansion valve.
The coil drain pan has a maximum service temperature
of 500°F. The drain pan must be at least 2" away from a
standard gas-red furnace heat exchanger and at least
4"-6” away from any drum-type or oil-red furnace heat
exchanger, depending on furnace model. Closer spacing
may damage the drain pan and cause a leak.
Refer to the Product Specication for the proper use of
these coils with specic furnaces, air handlers, condensers
and line sets.
These instructions are intended as a general guide and
do not supersede local or national codes in any way.
Authorities who have jurisdiction should be consulted
before installation.
Shipping and Packing List
Package 1 of 1 contains:
BC1P
1 – Evaporator coil
BC4X
1 – Evaporator coil
Check the components for shipping damage; if found,
immediately contact the last carrier.
Releasing Air Charge
The coil is shipped from the factory pressurized with dry
air. Pierce a hole in the rubber plug that seals the vapor
line to relieve the pressure before removing the plugs.
CAUTION
NOTE: If there is no pressure released when the vapor
line rubber plug is pierced, check the coil for leaks before
continuing with the installation.
The BC1P and BC4X coils are shipped with a 10 + 3 psi dry
air holding charge. Puncture the suction line rubber plug to
release the charge. Remove the rubber plug. Ensure that
the coil is void of pressure.
Installation
Risk of explosion or re.
Can cause injury or death.
Recover all refrigerant to relieve pressure before
opening the system.
WARNING
Install the furnace or air handler and condensing unit
according to the installation instructions provided with the
unit.
Position the cased coil on top of the furnace or air handler
cabinet and secure it using eld-provided screws.
NOTE: If the coil is to be installed on an oil furnace, it may
be necessary to install a eld-installed transition between
the furnace and the coil to prevent airow restriction and
possible damage to the coil drain pan. See the oil furnace
installation instructions for details.
NOTE: The coil cabinet has six screw clearance holes
which should be aligned with the furnace engagement
holes. Secure the coil cabinet to the furnace or air handler
using six eld-provided #8 X 1" screws.
Air Leakage
All indoor cabinets MUST be taped after installation to seal
against any air leaks. System performance and efciency
will be reduced if air leakage exists.