
Comfort Aire GUH GDD LP Gas Conversion Installation Guide

507371-02 Issue 1706 Page 5 of 5
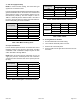
C - Gas Flow (Approximate)
NOTE: To obtain accurate reading, shut off all other gas
appliances connected to meter.
Furnace should operate at least 5 minutes before checking
gas ow. Determine time in seconds for two revolutions of
gas through the meter. (Two revolutions assures a more
accurate time.) Divide by two and compare to time in
Table 2. If manifold pressure matches Table 1 and rate is
incorrect, check gas orices for proper size and restriction.
Remove temporary gas meter if installed.
Unit Capacity
Seconds for One Revolution
LP
1 cu ft Dial 2 cu ft Dial
-045 200 400
-070 136 272
-090 102 204
-110 82 164
-135 68 136
2500 btu/cu ft
Table 2. Gas Meter Clocking Chart
D- Proper Combustion
Furnace should operate minimum 15 minutes with correct
manifold pressure and gas ow rate before checking
combustion. Take combustion sample beyond the ue
outlet. See Table 3 through Table 5 .
NOTE: Shut unit off and remove manometer as soon as
supply line pressure, manifold pressure and combustion
sample have been obtained. Take care to replace pressure
tap plug.
Unit Capacity
CO
2
% for LP
Low Fire High Fire
-045 6.4 - 7.4 8.8 - 9.8
-070 6.3 - 7.3 8.7 - 9.8
-090 6.8 - 7.8 8.9 - 9.9
-110 7.1 - 8.1 9.3 - 10.3
-135 7.1 - 8.2 9.1 - 10.1
The carbon monoxide reading should not exceed 100 ppm.
Table 3. A952 & 95G2 Upow / Horizontal Furnaces
Unit Capacity
CO
2
% for LP
Low Fire High Fire
-045 6.6 - 7.6 9.1 - 10.1
-070 6.5 - 7.5 8.6 - 9.6
-090 6.9 - 7.9 9.1 - 10.1
-110 7.3 - 8.3 9.5 - 10.5
The carbon monoxide reading should not exceed 100 ppm.
Table 4. A952 & 95G2 Downow Furnaces
All Models Firing Rate CO
2
% for Nat CO
2
% for LP
Upow/
Horizontal
High Fire 6.8 - 7.4 7.5 - 9.0
Low Fire 4.2 - 5.7 5.0 - 6.0
Downow
High Fire 6.0 - 7.4 6.9 - 8.4
Low Fire 4.8 - 6.0 5.7 - 7.0
The carbon monoxide reading should not exceed 100 ppm.
Table 5. A802 & 80G2
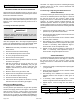
E - Turning Off Gas to the Unit
1. Set the thermostat to its lowest setting.
2. Turn off all the electrical power to the unit.
3. Remove the unit access panel.
4. Move the switch on the gas valve to OFF. Do not force
the switch.