
Ceiling Cassette Air Handler Installation Manual


Preparations before installation
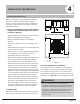
1. Relation of ceiling opening to unit and
suspension bolt position.
1. Installation hook pitch dimensions
2. Indoor unit dimensions
3. Decoration panel dimensions
4. Refrigerant piping
5. Installation hook
6. Ceiling opening dimensions
7. Hanger bracket
8. False ceiling
Adjust the position to ensure the gaps between
the indoor unit and the four sides of false ceiling
are even. The indoor unit's lower part should sink
into the false ceiling for 0.9in. See Fig. 4.3.
2. Create the ceiling opening needed for
indoor installation where applicable. (For
existing ceilings.)
• Create the ceiling opening required for
installation. From the side of the opening to
the casing outlet, implement the refrigerant
and drain piping and wiring for remote
control (unnecessary for wireless type). Refer
to each piping or wiring section.
• After making an opening in the ceiling, it may
be necessary to reinforce ceiling beams to
keep the ceiling level and to prevent it from
vibrating. Consult the builder for details.
3. Install the threaded rod. (Use either a M8 or
M10 size rod.)
• Use expansible hooks, sunken anchors or
other eld supplied parts to reinforce the
ceiling in order to bear the weight of the unit.
• Adjust clearance from the ceiling before
proceeding further. See Fig. 4.4 for
Installation example.
Fig 4.2
Fig 4.3
Fig 4.4
1
Indoor unit
2
False ceiling
1
2
0.9in
1
Ceiling
slab
2
Expansible hook (optional)
3
Installation hook (optional)
4 False ceiling
1.2~1.4in
1
2
3
4
Page 10
Revised 5/14/2020
NOTE: The opening in the ceiling should not
be larger than the decorative grill, otherwise
additional ceiling patching will be required.
For other installation other than standard
installation, contact your dealer for details.
1
1
2
2
3
3
21.5in
20.6in
22.4in
22.4in
25.5in
25.5in
4
5
2.8in
0.6in
0.6in23.6in6
7
8
0.8in
0.8in
Indoor Unit
Installation