
Ceiling Cassette Air Handler Installation Manual


Outer diam.
A
Max. Min
1/4 in 1.3 0.7
3/8in 1.6 1.0
1/2in 1.8 1.0
5/8in 2.2 2.0
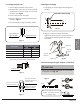
5.1 Flaring the pipe end
1. Cut the pipe end with a pipe cutter.
2. Remove burrs with the cut surface facing
downward so that the chips do not enter
the pipe. See Fig 5.3.
3. Put the are nut on the pipe.
4. Flare the pipe. Set exactly at the position
shown in Fig 5.5.
5. Check that the aring is properly made.
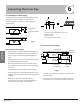
5.2 Refrigerant Piping
1. Use Nylog or similar approved refrigerant
sealant.
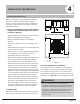
4.3 Install refrigerant pipe adapter. (if needed)
2. Align the centers of both ares and
tighten the are nuts 3 or 4 turns by hand.
Then tighten them fully with the torque
wrenches.
Cut exactly at
right angles
Remove
burrs
Fig 5.3
Fig 5.6
Fig 5.4
Fig 5.5
Fig 5.7
Fig 5.8
Die
Copper pipe
A
Set exactly at the position shown below
Flare's inner surface
must be flaw-free
Make sure that the
flare nut is fitted.
The pipe end must
be evenly flared in a
perfect circle.
Coat here with Nylog
Spanner
Piping
Union
Torque
wrench
Flare nut
Page 13
Revised 5/14/2020
Mount the refrigerant adapter as horizontally
as possible. See Fig. 5.8.
CAUTION
Indoor
Indoor
Indoor
Outdoor
Outdoor
Outdoor
Wrap the supplied anti-shock
rubber around the throttle
to reduce noise.
Refrigerant Piping
Installation