
Multizone Outdoor Unit Installation Manual

Revised 5/14/2020
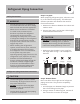
Air Evacuation
8
Refrigerant handling:
Leak Test, Evacuation, and Refrigerant Charging
Tools needed:
Procedure:
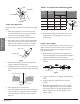
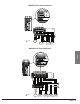
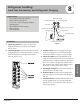
1. Open King valves (see Fig. 9.1) Open both
King Valves fully until you hit the stopper.
Do not force.
2. Connect gauges Connect low pressure mani-
fold gauge hose to mini-split adapter; connect
mini-split adapter to low pressure lineset
valve A (see Fig. 9.2).
• Dry nitrogen tank and regulator
• R410a manifold gauge set
• 1/4" to 5/16" mini-split gauge adapter
(yellowjacket)
• Soap bubble solution sprayer
• Micron gauge
• Vacuum pump
3. Pressure test Connect nitrogen tank regu-
lator to charging hose on manifold gauges.
Pressurize lineset to 200 psi of dry nitrogen.
4. Check for leaks Spray soap bubbles on t-
tings at outdoor and indoor units to check for
bubbles/ leaks. If leaks are present, retorque
are nut. If leak is still present, release nitro-
gen, inspect and re-work are. Repeat. Once
there are no leaks, proceed to step 6.
5. Discharge nitrogen pressure from lineset A
and disconnect nitrogen tank.
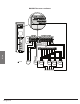
6. Evacuate lines Connect micron gauge and
vaccum pump to the line valve A as shown in
Fig. 9.2.
7. Vacuum lineset to below 500 microns. Once
micron gauge slows to a stop (usually 200 -
400 microns) , close manifold valve and turn
o vacuum pump.
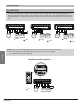
Manifold Gauge
Compound gauge
-76cmHg
Low pressure valve
Charge hose
High pressure valve
Charge hose
Vacuum pump
Pressure gauge
Low pressure valve
Page 20
Fig 9.1
Fig 9.2