
Ceiling Cassette Air Handler Installation Manual


Install the indoor unit
When installing optional accessories, read
also the installation manual of the optional
accessories. Depending on the eld conditions,
it may be easier to install optional accessories
before the indoor unit is installed (except for the
decoration panel). However, for existing ceiling,
install fresh air inlet component kit and branch
duct before installing the unit.
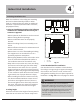
1. Install the indoor unit.
1. Attach the hanger bracket to the threaded
rod. Be sure to x it securely by using a nut
and washer from the upper and lower sides
of the hanger bracket.
2. Securing the hanger bracket see gure
below.
2. Adjust the unit to the right position for
installation.
(Refer to the chapter "Preparations before
installation").
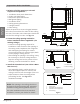
3. Check if the unit is horizontally leveled.
• Do not install the unit tilted. The indoor unit
is equipped with a built-in drain pump and
oat switch. (If the unit is tilted against the
direction of the condensate ow (the drain
piping side is raised), the oat switch may
malfunction and cause water to drip.)
• Check to ensure the unit is level at all four
corners.
Fig 4.5
Nut (field supply)
Washer
(field supply)
Hanger
bracket
Double nuts
(field supply,
tighten)
Page 11
Revised 5/14/2020
Indoor Unit
Installation