
Multizone Wall Mounted Air Handler Installation Manual


Indoor Unit
Installation
Page 17
Revised 5/14/2020
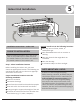
Step 6: Wiring connections
The signal cable enables communication and
power between the indoor and outdoor units.
Use 14 gauge, 4 conductor strander (not solid
core) copper wire.
1. Prepare the cable for connection:
a. Using wire strippers, strip the rubber
jacket from both ends of signal cable to
reveal about 1 1/2" of the wires inside.
b. Strip the insulation from the ends of the
wires.
c. Using wire crimper, crimp u-type lugs on
the ends of the wires.
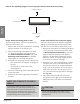
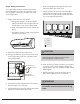
2. Open front panel of the indoor unit.
3. Using a screwdriver, open the wire box cover
on the right side of the unit. This will reveal
the terminal block.
WARNING
All wiring must be performed strictly in
accordance with local and national wiring
codes.
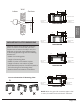
4. Unscrew the cable clamp below the terminal
block and place it to the side.
5. Facing the back of the unit, remove the plastic
panel on the bottom left-hand side.
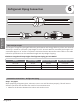
Terminal block
Wire cover
Screw
Cable clamp
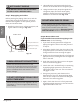
6. Feed the signal wire through this slot, from
the back of the unit to the front.
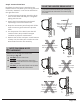
7. Facing the front of the unit, match the wire
colors with the labels on the terminal block,
connect the u-lug and rmly screw each wire
to its corresponding terminal.
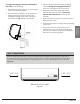
8. After checking to make sure every connection
is secure, use the cable clamp to fasten the
signal cable to the unit. Screw the cable clamp
down tightly.
9. Replace the wire cover on the front of the
unit, and the plastic panel on the back.
DO NOT MIX UP LIVE AND NULL WIRES
This is dangerous, and can cause the air
conditioning unit to malfunction.
CAUTION
1
2
3
B
W
R
G
1
2
3
Black
White
Red
Green