
BMKH24M-NDG3 Owners & Installation Manual

Blueridge Owners Manual
24
Document Version: 11/2016
Copyright 2016 Alpine Home Air Products
3
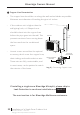
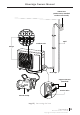
Mount the Outdoor Unit
• Mount the outdoor unit to a concrete pad, plastic pad, or wall bracket
your choice, using the foot holes and bolts.
4
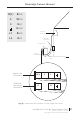
Connect the Copper Lines
• Remove the screw on the right handle of the outdoor unit.
• Slide the cover down to take the panel off and expose the valves.
• Remove the screw cap of the valves.
• Connect the pipe joint of the outdoor unit with the flared end of the cop-
per line set. If the copper pipes are not flared already, please reference
the Copper Line Flaring section of this document. (See page 54)
• Tighten the union nut (compression fitting) by hand.
• Place the open-ended wrench on the pipe joint and place the torque
wrench on the union nut (compression fitting). Tighten the union nut
according to the chart on the next page:
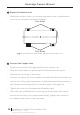
Img 11 | Footholes located at the botton of the outdoor unit
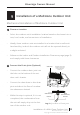
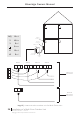
Installation of a Multi Zone Outdoor Unit
Foot Holes
Foot Holes