
BMKH42M-NDG3 Owners & Installation Manual


Free match series
13
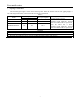
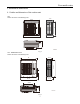
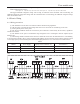
36K、BMKH42M-NDG3
Fig 12
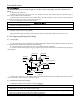
4.4.2 Earthing Requirements
(1) The air conditioner is classified into the Class I appliances, so its earthing must be reliable.
(2) The yellow-green line of the air conditioner is the earth line and can not be used for other purpose, cut off or
fixed by the tapping screw; otherwise it would cause the hazard of electric shock.
(3) The reliable earth terminal should be provided and the earth wire can not be connected to any of the follow
ing
places.
①Running water pipe;; ②Coal gas pipe; ③Sew
age pipe; ④Other places where the professional personnel
think unreliable.
4.4.3 Electrical Cable Connection
1) The mistake connecting line will result in malfunction. After the electrical wiring working, ensure the wire
between the connection place and the fixed place has a certain freedom degree.
2) The connection piping and connection line of each indoor unit should connect well according to the instruction.
3) The electric installation should be carried out by the technician as instructed by the local laws, regulations and
also this manual.
4) The installation location should be dry, and can't be expose in direct sunlight or strong breeze.
5) Have to install a breaker in the circuit that can shut off the main power supply of the system. Besides, the air
switch coupled with the leakage current protection switch must be equipped.
4.4.4 Wiring of the Power Cord
If the supply cord is damaged, it must be replaced by the manufacturer
or its service agent or a similarly qualified person in order to avoid a hazard.
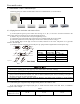
(1). Open the side plate.
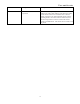
(2). Connect the power cord to the terminals “L1”, “L2” and also the earthing screw, and then connect the wiring
terminals “N(1),2,3” of the indoor unit to those of the outdoor unit correspondingly. Please use the green bonding screw
to connect the earthing cord. The location is showing in the figure 13.
(3). Fix the power cord with wire clips.
(4). Let the power cord go through the rubber ring.
Tighten the green
bonding screw here
Figure 13