
BMKH MFCC user manual


About Back-lighting Function
5.
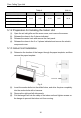
Press " " button to select fan blowing angle.
1.
2.
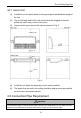
3. Place two 7# (AAA 1.5V) dry batteries, and make sure the position of “+”
4.
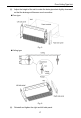
Fig.1
Fig.2
● During operation, point the remote control signal sender at the receiving
●
●
●
2.
Lift the cover along the direction of arrow (as shown in Fig 1 ①).
Take out the original batteries (as shown in Fig 1
②).
polar and “-” polar is correct (as shown in Fig 2
③).
Reinstall the cover (as shown in Fig 2
④).
NOTICE
window on indoor unit.
The distance between signal sender and receiving window should be no
more than 26 ft, and there should be no obstacles between them.
Signal may be interfered easily in the room where there is fluorescent lamp
or wireless telephone; remote controller should be close to indoor unit during
operation.
Replace new batteries of the same model when replacement is required.
When you don’t use remote controller for a long time, please take out the
batteries.
If the display on remote controller is fuzzy or there’s no display
, please
replace batteries.
3.
4.
After putting through the power, press "ON/OFF" button on remote controller to
turn on the air conditioner.
Press "MODE" button to select your required mode: AUTO, COOL, DRY, FAN,
HEAT.
▲
Press "▲" or " " button to set your required temperature. (Temperature can’t
be adjusted under auto mode).
Press "FAN" button to set your required fan speed: auto, low speed, medium
speed, high speed.
1.
●
●
NOTICE
3.5 Operation guide
3.6 Replacement of batteries in remote controller
11
Floor Ceiling Type Unit