
Beckett Burner Manual


19
AFG Burner Manual
Always verify the control functions according to all
specifi cations before leaving the installation site.
Replace the control if it does not operate as
specifi ed.
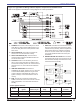
Startup / Checkout
○
○
If the burner or control fails any of the following tests,
recheck control wiring. If the burner or control still fails
any tests, replace the control.
Check Safety Features
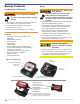
Safe Start Check
Place a jumper across the cad cell terminals.
Refer to the steps for “Start up burner/set
combustion” and have the system call for heat.
Burner must not start. Verify that the green light
is on continuously and that the control remains in
Standby mode.
End the call for heat and remove the cad cell
jumper.
Simulate Flame Failure and Ignition Failure
Refer to the steps for “Start up burner/set
combustion” and have the system call for heat.
After fl ame is established and the burner igniter
turns off, close the hand valve in the oil supply
line.
At fl ame loss, the control will enter Recycle
○
1.
2.
3.
4.
○
1.
2.
3.
mode. Verify that the green light is fl ashing. The
control will remain in Recycle for 60 seconds.
After the 60 second recycle period, the control
will try to restart the system.
After the 15 second lockout time, the control will
lock out the burner and the reset button will fl ash.
Verify that the burner motor and igniter are off
and that the burner oil solenoid valve (if used) is
not energized.
Open the hand valve in the oil line.
Click the reset button and verify that the red light
in the reset button shuts off and that the burner
lights.
End the call for heat.
Before leaving the installation, verify that all
thermostat and boiler/furnace control wiring is
correct. Consult heating appliance manual for
directions.
Set combustion with instruments
4.
5.
6.
7.
8.
○
Allow the burner to run for approximately 5 to 10
minutes.
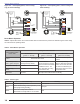
Set the stack or over-fi re draft to the level specifi ed
by the appliance manufacturer.
Natural Draft Applications; typically over-fi re
draft is -0.01” or -0.02” w.c.
Direct Venting; typically may not require draft
adjustment.
High Effi ciency/Positive Pressure Appliances;
also vary from traditional appliances (see
manufacturer’s recommendations).
Follow these four steps to properly adjust the
burner:
Step 1: Adjust the air shutter/band until a trace of
smoke is achieved.
Step 2: At the trace of smoke level, measure the
CO
2
(or O
2
) . This is the vital reference
point for further adjustments. Example:
13.5% CO
2
(2.6% O
2
)
Step 3:
Increase the air to reduce the CO
2
by 1.5 to
2 percentage points. (O
2
will be increased
by approximately 2.0 to 2.7 percentage
points.) Example: Reduce CO
2
from
13.5% to 11.5% (2.6% to 5.3% O
2
).
1.
2.
○
○
○
3.
Section: Start-up Burner/Set Combustion
Do not attempt to start the burner when excess oil
has accumulated in the appliance, the appliance is
full of vapor, or when the combustion chamber is
very hot.
Do not attempt to re-establish fl ame with the burner
running if the fl ame becomes extinguished during
start-up, venting, or adjustment.
Vapor-Filled Appliance: Allow the unit to cool off
and all vapors to dissipate before attempting another
start.
Oil-Flooded Appliance: Shut off the electrical
power and the oil supply to the burner and then clear
all accumulated oil before continuing.
If the condition still appears unsafe, contact the Fire
Department. Carefully follow their directions.
Keep a fi re extinguisher nearby and ready for use.
y
y
y
y
y
y
Failure to follow these instructions could
lead to equipment malfunction and result
in heavy smoke emission, soot-up, hot
gas puff-back, fi re and asphyxiation
hazards.
Explosion and Fire Hazard
Oil-Burning Equipment
shall be connected to fl ues
having suffi cient draft at all times to ensure
safe and proper operation of the burner.