
Beckett Burner Manual


20
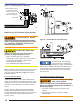
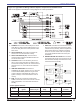
Step 4: Recheck smoke level. It should be Zero.
This procedure provides a margin of
reserve air to accommodate variable
conditions.
If the draft level has changed, recheck the
smoke and CO
2
levels and readjust the
burner if necessary.
Once combustion is set, tighten all fasteners on
air band, air shutter and head adjusting plate or
escutcheon plate.
Burner equipped with cover - Reinstall the cover
and repeat Steps 2 and 4. If CO
2
increases (O
2
decreases), remove the cover and adjust the
air setting so the CO
2
(O
2
) with cover on meets
requirements of Step 3.
Start and stop the burner several times to ensure
satisfactory operation. Test the primary control
and all other appliance safety controls to verify
that they function according to the manufacturer’s
specifi cations.
Perform Regular Maintenance
4.
5.
6.
replacing any that are cracked or chipped.
Check electrode tip settings. Replace electrodes if
tips are rounded.
Inspect the igniter spring contacts. Clean or replace
if corroded.
Clean the cad cell grid surface, if necessary.
Make sure Low Firing Rate Baffl e is in place
if required for the burner application. Omitting
the baffl e can result in unacceptable burner
combustion.
Inspect all gaskets. Replace any that are damaged
or would fail to seal adequately.
Inspect the combustion head and air tube. Remove
any carbon or foreign matter. Replace all damaged
units with exact parts.
Clean the blower wheel, air inlet, air guide, burner
housing and static plate of any lint or foreign
material.
If motor is not permanently lubricated, oil motor with
a few drops of SAE 20 nondetergent oil at each oil
hole. DO NOT over oil motor. Excessive oiling can
cause motor failure.
Check motor current. The amp draw should not
exceed the nameplate rating.
Check all wiring for secure connections or insulation
breaks.
Check the pump pressure and cutoff function.
Check primary control safety lockout timing.
Check ignition system for proper operation.
Inspect the vent system and chimney for soot
accumulation or other restriction.
Clean all fl ue passages and fl ue pipe. Replace
corroded or damaged pipes.
Clean the appliance thoroughly according to the
manufacturer’s recommendations.
Check the burner performance. Refer to the section
“Set combustion with test instruments”.
It is good practice to make a record of the service
performed and the combustion test results.
Shutting the Burner Off
□
□
□
□
□
□
□
□
□
□
□
□
□
□
□
□
□
□
Replace the oil supply line fi lter. The line fi lter
cartridge must be replaced to avoid contamination
of the fuel unit and nozzle.
Inspect the oil supply system. All fi ttings should be
leak-tight. The supply lines should be free of water,
sludge and other restrictions.
Remove and clean the pump strainer if applicable.
Verify the nozzle is the one originally specifi ed by
the appliance manufacturer and replace the nozzle
with one having the exact specifi cations from the
same manufacturer.
Clean and inspect the electrodes for damage,
□
□
□
□
□
Section: Perform Regular Maintenance
DO NOT TAMPER WITH THE UNIT OR
CONTROLS - CALL YOUR SERVICE PERSONNEL.
To ensure continued reliable operation, a qualifi ed
service technician must service this burner annually.
More frequent service intervals may be required in
dusty or adverse environments.
Operation and adjustment of the burner requires
technical training and skillful use of combustion test
instruments and other test equipment.
y
y
y
y
Tampering with or making incorrect
adjustments could lead to equipment
malfunction and result in asphyxiation,
explosion or fi re.
Annual Professional
Service Required
Always keep the fuel oil supply
valve shut-off if the burner(s)
is shut down for an extended period of time.
Turn off all electric power to the burner.
Note: There could be more than one disconnect switch.