
User's Manual

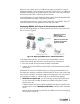


Table Of Contents
- BlueSecure™ Access Point 1500 Installation Guide
- Contents

8
Connecting and Powering the BSAP
Follow these instructions to connect your BlueSecure BSAP to your Bluesocket
WLAN and then power it up:
1. Make a note of the 12-character MAC address and the serial number listed
on the bottom of the BSAP before mounting the BSAP to a wall or other
surface. You will need this information during configuration.
2. Mount the BSAP to a horizontal surface or wall.
Mounting on a Horizontal Surface
To keep the BSAP from sliding on the surface, attach the four rubber feet
supplied with your BSAP distribution to the embossed circles on the bottom of
the BSAP chassis.
Mounting on a Wall
Mount the BSAP to a wall or other vertical surface using the BSAP mounting
bracket, and the four screws and screw anchors supplied with your BSAP
distribution.
You may use the wall mounting template found on the back page (page 14)
of this document to guide you when drilling the four holes required to anchor
the mounting bracket to the wall.
Secure the BSAP to its mounting bracket using its captive mounting bracket
screw.
3. Position the BSAP’s antennas for best radio performance.
The antennas emit signals along a plane perpendicular to the antenna (with
the propagation pattern shaped as a toroidal sphere), and thus provide more
effective coverage when positioned along different axes. Therefore, you may
want to position the antennas from 45 to 90 degrees from each other.
The BSAP also compares the strength of an incoming signal on both
antennas, and uses the antenna receiving the stronger signal to communicate
with a wireless client.
4. Connect the supplied power adapter to the BSAP, and its power cord to an
AC power outlet.
Otherwise, the BSAP can derive its operating power directly from the RJ-45
connector when connected to a device that provides IEEE 802.3af compliant
Power over Ethernet (PoE).
)
Note: If the BSAP is connected to both a PoE source device and an AC
power source, PoE will be disabled.
Caution: Use only the power adapter supplied with the BSAP. Otherwise,
the product may be damaged.
5. Verify that the PWR LED stops flashing and remains on, and that the other
status LEDs start functioning as described in the section entitled “LED
Indicators” on page 3.
6. Connect the BSAP to your Bluesocket WLAN.
You can wire the BSAP to a 10/100 Mbps Ethernet through a network device
such as a hub or a switch. Connect the RJ-45 Ethernet connector on the