
User's Manual

BlueSecure™ Access Point 1800 Installation Guide
9
See the
BlueSecure Controller Setup and Administration Guide
for detailed DHCP server and
DHCP relay agent configuration procedures.
In this deployment scenario, simply connect and power on the BSAPs. They will automatically
discover and communicate with their home BSC.
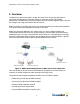
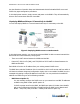
Deploying BSAPs with Layer-3 Connectivity to the BSC
You can also deploy BSAPs on a routed network with Layer-3 connectivity to the BSC
Figure 3: Deploying BSAPs across a routed network
In this deployment scenario, you must ensure that each BSAP is able to communicate with the
BSC across the routed network by verifying that:
• There are no NAT devices between the BSAPs and the BSC
• Protocol 97, UDP Port 53 (DNS), and TCP/UDP Port 33333 traffic is allowed between the
BSAPs and the BSC
Each BSAP will receive its IP address from your existing network DHCP server.
The BSAP also needs the IP address of the home BSC to which it will connect and from which it
will obtain its software image and configuration. Again, this is not needed if the BSAP is on the
managed side getting a relayed IP address from the BSC. You can provide the home BSC IP
address to a BSAP using one of the following methods:
• DHCP Server Option 43
You can manually configure the DHCP server on your network to send BSC IP addresses
to BSAPs using DHCP vendor-specific option 43.
In DHCP requests sent from the BSAP, the BSAP uses option 60 Vendor class identifier
with a value of BlueSecure.AP1500 to identify itself to the DHCP server (Note that all
BSAPs —1500,1540, 1800, and 1800 —identify as AP1500 for option 43).