
Owners Manual


PLAY/PAUSE: This button has multiple functions – a visual indicator of network connectivity and a PLAY/PAUSE button.
For a full listing of LED Blink Codes, please see #1 – Blink Codes. For an ungrouped Player, press the button to Play and
Pause the stream. If listening to an Internet radio stream, the Pause function will work for 30 seconds. At this point, the buffer
is full and the stream will Stop. When a Player is grouped, pressing the PLAY/PAUSE button will Mute that Player while
other Players continue the stream. The Player’s LED will ash blue when muted. This button is also used for Factory Reset
functions. See steps for Factory Reset later in this manual.
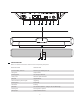
+/- VOLUME: Toggle the • buttons to vary volume level. The SOUNDBAR+ is equipped with an internal accelerometer, so
that no matter which direction the Player is mounted, the volume buttons will always function the same way: pressing the
upper button will increase volume; pressing the lower button will decrease volume.
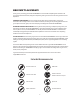
KICKSTAND FEET (REMOVABLE) : When placing the PULSE SOUNDBAR+ on its own, attach the supplied
Kickstand Feet for support.
HDMI eARC: Using the HDMI cable provided, connect one end to the eARC input of the PULSE SOUNDBAR+ and the other
end to an ARC-enabled HDMI output on your television. You may be required to enable ARC in your TV settings. Consult
you TV user manual for more information. The HDMI source will appear as HDMI ARC in the BluOS App.
SUBW OUT : The SUBW OUT connection can be used with a subwoofer cable (not provided). This is an optional
connection since the PULSE SOUNDBAR+ can be connected to a Bluesound PULSE SUB+ using a built-in wireless connection.
For wired subwoofers, use the SUBW OUT port. Connect one end of a subwoofer cable to the SUBW OUT on the PULSE
SOUNDBAR+ and the other end to the corresponding input on the subwoofer. The SUBW OUT crossover is set at 80Hz.
ANALOG AUDIO IN : Using a 3.5mm Stereo Mini Plug to RCA cable (not provided) connect one end to the Audio In of the
PULSE SOUNDBAR+ and the other end to the corresponding RCA output of a television or other audio source.
The source will show as an Analog Input in the BluOS App.
OPTICAL IN : Using the Digital Optical Audio Cable provided, connect one end to the Optical In of the
PULSE SOUNDBAR+ and the other end to the corresponding digital optical output of a television. The source will
show as an Optical Input in the BluOS App.
USB (TYPE B) : Use the SERVICE port in conjunction with USB (Type B Mini) to initially load rmware on the Player.
This is not for consumer use. Only Authorized Bluesound Service personnel can access this USB port and
SERVICE control button.
USB (TYPE A) : Connect a USB mass storage device to the USB input. Typical USB mass storage devices
compatible with the PULSE SOUNDBAR+ include portable ash memory devices and external hard drives
(FAT32 and NTFS formatted).
LAN PORT : The LAN PORT connection can be used with the Ethernet cable provided. This is an optional
connection since the PULSE SOUNDBAR+ can be connected to the network through a Wi-Fi connection to your router.
To setup the PULSE SOUNDBAR+ using the LAN Port a Wired Ethernet connection is required. Using the Ethernet
cable provided, connect one end of the Ethernet cable to the LAN port of your wired Ethernet broadband router
and the other end to the PULSE SOUNDBAR+’s LAN port.
SERVICE : Use the SERVICE port in conjunction with USB (Type B Mini) to initially load rmware on the Player.
This is not for consumer use. Only Authorized Bluesound Service personnel can access this USB port and
SERVICE control button.
AC MAINS INPUT : The PULSE SOUNDBAR+ comes supplied with two separate AC power cords. Select the AC
power cord appropriate for your region. Before connecting the plug to the wall outlet, connect rmly the other
end of the AC power cord to PULSE SOUNDBAR+’s AC Mains input socket. Never force the plug into a wall outlet.
An adaptor may be necessary in certain regions. Always disconnect the plug from the wall outlet rst, before
disconnecting the cable from the PULSE SOUNDBAR+’s AC Mains input socket.
2
3
4
5
7
6
8
9
11
12
13
10
4