USE & CARE MANUAL Electric Wall Oven 1 750162
BlueStar® Electric Wall Oven Use & Care Manual THIS APPLIANCE WAS DESIGNED FOR EASE OF INSTALLATION AND OPERATION. HOWEVER, WE RECOMMEND THAT YOU READ ALL SECTIONS OF THIS MANUAL BEFORE YOU BEGIN INSTALLATION AND USE. DO NOT REMOVE PERMANENTLY AFFIXED LABELS, WARNINGS OR DATA PLATES FROM YOUR APPLIANCE. THIS MAY VOID THE MANUFACTURER’S WARRANTY AND/OR HINDER EFFECTIVE SERVICING AND MAINTENANCE. THESE INSTRUCTIONS ARE TO REMAIN WITH THE APPLIANCE AND THE CONSUMER IS TO RETAIN THEM FOR FUTURE REFERENCE.
THANK YOU & WELCOME Thank you for your purchase and welcome to the BlueStar® Family! BlueStar® ovens and ranges are designed for discerning home chefs who demand restaurant-quality results in their own kitchens. As the owner of a new BlueStar® electric wall oven you can look forward to years of culinary excellence. You will prepare meals with the speed and accuracy of a professional chef right in your own kitchen.
SERVICE INFORMATION Date of Purchase Model Number Serial Number Dealer Name Dealer Phone Dealer Address Date of Installation Installer Name Installer Phone Installer Address Your installer should complete the Performance Checklist, found in the Installation Manual or on page 43 of this manual, before leaving your residence. Mail the completed checklist to: Warranty Department Prizer-Painter Stove Works Inc. 318 June Avenue Blandon, PA 19510 or email serviceteam@bluestarcooking.
IMPORTANT SAFETY INSTRUCTIONS SAVE THESE INSTRUCTIONS Read all instructions before using your appliance. Follow these important safety precautions to reduce the risk of fire, electric shock, personal injury or property damage. Do not remove permanent labels, warnings or data plates including the serial number from your appliance. Removal may void the manufacturer’s warranty and/or hinder effective servicing and maintenance.
GENERAL SAFETY INSTRUCTION SAVE THESE INSTRUCTIONS WARNING Never use this appliance as a space heater to warm a room. Do not touch the hot surfaces of the oven including the doors, door interior and oven interior. Before any maintenance or repairs are performed, disconnect the appliance from the electric supply. Only persons familiar with oven operation should use it.
IMPORTANT SAFETY INFORMATION SAVE THESE INSTRUCTIONS WARNING OVEN SAFETY INSTRUCTIONS OVEN WILL GET HOT! Never touch the inside of the oven cavity or heating elements when in operation. Personal injury or harm may occur. Do NOT cover the bottom of the oven floor with aluminum foil or any oven liner. Only use dry oven mitts or potholders. Moist or damp potholders on hot surfaces may result in steam burns. Do not allow potholders to touch hot burner areas in the oven.
Safe Minimum Internal Temperature Chart Safe steps in food handling, cooking, and storage are essential in preventing foodborne illness. You can't see, smell, or taste harmful bacteria that may cause illness. In every step of food preparation, follow the four guidelines to keep food safe: Clean—Wash hands and surfaces often. Separate—Separate raw meat from other foods. Cook—Cook to the right temperature. Chill—Refrigerate food promptly.
GETTING STARTED We know you are excited to start cooking and baking with your new BlueStar oven. Before you begin, it is essential that you follow these steps for safe and optimal use. Become familiar with all the parts of your electric wall oven. Remove and properly discard all temporary labels and packaging material from the oven exterior, oven interior, oven rack glides and oven racks. Remove all cardboard, zip ties, paper and plastic sheathing used as packaging.
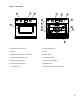
GUIDE TO THE OVEN 1 2 3 5 7 8 9 11 11 4 10 12 6 13 14 1. Quick Start Control Knob 8. Roast Probe Socket 2. Display 9. Light 3. Temperature Setting (5 increments) 10. Rack Guide 4. French Doors/Standard Door 11. Standard Rack (2) 5. Infrared Broiler Element 12. Full Extension Rack (1) 6. Infrared Heating Element 13. Baking Stone 7. Convection Fan 14.
GUIDE TO THE OVEN CONTROLS 1 2 3 Quick Start Control Knob Use this knob to bypass the display screen and go directly to Bake mode. Display Shows and instructs the use of all the oven features. Temperature Set Set a temperature.
OVEN ACCESSORIES OVEN RACKS AND OVEN RACK GUIDES Your oven comes equipped with two standard racks, one extension rack and two five-position rack guides. Follow your recipe guidelines to determine the best rack location for your dish. TIP: For best results, center baking pans on the rack to allow maximum air circulation around the food. WARNING Always use an oven rack. Never place any food, pot, pan or tray directly on the oven floor. You may place cooking vessels directly on the baking stone.
Roast Probe Cleaning When cool, wipe the probe clean with a mild soapy water solution. Rinse and dry thoroughly. ATTENTION Do not put meat probe in the dishwasher. BAKING STONE The integrated baking stone lets you create perfectly bakes breads and pizzas. In StoneBake™ mode, the baking stone temperature probe makes sure that the stone maintains the desired temperature. ATTENTION The stone should be pre-dried before first use. If not pre-dried, the stone could be damaged.
OPERATING THE OVEN BEFORE YOU BEGIN Clean removable oven parts Remove and properly discard all temporary labels and packaging material including cardboard, zip ties, paper and wrapping from the oven, broiler pan, oven racks, oven rack glides and exterior surfaces. Remove protective plastic wrap from any stainless steel surfaces. BEFORE turning on your oven for the first time, remove and wash the oven racks and rack glides in hot, soapy water. Rinse well and dry thoroughly.
PRE-DRY THE BAKING STONE Your baking stone must by pre-dried before using it to prevent warping and maximize its life. If the stone is not properly dried before its first use, it could warp, crack or shatter with explosive force. Follow the pre-drying instructions and document the start time for each step to keep track of your activity. ATTENTION The entire pre-drying process will take six hours and must be followed exactly as directed.
TIPS Sprinkle a light dusting of baking flour on the stone to help season it before baking the first time. The flour allows air to flow between the stone and the item to be baked. Never use any type of oil on the stone. It is recommended to cook doughs on the rough surface. The stone can be used with either the rough or the smooth surface, depending on your preference. Do not allow any liquid to come in contact with the stone.
OPERATING THE OVEN DISPLAY SCREEN All the oven’s functions operate from the display screen. When the oven is not in use, the screen displays the time and the BlueStar logo. Press the BlueStar® logo to start any oven operation. Note: If “Locked” is displayed, press the BlueStar® logo for five seconds and release to unlock the display. Figure 1 The Welcome screen will appear briefly.
KITCHEN TIMER The kitchen timer can be set by: 1. Select Time 1 or Timer 2 from Touch Screen. Figure 1 2. Use the buttons on the screen to select the desired time, and press Start. Figure 2 3. The Kitchen Timer running time screen will appear briefly. Figure 3 ATTENTION The Kitchen Timer screen will move to the background and the last screen displayed will appear. If you are not using the oven and only using the Kitchen Timer, that screen will remain displayed.
OPERATING THE OVEN MODES Your electric wall oven has 17 operating modes: Bake, Roast, Probe Roast, Broil, StoneBake™, Proof, Dehydrate, Convection Bake, Convection Roast, Convection Probe Roast, Convection Broil, Convection StoneBake™, Convection Proof, Convection Dehydrate, Sabbath, Convection Sabbath and Clean. Each mode has pre-set minimum and maximum temperature ranges. CONVECTION FAN You have the option of using the convection fan for many modes.
OPERATING THE OVEN WITH LEFT KNOB TOUCH SCREEN CONTROL PANEL Regardless of the cooking mode you select, your oven preheats using a combination of the infrared heating element, the broiling element and the convection fan. ATTENTION It is critical that you do not place food in the oven until the preheating cycle is complete. Figure 1 The Quick Start Control Knob lets you bypass the Welcome and Main Menu screen scroll through available cook modes. Figure 1 QUICK START CONTROL KNOB 1.
OPERATING THE OVEN USING THE DISPLAY PANEL BAKE 1. Press Cook Modes on the Main Menu display. Figure 1 2. Press Bake on the Select Cook Mode screen. Figure 2 3. Press Set Temp on the Bake screen. Figure 3 4. Select one of the preset Bake temperatures or press Other to enter a different temperature. Figure 4 5. If desired, press the Fan icon or Conv Fan for convection baking, then press Start. Convection Bake will be displayed. Figure 3 See the TIPS section for Convection Baking recommendations. 6.
TIPS TEMPERATURE RANGE In Bake mode, the oven can operate at temperatures between 150 and 500 degrees F. Entering a temperature outside of this range will result in an error message. CONVECTION COOKING Convection cooking uses a fan inside the oven to circulate the heated air more evenly, resulting in better heat distribution and a more consistent temperature. In general, convection baking takes less time at lower temperatures than traditional baking.
OPERATING THE OVEN BROIL 1. 2. 3. 4. Press Cook Modes on the Main Menu display. Figure 1 Press Broil on the Select Cook Mode screen. Figure 2 Press Set Temp on the Broil screen. Figure 3 Select a broil temperature of Low or High. a. In Broil mode, the oven will operate at temperatures at either Low (450 degrees F.) or High (550 degrees F). 5. If desired, press the Fan icon or Conv Fan for convection baking, then press Start. Convection Broil will be displayed. 6.
TIPS: CONVECTION COOKING Convection cooking uses a fan inside the oven to circulate the heated air more evenly, resulting in better heat distribution and a more consistent temperature. In general, convection baking takes less time at lower temperatures than traditional baking. For best results: Reduce the recommended recipe temperature 25°F to 50°F. Reduce the recommended cooking time. Closely monitor the first batch of each new recipe. Keep a record of temperature, time and weight for each recipe.
OPERATING THE OVEN ROAST WITHOUT THE ROAST PROBE 1. 2. 3. 4. 5. 6. 7. 8. 9. 10. 11. 12. Press Cook Modes on the Main Menu display. Figure 1 Press Roast on the Select Cook Mode screen. Figure 2 Press No when asked if a meat probe will be used. Figure 3 Press Set Temp on the Roast screen. Figure 4 Select one of the preset Roast temperatures or press Other to enter a different temperature. Figure 5 If Other, enter your desired temperature, then Start.
TEMPERATURE RANGE In Roast without the probe mode, the oven can operate at temperatures between 150 and 500 degrees F. Entering a temperature outside of this range will result in an error message. CONVECTION COOKING Convection cooking uses a fan inside the oven to circulate the heated air more evenly, resulting in better heat distribution and a more consistent temperature. In general, convection baking takes less time at lower temperatures than traditional baking.
OPERATING THE OVEN ROAST WITH THE ROAST PROBE 1. 2. 3. 4. 5. 6. 7. 8. 9. 10. Press Cook Modes on the Main Menu display. Figure 1 Press Roast on the Select Cook Mode screen. Figure 2 Press Yes when asked if a meat probe will be used. Figure 3 Insert the short end of the probe into the oven wall socket and the long end into the thickest portion of the meat. Press Start. Figure 4 Press Set Temp on the Roast screen.
TEMPERATURE RANGE The oven probe temperature can be set between 80 and 200 degrees F., ensuring your dish cooks to the precise internal temperature you want. In Roast with Oven Probe mode, the oven can operate at temperatures between 150 and 500 degrees F. Entering a temperature outside of this range will result in an error message.
OPERATING THE OVEN STONEBAKE™ MODE WARNING Your baking stone must be pre-dried before first use to prevent damaging it. See page 15. Failure to follow the installation instructions and warnings may result in the baking stone disintegrating with explosive force. The baking stone weighs approximately 35 pounds. Handle with care. If the stone knocks a hard surface, it may crack or develop hairline fractures that may expand over time and lead to premature product failure.
*SET COOKING TIME 1. From the StoneBake™ screen, press Cook Time. Figure 3 2. Use the buttons on the touchpad to select desired cooking time, and press Set. Figure 9 3. Return to the last screen displayed. 4. If the cooking timer is not populated, the oven will continue to operate at the set temperature. TIPS During StoneBake™ mode both the bottom bake element and the broiler turn on to maintain the oven cavity temperature.
BAKING PIZZA AT HOME Why cook pizza at high temperatures? It's a little bit like popcorn. Popcorn needs extreme heat for the moisture inside the kernel to convert to steam, expanding rapidly and exploding the outer hull. If you cooked popcorn at a low temp, it would dry out and never pop. With pizza, you don't have a hull containing this pressure, but the pressure of the expanding gases is still vital to the volume achieved in the baked product.
OPERATING THE OVEN PROOF 1. 2. 3. 4. 5. 6. 7. 8. 9. 10. Press Cook Modes on the Main Menu display. Figure 1 Press Proof on the Select Cook Mode screen. Figure 2 Press Set Temp on the Proof screen. Figure 3 Select one of the preset Proof temperatures or press Other to enter a different temperature. Figure 4 If Other, enter your desired temperature, then Start. Figure 5 The oven will begin preheating. Figure 6 When the oven is preheated, the alarm will sound and the Oven Ready screen will appear.
TEMPERATURE RANGE In Proof mode, the oven can operate at temperatures between 80 and 200 degrees F. Entering a temperature outside of this range will result in an error message.
OPERATING THE OVEN DEHYDRATE ATTENTION 1. 2. 3. 4. 5. 6. 7. 8. 9. 10. Foods must be dried to below .60 water activity or dry to the touch to be safely stored with no danger of mold, yeasts or bacteria growing. Press Cook Modes on the Main Menu display. Figure 1 Press Dehydrate on the Select Cook Mode screen. Figure 2 Press Set Temp on the Dehydrate screen. Figure 3 Select one of the preset Dehydrate temperatures or press Other to enter a different temperature.
OPERATING THE OVEN SABBATH Sabbath mode is intended to allow the oven to be used (subject to various constraints) by Shabbat-observant Jews on the Shabbat and Jewish holidays. The oven maintains a set cooking temperature for a period of up to 76 hours with the display screen dark and all alarms disabled. 1. Press Other on the Main Menu display. Figure 1 2. Press Sabbath on the Other screen. Figure 2 3. The oven goes into Bake mode. Press Set Temp on the Sabbath screen. Figure 3 4.
CLEANING The electric wall oven’s eco-friendly Continu Clean™ works every time the oven is on, helping to keep your oven clean without extreme temperatures or harsh cleaning chemicals. Figure1 When your oven interior becomes heavily soiled, use the self-cleaning cycle to clean your oven. TIPS ATTENTION WARNING Turn on ventilation to remove excess smoke or fumes that might be produced. Remove large built-up food particles and grease before starting the Oven Cleaning Cycle.
Oven Cleaning WARNING Do NOT apply commercially available oven cleaners to the oven door gasket. Do NOT rub or scrub the gasket since it may damage the oven door seal. Make sure cleaning chemicals do not come in contact with any stainless steel, painted surfaces. Do NOT use steel wool or metal pads to clean the interior oven walls. They may damage or scratch the enamel coating. Do NOT apply commercially available oven cleaners, water or solvents to Bake Stone.
SETTINGS The Settings screen is used by the technician during installation or service calls to optimize the oven’s performance. If you reach this screen by accident, press Cancel to return to the previous screen. CHANGING TEMPERATE SCALE FROM C TO F, OR F TO C 1. 2. 3. 4. 5. 6. Figure 1 Press Other on the Main Menu display. Figure 1 Press Settings on the Other display. Figure 2 Press Enter Password. Figure 3 Enter 12345. Figure 4 Press F or C located in the top right of the screen. Press SAVE & EXIT.
CARE AND CLEANING WARNING PART/ MATERIAL Make sure the oven is cool before cleaning. CLEANING FREQUENCY ATTENTION Turn on ventilation fan and make sure room is well vented. Convection Fan Guard / Porcelain Enamel Remove obstructions like aluminum foil or other particles. Apply commercial oven cleaner to a cloth and wipe the guard. Follow manufacturer’s instructions. Once a month; more often with frequent use. Do NOT use steel wool, metal pads or abrasive cleaners.
Do NOT allow citrus or tomato juices to sit and dry on the surface. Citric acid will discolor stainless steel. Display Screen Lock the display screen before cleaning to prevent the oven from operating. Use damp microfiber or soft cotton cloth; wipe dry Turn on ventilation fan and make sure room is well vented. Do NOT apply commercial oven cleaners to the oven door gasket. Oven Interior / Porcelain Enamel Use a commercially available oven cleaner. Follow cleaner manufacturer’s instructions.
BEFORE CALLING FOR SERVICE Check these helpful tips for any problems with your range. If you need additional help call BlueStar® Customer Service at 800 449-8691. PROBLEM POSSIBLE CAUSE SOLUTION Cancel Sabbath mode Sabbath mode Display Screen not lit No electrical power to the unit. No electrical power to the unit. Check if the breaker/fuse is tripped. Reset breaker. Call for service if it occurs more than once during a backing cycle.
MAINTENANCE Oven Light Bulb Replacement ATTENTION Only use a 25 watt halogen G9 light bulb. Regular light bulbs cannot tolerate oven temperatures. To replace your oven light bulb: 1. Make sure appliance and lights are cool, and power has been turned off before replacing light bulb. 2. Remove glass cover, pull out blub out, push new bulb in, replace and press glass cover back in place ATTENTION o Hold replacement light bulb with a dry cloth, do not let hands make contact with light bulb.
PERFORMANCE CHECKLIST This checklist has been developed to assure proper installation of your appliance. To validate your warranty you must mail or fax this form within 90 days of installation, with a copy of your receipt to: Warranty Department, Prizer-Painter Stove Works Inc.,318 June Avenue Blandon, PA 19510 or email service serviceteam@bluestarcooking.com.
LIMITED WARRANTY ® BlueStar Cooking Appliances, BlueStar® Ventilation Hoods, Prizer Hoods® Ventilation Hoods and Abbaka Ventilation hoods and remote blowers Before using your Product, please read this Limited Warranty and Arbitration Clause carefully to understand your rights. This Warranty is provided to you by Prizer-Painter Stove Works, Inc.
factory authorized service agent located within 100 miles roundtrip from the location of the Product. Service will be provided during normal business hours. The Owner will be responsible for any and all costs associated with additional mileage, non-standard service or overtime, and special equipment required to remove the Product so that service may be performed. Prizer-Painter reserves the right to deny warranty coverage for excessive installation delays.
Prizer-Painter is under no obligation, at law otherwise, to provide you with any concessions, including repairs, pro-rates or Product replacement, once this warranty has expired. What Is Not Covered This Warranty does not cover, and specifically excludes: Damages caused by shipping. Damage or repairs to the porcelain igniters, calibrations and normal adjustments after installation and setup, including burner adjustments.
INCLUDING BUT NOT LIMITED TO DAMAGES FOR EXPENSES, SUCH AS, EXTRA UTILITY EXPENSES, SHIPPING COSTS RELATED TO REPAIR OR REPLACEMENT OF ANY PRODUCT OR DAMAGES TO PROPERTY, RESULTING FROM BREACH OF THIS WARRANTY OR ANY IMPLIED WARRANTY. Some states and provinces do not allow the exclusion or limitation of incidental or consequential damages, so these provisions may not apply to you.
ARBITRATION CLAUSE BlueStar® Cooking Appliances, BlueStar® Ventilation Hoods, Prizer Hoods® Ventilation Hoods and Abbaka Ventilation Hoods and remote blowers ARBITRATION CLAUSE. IMPORTANT. PLEASE REVIEW THIS ARBITRATION CLAUSE. IT AFFECTS YOUR LEGAL RIGHTS. YOU SHOULD ALSO CONSIDER CONSULTING WITH OTHERS ABOUT ARBITRATION BECAUSE THE INFORMATION PROVIDED IS NOT INTENDED TO CONTAIN A COMPLETE EXPLANATION OF THE CONSEQUENCES OF ARBITRATION. 1.
Arbitration Act (9 U.S.C. § 1 et seq.) rather than by state law concerning arbitration. The law governing your substantive warranty rights and other claims will be the law of the state in which you purchased your PrizerPainter Product. Any court having jurisdiction may enter judgment on the arbitration award. 8.