
Use and Care Manual


25
OPERATING THE OVEN
ROAST WITHOUT THE ROAST PROBE
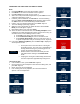
1. Press Cook Modes on the Main Menu display. Figure 1
2. Press Roast on the Select Cook Mode screen. Figure 2
3. Press No when asked if a meat probe will be used. Figure 3
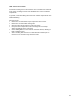
4. Press Set Temp on the Roast screen. Figure 4
5. Select one of the preset Roast temperatures or press Other to enter
a different temperature. Figure 5
6. If Other, enter your desired temperature, then Start. Figure 6
7. If desired, press the Fan icon or Conv Fan for convection baking,
then press Start. Convection Roast will be displayed. See the TIPS
section for Convection Baking recommendations.
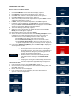
8. The oven will begin preheating. Figure 7
9. When the oven is preheated, the alarm will sound and the Oven
Ready screen will appear. Figure 8
10. Place baking dish in oven and select Start.*
11. At the end of the selected bake time, the Cooking Complete screen
is displayed. An alarm will signal twice and then once every 10
seconds until one of the following actions is taken. Figure 9
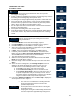
a. Select Off to turn off the oven and remove food.
b. Select Continue Cooking to return to the Roast screen.
c. Select Hold & Keep Warm to keep your food in the oven at
a specific temperature until you are ready to serve. Figure 11
12. If you select Hold & Keep Warm, press the Set Temp to display the
set temperature screen.
Do not place food in the oven before or during the
preheating process. The oven uses a combination of
heating elements during the preheating process to
achieve the specified temperature.
Beware that the oven loses heat slowly and that
food will continue cooking in the Hold & Warm
mode.
Keeping the oven light on while baking will increase
the oven temperature approximately 15 degrees F.
*SET COOKING TIME
1. From the Roast screen, press Cook Time. Figure 4
2. Use the buttons on the touchpad to select desired cooking time, and
press Set. Figure 10
3. Return to the last screen displayed.
4. If the cooking timer is not populated, the oven will continue to
operate at the set temperature.
Figure1
Figure 2
Figure 3
Figure 4
Figure 5
Figure 6
Figure 7
Figure 8
Figure 9
Figure 10
Figure 11
ATTENTION