USE & CARE MANUAL Gas Wall Oven 1 BWO 750323
BlueStar® Gas Wall Oven MODELS BWO THIS APPLIANCE WAS DESIGNED FOR EASE OF INSTALLATION AND OPERATION. HOWEVER, WE RECOMMEND THAT YOU READ ALL SECTIONS OF THIS MANUAL BEFORE YOU BEGIN INSTALLATION. INSTALLATION MUST BE PERFORMED BY AN APPROVED GAS INSTALLER OR GAS SERVICE TECHNICIAN OR THE WARRANTY IS VOID. IN THE COMMONWEALTH OF MASSACHUSETTS A LICENSED PLUMBER OR GAS FITTER CAPABLE OF REVIEWING AND PERFORMING THE MANUFACTURER’S INSTALLATION CHECKLIST SHOULD INSTALL THIS APPLIANCE.
SAFETY INSTRUCTIONS To avoid personal injury or property damage, please read and follow these important safety precautions. 1. Before any maintenance or repairs are performed, disconnect the appliance from the electric supply. 2. Your appliance should be installed by a qualified gas installation technician. Have the technician show you the exact location of the gas shutoff valve on the incoming gas line so you know how to turn off the gas if necessary. 3.
SAFETY INSTRUCTIONS WARNING! To Prevent Fire and Smoke Damage • • • • • Be sure all packing materials are removed from the appliance. Keep area around appliance free and clear of all combustible materials, gasoline, and other flammable vapors. Many aerosol spray cans be explosive when exposed to heat— Do not store near appliance. Many plastics are vulnerable to heat—Do not store near appliance.
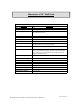
Dimensions of 24” Wall Oven Description Built In 24” All Gas Wall Oven BWO24AGS Overall Width Overall Height Overall Depth from Rear 24” 32 3/4” To edge of cabinet face 23 1/2” To end of door 26 1/2” Cutout Width Cutout Height Cutout Depth Cutout Height from Floor 23 5/8”” 32 1/4” 23 1/2” 10” Gas Requirements Shipped natural or LP gas, must be specified, Accepts standard residential 1/2”(1.3 cm) beyond 23” Natural 5.0” W.C.P/Liquid Propane 10” W.C.
Cut Out Dimensions of 24” Wall Oven • • • • • This unit must vent 36” off of the ground This is a built in unit. This is a zero clearance unit. The grounded electrical socket must be placed above or below cut off To prevent possible damage to the cabinets, use only moisture resistant materials and finishes that will withstand temperatures up to 190 degrees F(88 degrees C) P/N 750323 Page 8 All specifications are subject to change without prior notification.
Dimensions of 30” Wall Oven Description Overall Width Overall Height Overall Depth from Rear Cutout Width Cutout Height Cutout Depth Cutout Height from Floor Gas Requirements Gas Manifold Pressure Built In 30” All Gas Wall Oven BWO30AGS 30” 32 3/4” To edge of cabinet face 23 1/2” To end of door 26 1/2” 29 5/8” 32 1/4” 23 1/2” 10” Shipped natural or LP gas, must be specified, Accepts standard residential 1/2”(1.3 cm) beyond 23” Natural 5.0 W.C.P/Liquid Propane 10 W.C.
Cut Out Dimensions of 30” Wall Oven • • • • • This unit must vent 36” off of the ground This is a built in unit. This is a zero clearance unit. The grounded electrical socket must be placed above or below cut off To prevent possible damage to the cabinets, use only moisture resistant materials and finishes that will withstand temperatures up to 190 degrees F(88 degrees C) P/N 750323 Page 10 All specifications are subject to change without prior notification.
Dimensions of 36” Wall Oven Description Overall Width Overall Height Overall Depth from Rear Built In 36” All Gas Wall Oven BWO36AGS 36” 32 3/4” To edge of cabinet face 23 1/2” To end of door 26 1/2” Cutout Width Cutout Height Cutout Depth Cutout Height from Floor 35 5/8” 32 1/4” 23 1/2” 10” Gas Requirements Shipped natural or LP gas, must be specified, Accepts standard residential 1/2”(1.3 cm) beyond 23” Natural 5.0 W.C.P/Liquid Propane 10 W.C.
Cut Out Dimensions of 36” Wall Oven • • • • • This unit must vent 36” off of the ground This is a built in unit. This is a zero clearance unit. The grounded electrical socket must be placed above or below cut off To prevent possible damage to the cabinets, use only moisture resistant materials and finishes that will withstand temperatures up to 190 degrees F(88 degrees C) P/N 750323 Page 12 All specifications are subject to change without prior notification.
INSTALLATION UNPACKING 1. Check the package for damage. If any damage is visible you should mark the bill of lading you sign that there may be concealed damage. 2. Ensure the container is upright. If the container is not upright major damage can occur to your appliance. Thoroughly inspect your appliance for damage. If damage is discovered, do not refuse delivery. Contact the dealer and file appropriate freight claims. Save all packaging material. Do not contact the manufacturer.
INSTALLATION GAS CONNECTIONS 1. The installation of this appliance must conform with all applicable local codes. In the absence of local codes, the installation must conform to the latest level of the National Fuel Gas Code, ANSI Z223.1/NFPA 54. In Canada, the installation must be in accordance with the current CAN/CGA B149.1 and B149.2. 2. This appliance can be configured to work with either natural gas or LP gas. Verify that the appliance and the incoming gas supply are compatible. Check the rating plate.
INSTALLATION soapy solution. DO NOT USE AN OPEN FLAME TO CHECK FOR LEAKS. Such a procedure is dangerous and it may not detect all the small leaks that a soapy solution will. 16. Air shutter adjustments are preset at the factory. These adjustments may need to be redone and/or fine tuned by the installer. These adjustments are normal. They are the responsibility of the qualified installer and are not covered by your warranty. 17. A gas conversion performed in the field may void your warranty.
OPERATION • • • • • • BEFORE YOU TURN IT ON…. As part of the installation protective plastic wrappers on stainless steel surfaces should be removed. These wrappers must be removed before operation. New appliances are wiped clean with various cleaners and solvents to remove visible signs of dirt, oil and grease before leaving the factory. After installation, performance checks and adjustments, the appliance should be allowed to heat to burn off any such oils from internal parts.
OPERATION • • • • • • • • • Push in and turn the oven thermostat knob counter clockwise to the broil “BR” position. Properly position the rack and the food you will broil to the correct distance from the broiler. The broiler igniter will begin to glow brightly, the gas valve will open to allow gas flow and the ceramic burners will light. This takes approximately one minute. The infrared oven broiler may have an initial bellowing flame that will even out to a blanket of blue flame .
CLEANING • • • • • • • • • • BODY All stainless steel and painted parts should be cleaned regularly with hot soapy water. Commercially available stainless steel cleaners may be used on stainless steel. Be sure to follow manufacturer’s instruction for use. DO NOT use steel wool or metal pads or other abrasive cleaners. These surfaces are painted or polished and using these products will scratch and damage your finish.
HELPFUL HINTS • • • • • • • • • OVEN Oven may make banging noises as it heats and cools. This is a normal condition. Pre-heat the oven thoroughly before use (20-30 minutes). Never use foil to line the oven bottom or oven racks. This will block the heat flow and can create a hazard. Never place anything directly on the bottom of the oven cavity. This obstructs the airflow and will cause uneven results. Place items on oven racks evenly and centered for even baking.
HELPFUL HINTS THERMAL vs. CONVECTION BAKING Thermal baking refers to the use of traditional heat circulation by means of natural air flow - fan not turned on. In thermal baking, heat is emitted by a burner below the oven cavity. The heat rises through the oven cavity and is transferred to the food and oven interior. The continuous supply of heat from the burner causes the heated air to circulate within the oven.
HELPFUL HINTS Problems/Solutions • If cakes are dark on the sides and not done in the center - Lower oven temperature • If cakes edges are too brown - Reduce number of pans or lower oven temperature • If cakes have light outer color - Raise oven temperature • If cake settles slightly in the center Bake longer or raise oven temperature slightly.
HELPFUL HINTS Suggested Broiler Settings What Steak Hamburger Fish Chicken Garlic Bread How Where Temp Time Rare Top Rack High 6-8 minutes/side Medium Middle Rack High 8-10 minutes/ side Medium Top Rack High 6-8 minutes/side Medium-Well Middle Rack High 8-10 minutes/ side 1” thick Middle Rack Medium-High 10-15 minutes 1/2 “ Thick Top Rack Medium-High 8-10 minutes Boneless Breast Middle Rack Medium 15 minutes/side Leg & Thigh Lower Rack Medium 25 minutes/side Lower R
CARE AND MAINTENANCE • • • • • • • • OVEN BURN-OFF PROCEDURE As part of installation protective plastic wrappers on stainless steel surfaces should be removed. These wrappers must be removed before operation. New appliances are wiped clean with various cleaners and solvents to remove visible signs of dirt, oil and grease before leaving the factory. Before turning on your oven for the first time, remove the broiler pan, oven racks, and rack guides and wash them with hot soapy water.
CARE AND MAINTENANCE OVEN BURNER AIR SHUTTER ADJUSTMENT Before attempting to adjust the oven burner air shutter, insure the following has been checked and is correct: • Proper gas type - match serial plate • Proper regulator setting • Orifice aligned - parallel with the venturi to the burner After verifying the gas, regulator and orifices adjust the air shutter by: 1. Remove bottom panel from inside oven cavity. 2. Remove lower kick panel held in place by two sheet metal screws 3.
TROUBLESHOOTING PROBLEM SOLUTION LAZY flame—floating, larger in size than nor- Air shutter adjustment. mal LIFTING flame—well defined with visible inner core, noisy, gap between burner and flame Air shutter adjustment. Oven won’t light Ensure range is plugged in. Ensure gas is turned on - test top burner. Check hot surface igniter for red glow, call for service. Broiler won’t light Ensure range is plugged in. Insure gas is turned on - test top burner.
PERFORMANCE CHECKLIST This checklist has been developed to assure proper installation of your appliance. To validate your warranty you must mail or submit online this form within 90 days of installation and a copy of your receipt to: Warranty Department, Prizer-Painter Stove Works Inc., 318 June Avenue Blandon, PA 19510 or www.bluestarcooking.com/support/product-registration/.
LIMITED WARRANTY ® BlueStar Cooking Appliances, BlueStar® Ventilation Hoods, Prizer Hoods® Ventilation Hoods and Abbaka Ventilation hoods and remote blowers Before using your Product, please read this Limited Warranty and Arbitration Clause carefully to understand your rights. This Warranty is provided to you by Prizer-Painter Stove Works, Inc.
factory authorized service agent located within 100 miles roundtrip from the location of the Product. Service will be provided during normal business hours. The Owner will be responsible for any and all costs associated with additional mileage, non-standard service or overtime, and special equipment required to remove the Product so that service may be performed. Prizer-Painter reserves the right to deny warranty coverage for excessive installation delays.
Prizer-Painter is under no obligation, at law otherwise, to provide you with any concessions, including repairs, pro-rates or Product replacement, once this warranty has expired. What Is Not Covered This Warranty does not cover, and specifically excludes: Damages caused by shipping. Damage or repairs to the porcelain igniters, calibrations and normal adjustments after installation and setup, including burner adjustments.
INCLUDING BUT NOT LIMITED TO DAMAGES FOR EXPENSES, SUCH AS, EXTRA UTILITY EXPENSES, SHIPPING COSTS RELATED TO REPAIR OR REPLACEMENT OF ANY PRODUCT OR DAMAGES TO PROPERTY, RESULTING FROM BREACH OF THIS WARRANTY OR ANY IMPLIED WARRANTY. Some states and provinces do not allow the exclusion or limitation of incidental or consequential damages, so these provisions may not apply to you.
ARBITRATION CLAUSE BlueStar® Cooking Appliances, BlueStar® Ventilation Hoods, Prizer Hoods® Ventilation Hoods and Abbaka Ventilation Hoods and remote blowers ARBITRATION CLAUSE. IMPORTANT. PLEASE REVIEW THIS ARBITRATION CLAUSE. IT AFFECTS YOUR LEGAL RIGHTS. YOU SHOULD ALSO CONSIDER CONSULTING WITH OTHERS ABOUT ARBITRATION BECAUSE THE INFORMATION PROVIDED IS NOT INTENDED TO CONTAIN A COMPLETE EXPLANATION OF THE CONSEQUENCES OF ARBITRATION. 1.
Arbitration Act (9 U.S.C. § 1 et seq.) rather than by state law concerning arbitration. The law governing your substantive warranty rights and other claims will be the law of the state in which you purchased your PrizerPainter Product. Any court having jurisdiction may enter judgment on the arbitration award. 8.