
Install Manual: Mesa Series (Updated 4/7/2022)


INSTALLATION INSTRUCTIONS
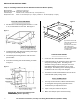
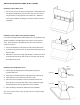
Step 7. Connect Ducting to Ventilation Hood
Install ducting around starter collar on top or rear of hood and seal according to building code regulations. Be sure to
include a back draft damper in the duct work to prevent drafts.
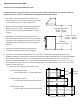
Step 6. Re-install Liner into Outer Shell
NOTE: If duct cover is being used, please review next steps carefully. Depending on your specific
installation, the duct cover may need to be installed prior to reinstalling the liner.
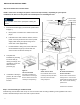
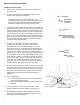
Figure A:
Lift Liner into Shell
Carefully re-install liner to
avoid scratches or damage.
Ensure cables are dressed
carefully to avoid pinching.
Figure B:
Attach Liner to Shell
Re-install with all the screws
removed previously that held
the liner to the hood shell
during shipment.
Figure C:
Re-install Control Panel,
Screen and Filters
Attach button control harness
and light wires. Insert control
panel’s tabs into slots in front of
liner. Drive screws attaching
panel to liner.
Install screen and filters.
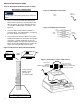
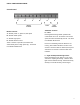
1. Connect Electrical Supply (see Electrical Specifications
on page 7)
a. Route power cord from liner to outlet location and
plug in.
b. If alternate direct wire method is desired, remove
power cord from junction box and connect power
supply cable directly in its place being sure to
match wire colors appropriately.
c. If remote blower is being used, route cable from
remote blower through top of hood shell and
connect to liner as directed in Step 4-5.
2. Complete liner
installation by inserting
into hood shell (A),
driving screws (B), and
reinstalling covers and
filters removed
previously (C).
3. If ductwork is already in
position, be sure to align
properly as liner is
inserted.
14
c. remote blower
power supply
(n/a for in-hood
blowers)
a. to outlet
b. power cord
junction box
c. remote blower
connection only
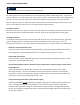
Turn off power at the service panel prior to wiring the
blower.
WARNING