
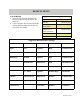
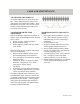
Specifications


AIR SHUTTER ADJUSTMENTS
Air shutter adjustments are preset at the fac-
tory. These adjustments may need to be re-
done and/or fine tuned by the installer. These
adjustments are normal. They are the respon-
sibility of the qualified installer and are not
covered by your warranty.
TOP BURNER AIR SHUTTER
ADJUSTMENT
Before attempting to adjust any top burner air
shutter, insure the following has been checked
and is correct:
Proper gas type - match serial plate
Proper regulator setting
Orifice aligned - parallel with the venturi
to the burner
After verifying the gas, regulator and orifices
adjust the air shutter by:
Remove all top cooking sections associ-
ated with the burner(s) to be adjusted.
Use a screwdriver to loosen the air shutter
tightening screw.
Turn the air shutter as required to adjust
the flame - open gap for “lazy” flame,
close gap for “lifting” flame.
Test burner.
If necessary, turn off burner and readjust.
Turn off burner, tighten shutter screw and
replace top sections when complete.
A properly adjusted burner will have a coni-
cal shaped blue flame, however, on some lar-
ger burners (22K) the cones are close together
and blend into one another. Yellow tips nor-
mally flicker occasionally with natural gas,
more often with propane. The flame should
be almost all blue all the time.
CARE AND MAINTENANCE
TOP BURNER LOW FLAME ADJUST-
MENT
1. Insure gas pressure regulator is set prop-
erly. This setting is typically checked
and adjusted by a service agent using a
manometer.
2. Turn the burner on low.
3. Remove the burner knob from the valve
stem by pulling straight toward you.
4. Insert a small slotted screwdriver blade
into the “D” shaped valve stem inserting
it into the adjusting screw.
5. Turn the adjusting screw 1/8 of a turn at a
time - clockwise to lower the flame,
counter-clockwise to raise the flame.
6. Replace knob by aligning the “D” shaped
cut-out and pressing straight onto the
valve stem
RGTNB 2011-REV1