
Freestanding Range Use & Care Manual


38
TOP BURNER LOW FLAME ADJUSTMENT
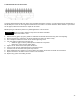
At its lowest setting, a properly adjusted burner will produce a steady flame about 1/8” above the burner ports. If your
flames do not appear, follow the instructions to adjust the flame height.
Before you begin, follow the steps in the Air Shutter Checklist.
1. Push and turn the burner fully counter clockwise to the lowest simmer setting. Leave burner on.
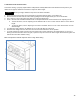
2. Remove the burner knob from the valve stem by pulling the knob straight toward you. Set the knob aside.
3. Use a wrench to secure the valve stem while you make the adjustments.
4. Insert a 1/8” flat-head screwdriver blade into the “D” shaped valve stem and is inserted into the adjusting screw.
To lower the flame, turn the adjusting screw clockwise 1/8 of a turn at a time until the flame is at the desired
height.
To raise the flame, turn the adjusting screw counter clockwise 1/8 of a turn at a time until the flame is at the
desired height.
5. To replace the knob, align the “D” shaped cut-out on the knob with the valve stem.
6. Push the knob straight onto the valve stem and turn the knob clockwise to the off position.
7. To check new burner height: Push and turn the burner knob counter clockwise to the lowest simmer. If you hear a
clicking sound but the burner does not ignite, repeat the steps to increase the flame height until the burner ignites and
remains lit at the lowest simmer setting.
TIP: This adjustment will also adjust the burner’s high flame setting.
ATTENTION