SERVO-DRIVE for AVENTOS Opens and Closes Automatically
Opening and Closing Lift Systems in an Effortless Way AVENTOS lift systems open with just a light touch ‒ and then close again with the press of a button. An inspiring feature that is certain to impress, thanks to SERVO-DRIVE for AVENTOS, the electrical opening support for lift systems. 2 © 2017 Blum, Inc.
Contents SERVO-DRIVE for AVENTOS 4 SERVO-DRIVE Features 6 Components for SERVO-DRIVE 8 SERVO-DRIVE for AVENTOS HF 9 SERVO-DRIVE for AVENTOS HS 10 SERVO-DRIVE for AVENTOS HL 11 SERVO-DRIVE for AVENTOS HK 12 Electrical Specifications 13 Wiring Options 14 Assembly for AVENTOS HF/HS/HL 16 Assembly for AVENTOS HK 18 Overview of Functions 22 Cover Cap Assembly 22 Battery Replacement 23 Assembly Aids 24 Part Number Index © 2017 Blum, Inc.
SERVO-DRIVE for AVENTOS Features Effortless Opening and Closing A light touch on the front using your hand or elbow is all that's required to open doors with SERVO-DRIVE for AVENTOS. Even large and heavy doors open effortlessly. For the user, this means easy access to the cabinet interior. Comfortable and easy closing Provided by the easy to reach switch on the cabinet side. This enables the doors to close easily and ergonomically. The proven BLUMOTION function also ensures silent and effortless closing.
SERVO-DRIVE inside SERVO-DRIVE for AVENTOS BLUMOTION inside The Focus is on the User Completely safe – even when closing Even when the switch has just been pressed for closing – the closing procedure is halted immediately if the user again reaches into the cabinet and/or an object is placed between the cabinet and the door. Completely under control Even though lift systems open and close automatically, the motion can be interrupted at any time.
SERVO-DRIVE for AVENTOS Overview of Components Blum distance bumper Power supply and wall mount bracket Cabling Lift mechanism Drive unit Cover plate SERVO-DRIVE switch 6 © 2017 Blum, Inc.
Individual Components SERVO-DRIVE for AVENTOS After lift mechanism installation and adjustment, SERVO-DRIVE components are attached to the lift mechanism and cabinet. Lift mechanism ▀ SERVO-DRIVE-compatible lift mechanism with tool-free attachment of the drive unit. Please see AVENTOS brochure (LIT.1000) for more details.
SERVO-DRIVE for AVENTOS HF Ordering Information C C B C A B B B B Cover set SERVO-DRIVE set A Set includes: ▀ Drive unit ▀ 60" universal cable ▀ Cable connector ▀ Cable end protector (qty 2) B Set includes: ▀ SERVO-DRIVE cover plate (left) ▀ Cover plate (right) ▀ Non-handed cover cap (qty 2) ▀ SERVO-DRIVE switches (qty 2) ▀ Ø5 mm Blum distance bumper (qty 6) ▀ Color: gray Part no. Part no. SERVO-DRIVE set 21FA000 Cover set 21F8000.
Ordering Information SERVO-DRIVE for AVENTOS HS C D A B B B B Cover set SERVO-DRIVE set A Set includes: ▀ Drive unit ▀ 60" universal cable ▀ Cable connector ▀ Cable end protector (qty 2) B Set includes: ▀ SERVO-DRIVE cover plate (left) ▀ Cover plate (right) ▀ Non-handed cover cap (qty 2) ▀ SERVO-DRIVE switches (qty 2) ▀ Ø5 mm Blum distance bumper (qty 4) ▀ Color: gray Part no. Part no. SERVO-DRIVE set 21FA000 Arm assembly set Cover set 21S8000.
SERVO-DRIVE for AVENTOS HL Ordering Information C D A B B B B Cover set SERVO-DRIVE set A Set includes: ▀ Drive unit ▀ 60" universal cable ▀ Cable connector ▀ Cable end protector (qty 2) B Arm assembly set Set includes: ▀ SERVO-DRIVE cover plate (left) ▀ Cover plate (right) ▀ Non-handed cover cap (qty 2) ▀ SERVO-DRIVE switches (qty 2) ▀ Ø5 mm Blum distance bumper (qty 4) ▀ Color: gray C Set includes: ▀ SERVO-DRIVE arm assembly (left) ▀ Standard arm assembly (right) ▀ Stabilizer rod cover cap
Ordering Information SERVO-DRIVE for AVENTOS HK C A B B B B Cover set SERVO-DRIVE set A Set includes: ▀ Drive unit ▀ 60" universal cable ▀ Cable connector ▀ Cable end protector (qty 2) B Set includes: ▀ SERVO-DRIVE cover plate (left) ▀ Cover plate (right) ▀ Non-handed cover cap (qty 2) ▀ SERVO-DRIVE switches (qty 2) ▀ Ø5 mm Blum distance bumper (qty 4) ▀ Color: gray Part no. Part no. SERVO-DRIVE set 21KA000 Cover set 21K8000.
SERVO-DRIVE for AVENTOS Electrical Components Power supply set SERVO-DRIVE power supply components Set includes: ▀ Power supply ▀ Wall mount bracket ▀ Three-prong power cord ▀ Cable connector ▀ Cable end protector (qty 3) ▀ Cable clips (qty 10) ▀ 19 feet universal cable ▀ Technical information Supplies power to the drive units Energy Star Level VI UL certified ▀ Can power up to 16 drive units ▀ Connect to switched GFCI outlet ▀ Cable length is six feet ▀ ▀ NOTE: Three-prong power cord required Part no.
Wiring Options SERVO-DRIVE for AVENTOS Wiring options For wall cabinets For SERVO-DRIVE in wall and base cabinets Installing cable connector 1 Insert cable for distribution into open slot 2 Insert cable for power into open slot 3 Rotate orange lever to lock into place 4 Slide cable end protector over exposed cable 3 2 4 1 NOTE: Ensure piercing pins are not damaged Dimensions in millimeters (inch equivalents as noted) © 2017 Blum, Inc.
SERVO-DRIVE for AVENTOS Assembly for AVENTOS HF/HS/HL Installation of SERVO-DRIVE activation switch 12 The activation switch should be installed by pressing into the cabinet side with your hand. Do not use hammer to install. 30 min. 90 max. Ø35 11 NOTE: Use of boring template (M31.2000) recommended, see page 27 Installation of Blum distance bumpers For AVENTOS HF – install into drawer front. Use of six distance bumpers is recommended. For AVENTOS HS/HL ‒ install into drawer front.
SERVO-DRIVE for AVENTOS Drive unit installation 1 Insert the drive unit into back of lift mechanism and slide forward 1 2 Position drive unit into front of lift mechanism with locator pin 2 1 The drive unit can be locked when the orange slide is no longer visible in the view window. 3 To lock drive unit to the lift mechanism, slide the lift mechanism selection switch to the locked position (reference noted positions on drive unit). There will be an audible click when locked.
SERVO-DRIVE for AVENTOS Assembly for AVENTOS HK Installation of SERVO-DRIVE activation switch The activation switch should be installed by pressing into the cabinet side with your hand. Do not use hammer to install. 11 Ø35 30 min. 90 max. 12 NOTE: Use of boring template (M31.2000) recommended, see page 27 Installation of Blum distance bumpers Install into door front. Use of four distance bumpers is recommended. Two may be sufficient for smaller, lighter doors. 32 32 8 * 10 min.
SERVO-DRIVE for AVENTOS Drive unit installation 1 Position drive unit onto lift mechanism with locator pin. 1 2 To lock drive unit to the lift mechanism, hold drive unit in place and press down the three orange lock tabs. 2 Dimensions in millimeters (inch equivalents as noted) © 2017 Blum, Inc.
SERVO-DRIVE for AVENTOS Overview of Functions Start-Up A Activating the SERVO-DRIVE switch Optional Additional Features B C Activating synchronization D Activating collision avoidance Start reference run Deactivation E Reset Motion F Reset Wireless Function buttons layout ▀ 1 ▀ 2 ▀ 3 2 ▀ 4 3 4 5 6 7 1 9 18 © 2017 Blum, Inc.
Start-Up SERVO-DRIVE for AVENTOS Start-Up A Activating the SERVO-DRIVE switch Setting up the wireless connection between the SERVO-DRIVE switch and the drive unit. Each switch can only be assigned to one SERVO-DRIVE unit. Operation Lights up continuously Flashes 1 Press and hold the button until the LED flashes 2 Press and hold the SERVO-DRIVE switch until the LED lights up continuously. Repeat steps 1 and 2 for additional SERVO-DRIVE switches in the cabinet.
SERVO-DRIVE for AVENTOS C Additional Features Activating synchronization Up to three drive units can be synchronized allowing them to move simultaneously. This function is required for several cabinets with one wide front.
Deactivation E SERVO-DRIVE for AVENTOS Reset motion Resets the reference run and enables a new reference run to be started. Flashes quickly 1 Press and hold the button using a pen (at least 3 seconds) until the LED flashes quickly F Reset wireless Deactivates all functions. All active SERVO-DRIVE switches, synchronization and collision avoidance settings for the respective drive unit are deleted.
SERVO-DRIVE for AVENTOS Cover Cap and Battery Replacement Cover cap 1 2 Battery replacement When battery power begins to weaken, the SERVO-DRIVE switch battery display flashes red Only use type CR2032 batteries from known manufacturers ▀ Make sure that the new battery is inserted correctly (note proper pole connections +/-) ▀ The SERVO-DRIVE switch battery cannot be recharged ▀ If the battery is inserted incorrectly, the SERVO-DRIVE switch battery display will flash red ▀ ▀ ▀ 1 22 Remove battery carrie
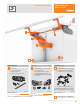
Assembly Aids SERVO-DRIVE for AVENTOS SERVO-DRIVE switch boring template ▀ ▀ For easy installation of SERVO-DRIVE for AVENTOS switch Clamp assembly for secure boring Set includes: ▀ Ø35 mm bit ▀ Torx driver bit (qty 2) Part no. M31.2000 SERVO-DRIVE switch boring template Specifications Mark switch location 11 Ø35 ▀ 1 Set drilling depth 2 ▀ Align mark 3 ▀ Secure template to cabinet panel with clamp 4 ▀ Use provided Torx driver bit to bore hole 4 15 30 min. 90 max.
SERVO-DRIVE for AVENTOS Part no. Page no. 21KA000 11 21K8000.NA 11 21L3200.01 10 21L3500.01 10 21L3800.01 10 21L3900.01 10 21L8000.NA 10 21FA000 21F8000.NA 21P5020 21S3500.01 24 Part Number Index 8, 9, 10 8 12 9 M31.2000 23 Z10M200U 12 Z10NE030G 12 Z10NE03UG10 12 © 2017 Blum, Inc.
Notes SERVO-DRIVE for AVENTOS Dimensions in millimeters (inch equivalents as noted) © 2017 Blum, Inc.
Blum, Inc. Headquarters, Stanley, NC 26 © 2017 Blum, Inc.
Why Choose Blum Blum, Inc. is a leading manufacturer of functional hardware for the kitchen cabinet and commercial casework industries specializing in lift systems, concealed hinges and drawer runner systems. Virtually all of the hardware needed to assemble and make cabinets functional is available within the wide range of quality Blum products. Blum supports the U.S.
Please visit blum.com for information on other Blum products. LIT.AVT1800.1.17 © 2017 Blum, Inc. Printed in the USA. Blum, Inc. 7733 Old Plank Rd. Stanley, NC 28164 800-438-6788 blum.com 28 © 2017 Blum, Inc.