
Instructions / Assembly
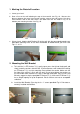

1. Marking the Waterfall Location
a. Locate your Level.
b. Draw a line on the wall indicating the top of the waterfall. See Fig 1.A. Measure the
distance between the top of your fountain and the center of the wall bracket. Use those
measurements and on the wall, draw a line down from the line made in Fig 1.A to
indicate your mounting location. See Fig 1.B.
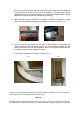
c. Using a level, hold the Wall Bracket (G) to the wall with the top angled towards you.
Mark both mounting holes on the wall. Remember to double-check your level. See
Fig 1.C. & 1.D
1.B 1.A
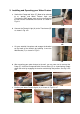
2. Mounting the Wall Bracket
1.C
1.D
a. To install the 3 x EZ Anchors™ (I), gently tap or press the tip into the drywall and
slowly screw the anchors into the wall. If you encounter a wall stud while installing
an EZ Anchor™ (I), use the mounting screw without the anchor. Make sure the
flat side of the anchor is flush with the wall. Do not over-tighten the anchors as
this will render them ineffective, as well as damage the drywall. See Fig 2.A & 2.B.
We only suggest using the provided EZ Anchors™ (I) since each EZ Anchor™ (I)
has a weight capacity of up to 50 pounds. Plastic anchors are not an acceptable
substitute.
b. Install the Wall Bracket (G) using the 3 x 1” screws provided. Fig 2.C illustrates a
correctly installed wall bracket.
2.A 2.B 2.C