
Instructions / Assembly


FOR DOWN LIGHTING
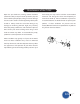
Insert the light as shown (figure L) on the top center of the waterfall panel. In the center you will find a slot to
accommodate the light.
You are provided self-stick cups to hold the wire. Place them as shown (figure M) along the side as well as the
top
Plug the light into the transformer (figure N). Plug the transformer into an outlet.
. You can adjust the light to achieve a nice effect on the water panel.
FOR UP LIGHTING
The light may be placed in the rock tray, creating a different lighting effect for your Gardenfall.
Note: Whereas the light can be submersed as it is an underwater lamp. The transformer for the
light CANNOT BE PUT IN THE WATER. It must be left outside the reservoir.
. Once the panel is placed in the base, turn the thumb screws (as shown in figure H) to secure the panel in the
base.
. Line up the pump/filter/valve assembly to the hose coming out of the panel, as shown. Simply hand screw
the two connections together. See figures I and J.
. Fill the reservoir with water. Do not fill the plug hole. Plug it in and the water should begin to flow. Adjust
the flow if necessary by turning the red handle on the filter/valve assembly as shown in figure K. Note: Too
much water flow will cause dripping and splashing. Water level must be maintained at least one inch above
pump. If water level drops below the top of the pump, it may damage the pump.
10 Place the metal trays in the top of the reservoir and arrange the rocks in them as you like.
Installing the Light Accessory
9
8
7
1
2
3
4
1
figure H
figure I
figure J
figure K
figure L
figure M
figure N
BLUW O RLD
of water
blu